Enterprise Promotion Manager
Initial (Main Search) Screen
-
SignOn to the BackOffice.
-
From the Item Pricing / Data Management menu, select Enterprise Promotions Manager.
-
An initial search screen (like the one shown below) should appear.
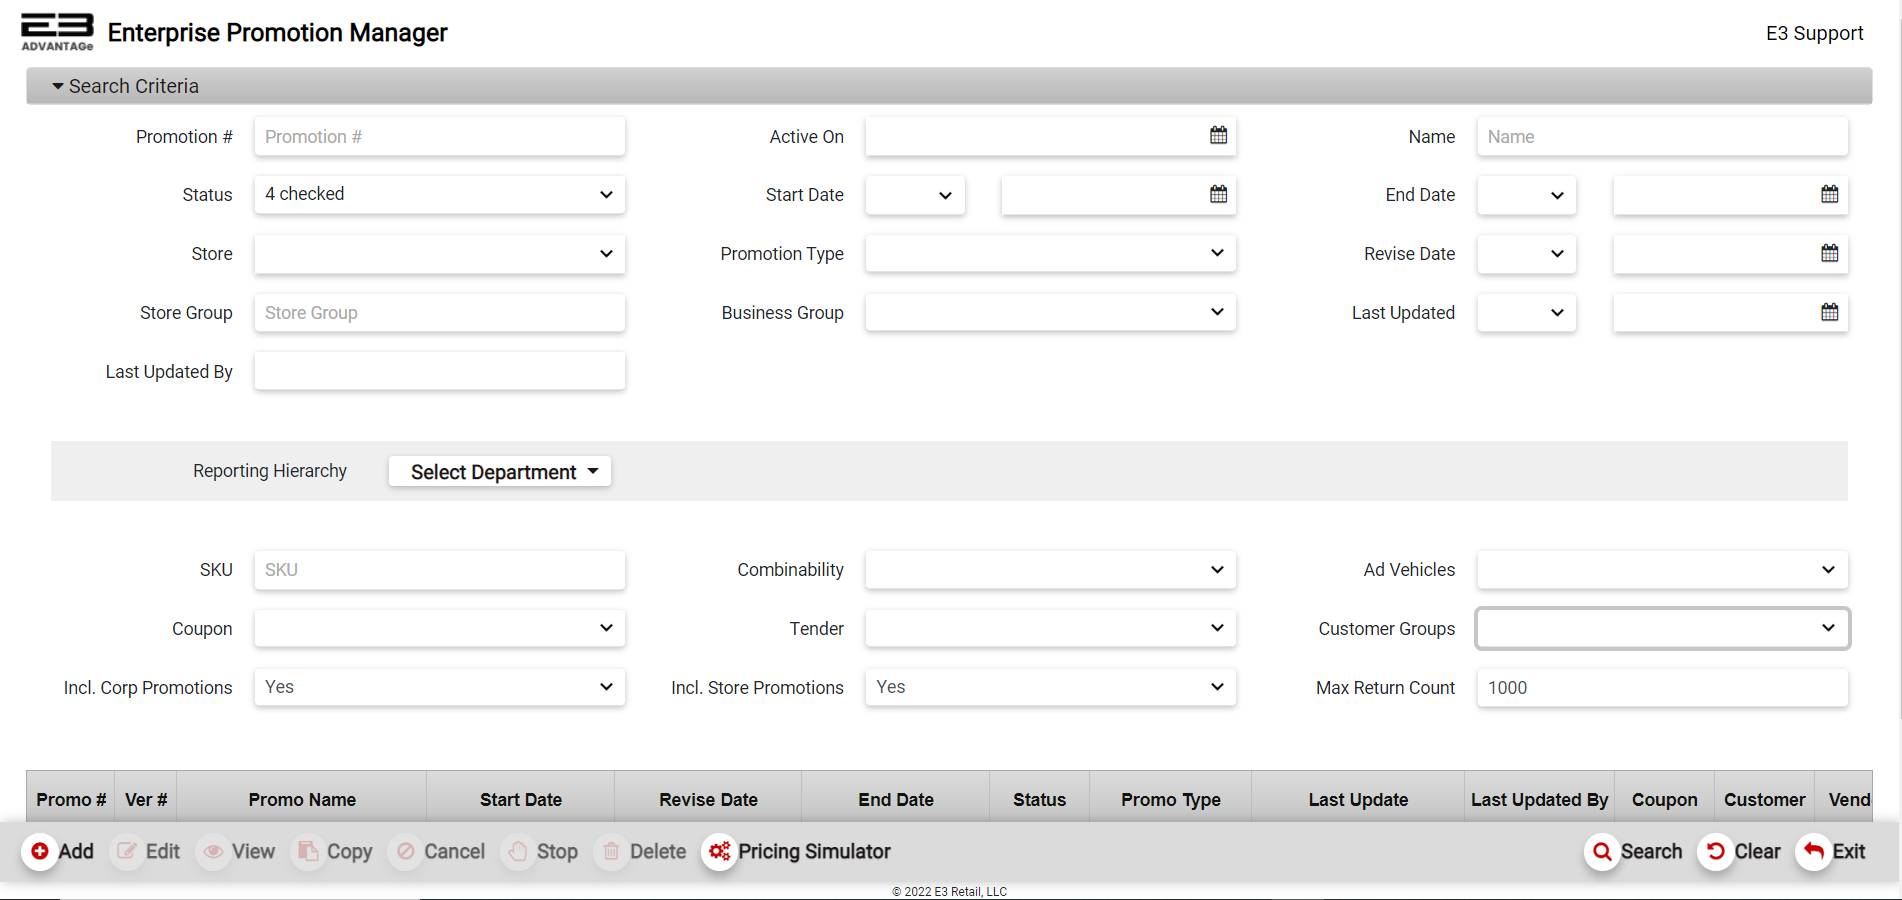
Screenshot of the Enterprise Promotion Manager application.
-
Note that only the Add, Pricing Simulator, Search, Clear, and Exit buttons are enabled (at the bottom of the screen).
-
Add will create a new promotion.
-
Search will search for promotions based on the search criteria.
-
Clear will clear any results and reset the search criteria back to their default values.
-
Pricing Simulator launches the pricing simulator tool for testing promotions.
-
Exit closes Promotion Manager and returns to the main backoffice menu.
-
-
The Export and Print buttons are enabled when there are search results. These buttons are hidden until there are search results.
-
The remaining buttons are enabled when an appropriate promotion has been selected from the results.
Search Criteria
Several date search criteria can use relational operators, these fields are Start Date, End Date, Revise Date, and Last Updated. The relational operators are < (before the specified date), = (on the specified date), > (after the specified date), >= (on or after the specified date), and <= (on or before the specified date).
-
Promotion # - returns the promotion whose unique number matches the number provided.
-
Active On - returns promotions that were active on the specified date.
-
Name - returns promotions whose names match the text provided.
-
Status - returns promotions whose status matches the selected value(s).
-
Planning - selected by default
-
Submitted - selected by default
-
Approved - selected by default
-
Modified - selected by default
-
Cancelled
-
Expired
-
Archived
-
-
Start Date - returns promotions whose start date is relative to the specified start date.
-
End Date - returns promotions whose end date is relative to the specified end date.
-
Store #(s) - returns promotions that match the specified store numbers from the visible store list (default is all).
-
Promotion Type - returns promotions that match the type: instant savings, conditional, or tiered.
-
Revise Date - returns promotions whose revision date is relative to the specified revision date.
-
Store Group - returns promotions that match the specified store group.
-
Business Group - returns promotions matching selected group(s): All, Electronics, Office Supplies, Home Goods.
-
Last Updated - returns promotions whose last updated date is relative to the specified last update date.
-
Last Updated By - returns promotions that were last updated by the specified operator.
-
Reporting Hierarchy - returns promotions whose items are in the matching merchandise hierarchy.
-
SKU - returns promotions where the item SKU matches the SKU provided.
-
Combinability - returns promotions whose combinability matches the selected combinability flags.
-
Ad Vehicles - returns promotions that match one of the selected advertising venue values.
-
Coupon - returns promotions that match the coupon required state (yes or no).
-
Tender - returns promotions that match the tender required state (yes or no).
-
Customer Groups - returns promotions that match selected Customer Groups (example: Bronze, Silver, Gold, Platinum etc.).
-
Incl. Corp Promotions - true includes corporate promotions, false excludes corporate promotions.
-
Incl. Store Promotions - true includes store promotions, false excludes store promotions.
-
Max Return Count - the maximum number of promotions returned by the search, default is 1000.
Searching And Selecting
-
Set the search criteria described in the previous section to locate the desired promotion(s). User can search by setting one or more of the search criteria.
-
Click Search (bottom right).
-
The search results will look something like this:

Screenshot of the Enterprise Promotion Manager application.
-
Promo # - an internal identification number for the promotion
-
Ver # - the version number of the promotion, versions ending in .0 are approved, other ones are in progress
-
Promo Name - the name of the promotion
-
Start Date - the starting date and time for the promotion
-
Revise Date - the most recent date the promotion was modified
-
End Date - the ending date and time for the promotion
-
Status - the status of the promotion: Planning, Submitted, Approved, Modified, Cancelled, Expired, Archived
-
Promo Type - promotion type: Instant Savings, Conditional, Tiered
-
Last Update - date and time of the last update to the promotion
-
Last Updated By - user name or ID of the operator that last modified the promotion
-
Coupon - if checked, a Coupon is associated with this promotion
-
Customer - if checked, a Customer loyalty level is associated with this promotion
-
Vendor - vendor price support for this promotion
-
Ref # - reference number for this promotion
-
Business Group - the business group for this promotion, e.g. Electronics, Office Supplies, Home Goods
-
Overlap Status - if checked, warns that this promotion overlaps other ones by date and time
-
If you don’t see the desired promotion(s) in the search results, adjust the criteria and search again.
-
Highlight a promotion in the results to enable the Edit, Copy, and View functions.
-
The Cancel, Stop, and Delete buttons at the bottom left get enabled depending on the promotion’s status.
-
Delete is enabled if the promotion’s status is Planning, Being Modified or Submitted only.
-
Cancel is enabled if the promotion is approved but not active, start time is > 3 hours in the future.
-
Stop is enabled if the promotion is both approved and active.
-
-
Once the search results are shown, the search criteria tab is automatically collapsed. To get back to the search criteria section, click on the grey Search Criteria tab.
-
Click Clear on the bottom right, to refresh the search criteria fields and results table.
Creating A Promotion
There are three types of promotions:
-
An Instant Savings promotion is triggered when a promoted item is purchased. In other words, if a customer purchases a promoted item the discount gets activated right away, there are no dependencies on other items or numbers/amounts of items. You can have multiple items with different discounts.
-
A Conditional promotion is triggered by purchasing different required items where the discount depends on specified items purchased. For example, if a customer buys a laptop then you can get a discount on a battery to go along with the laptop.
-
A Tiered promotion is triggered by purchasing a specified number or dollar amount of the promoted item(s). A tier defines how many items or how much is spent on the items to get the specified discount. Tiers can be added to increase the discount if more items are purchased or more money is spent on the purchase.
Add
-
From the search screen, click Add (bottom left).
-
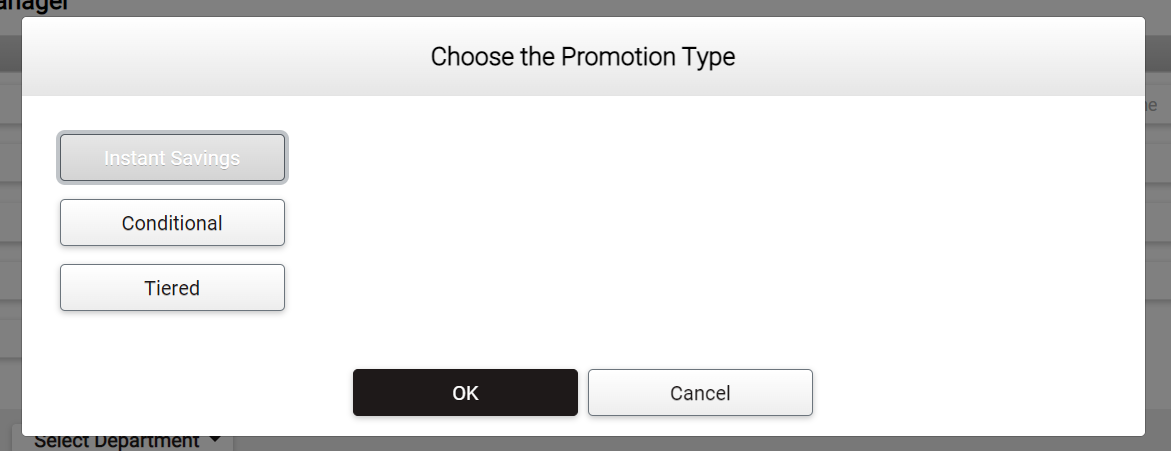
The promotion type selection dialog appears as seen here:
Screenshot of the Enterprise Promotion Manager application.
-
Select the desired promotion type by clicking the appropriate button and then clicking OK.
-
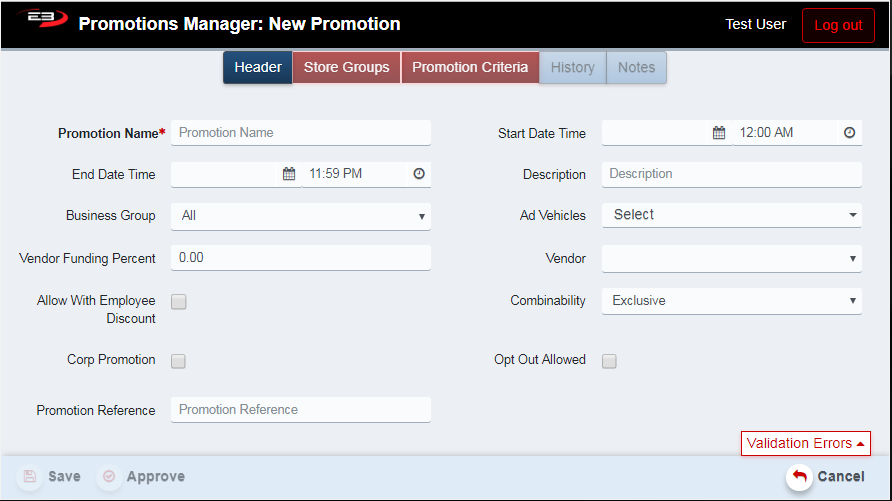
The Creating a Promotion screen will appear. Notice that on the top centre of the screen there are 5 different tabs - Header, Store Groups, Promotion Criteria, History and Notes.
-
The application opens up to the Header tab on creating a promotion by default. Refer to the Header Tab section below for instructions.
-
When the information on the Header tab is complete, the Store Groups tab needs to be filled out.
-
See Store Groups Tab below for instructions.
-
When the information on the Store Groups tab is complete, the Promotion Criteria tab needs to be filled out.
-
See Promotion Criteria Tab below. The three promotion types have different controls and requirements for the Promotion Criteria tab:
- See section below for Instant Savings promotions, Conditional promotions and Tiered promotions.
-
At this point, all the required information for creating the promotion should have been entered on the tabs.
-
The History tab will not have any information until the promotion has been saved the first time.
-
See History Tab section below for more information about the History tab, users can’t enter data on this tab.
-
See Notes Tab section below for more information about optionally entering notes for the promotion.
-
When the promotion is configured as desired and all validation errors have been addressed, the promotion is ready to be saved and eventually approved.
-
Click Save to save the promotion as work in progress for later updating and approval. Click OK to dismiss the dialog.
-
Click Approve to save and approve the promotion in one operation. A dialog appears requesting confirmation for the approval.
-
Click No to cancel the approval and return to the add/edit screen. Click Yes to approve the promotion. Once the promotion is approved, the promotion will become active on the Start Date Time.
-
Click the Cancel button (bottom right) to cancel creation of a new promotion and go back to the Promotion Management Main Screen.
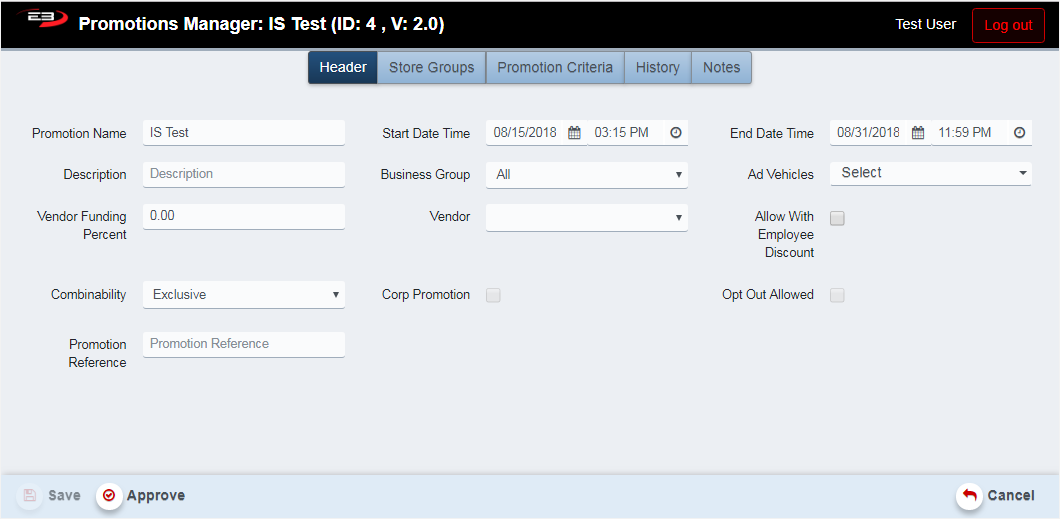
Header Tab
The Header tab is common to all promotion types and specifies the basics for the promotion.
Screenshot of the Enterprise Promotion Manager application.
-
Promotion Name - required, alphanumeric, this is the name that appears in the search results
-
Start Date Time - required, timestamp for promotion becoming active, at least 15 minutes in the future
-
End Date Time - required, timestamp for promotion expiration, at least 1 hour after the Start Date Time
-
Description - brief text description of the promotion
-
Business Group - select from All, Electronics, Office Supplies, Home Goods
-
Ad Vehicles - select one or more advertising venues
-
Vendor Funding Percent - what portion of the promotion is paid for by the item vendor
-
Vendor - select the vendor from the list
-
Allow With Employee Discount - if chcked, allows promotion to run on employee discounted items
-
Combinability - indicates whether the promotion can be combined with other promotions
-
Corporate Promotion - if checked, this is a corporate promotion
-
Opt Out Allowed - if checked, stores in the group can opt out of participation in the promotion
-
Promotion Reference - reference information for correlating promotions
Store Groups Tab
The Store Groups tab is common to all promotion types. It specifies the stores to which the promotion is available, and sets the store and date/time used to calculate the reference price for the item(s).
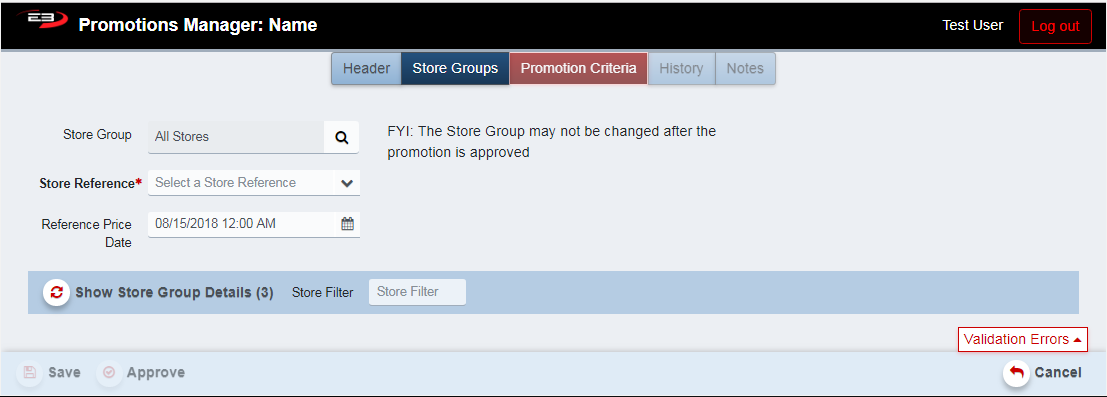
Screenshot of the Enterprise Promotion Manager application.
-
Store Group - sets the store group for which the promotion is available, can’t be changed after approval
-
Store Reference - required, store number to get the item’s reference price
-
Reference Price Date - required, date to get the item’s reference price
-
Reference Price Date must be between the Start Date Time and the End Date Time
-
Show Store Group Details - click this button to show the stores in the selected store group
Promotion Criteria Tab
The contents of the Promotion Criteria tab varies depending on the type of promotion: Instant Savings, Tiered, or Conditional. The following sections define the Promotion Criteria tab for each type of promotion.
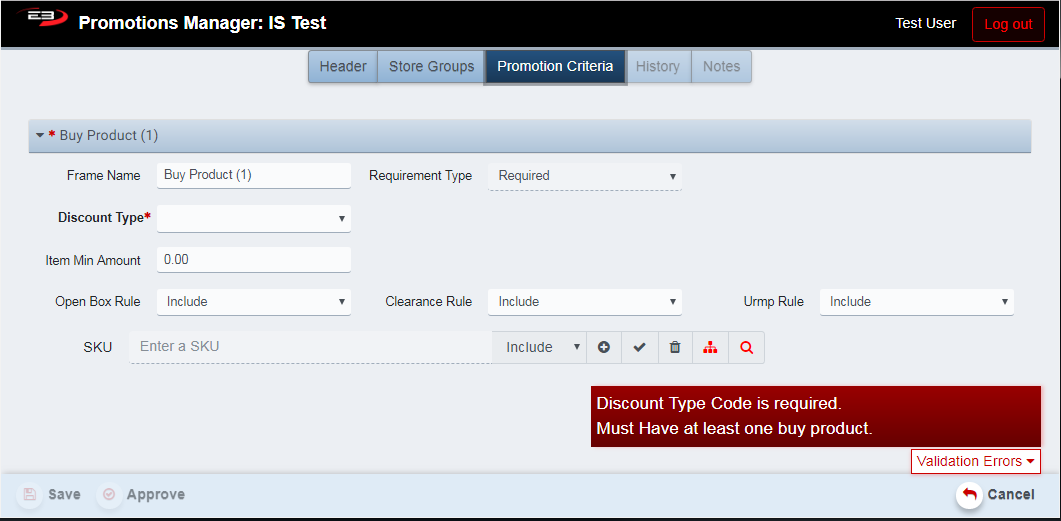
Instant Savings
For an Instant Savings promotion, the Promotion Criteria tab looks like this when the promotion is first created:
Screenshot of the Enterprise Promotion Manager application.
-
The Frame Name defaults to Buy Product (1), it can be renamed if desired.
-
The Requirement Type for an Instant Savings promotion is always required as there is only one frame.
-
The Discount Type field is required and is selected from the following list:

Screenshot of the Enterprise Promotion Manager application.
-
Once the Discount Type field has been set, the Discount Value field appears
-
The Discount Value is either a whole percent, a discount amount, or a fixed price amount according to the type
-
If the Discount Type selected is % OFF, the Max Disc Savings Amount field appears
-
If visible, the Max Disc Savings Amount is a dollar amount that is a limit to the discount
-
The Item Min Amount is the minimum item price that can be discounted
-
If the Open Box Rule is checked, items that are open box may be discounted
-
If the Clearance Rule is checked, items on clearance sale may be discounted
-
If the UMRP Rule is checked, items with a UMRP defined may be discounted
-
Once the discount has been configured, items must be added.
-
Items can be added singly by using the SKUs.
-
Items can also be added groups by using the merchandise hierarchy.
-
Items can be excluded from groups by using the Exclude flag.

Screenshot of the Enterprise Promotion Manager application.
-
From left to right, the controls are:
-
Field for manually entering a SKU for an item
-
Include/Exclude selector, defaults to Include
-
Plus sign for adding the SKU whose value is in the SKU field
-
Check mark for selecting all product frames
-
Trash can for deleting selected product frames
-
Tree icon for selecting merchandise hierarchies
-
Magnifying glass icon for using the Enterprise Item Maintenance search to find items
-
-
Adding an item creates a product frame as seen here:

Screenshot of the Enterprise Promotion Manager application.
- Adding a merchandise hierarchy (department, in this case) creates a product frame as seen here:

Screenshot of the Enterprise Promotion Manager application.
- Here’s an example where a department is added but one of the items in that department is excluded:

Screenshot of the Enterprise Promotion Manager application.
- You can override the discount type and amount values, here’s an example of a hierarchy with an item within the MH that has a bigger discount:

Screenshot of the Enterprise Promotion Manager application.
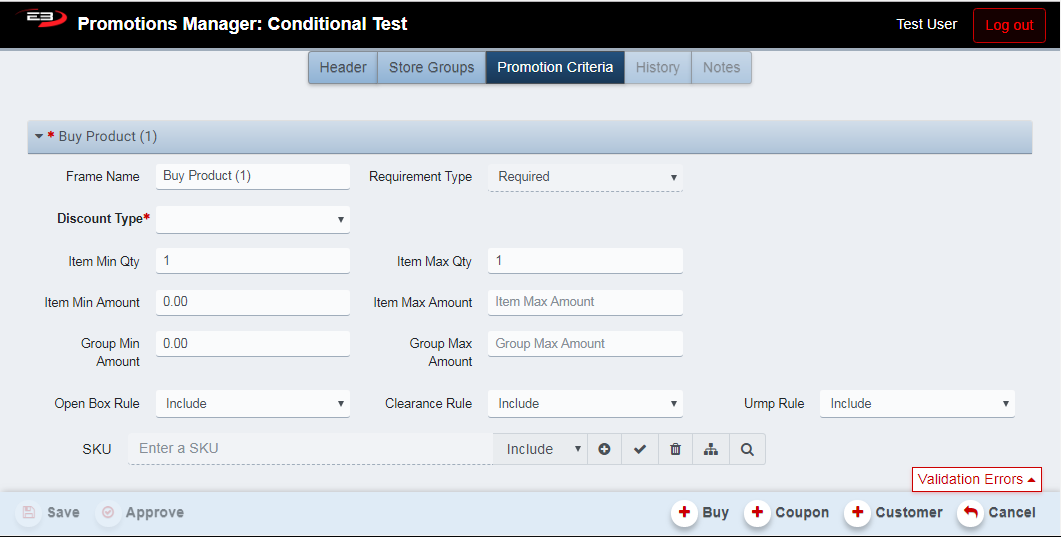
Conditional
For a Conditional promotion, the Promotion Criteria tab looks like the following when the promotion is first created, note the additional Buy, Coupon, and Customer buttons for a Conditional promotion.
Screenshot of the Enterprise Promotion Manager application.
-
The first Buy Product frame is required, this item satisfies the “must buy” condition.
-
Item Min Qty and Item Max Qty set requirements for multiple items.
-
Item Min Amount and Item Max Amount set requirements for an item’s price amount.
-
Group Min Amount and Group Max Amount set requirements for the amount spent on multiple items.
-
The remaining parameters are the same as those used for an Instant Savings promotion.
-
One or more items are attached to this frame to complete the “must buy” condition(s).

Screenshot of the Enterprise Promotion Manager application.
- The second and subsequent frames (if any), define the items and discounts which are conditional on the first frame’s item and pricing. Subsequent frames can also be optional, i.e. the items defined in those frames don’t have to be purchased for other discounts to be available.
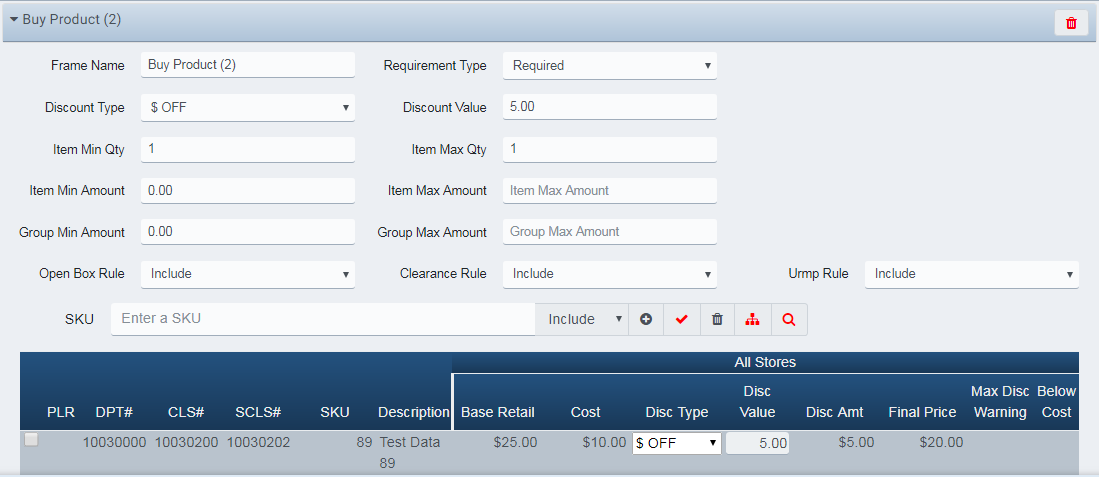
Screenshot of the Enterprise Promotion Manager application.
- In the frames above, getting a discount on item 89 depends on the purchase of item 88. If both 88 and 89 are purchased together, there’s a $5.00 discount on item 89 but no discount on item 88. Also, in this example the frame for item 89 marks it as required but it just as easily could be set to optional with no adverse effect on the promotion’s discount for item 89. In other words, if you buy item 88 you can get a discount on item 89 and additional items can be added to the second frame to get discounts based on the fact that you did buy item 88.
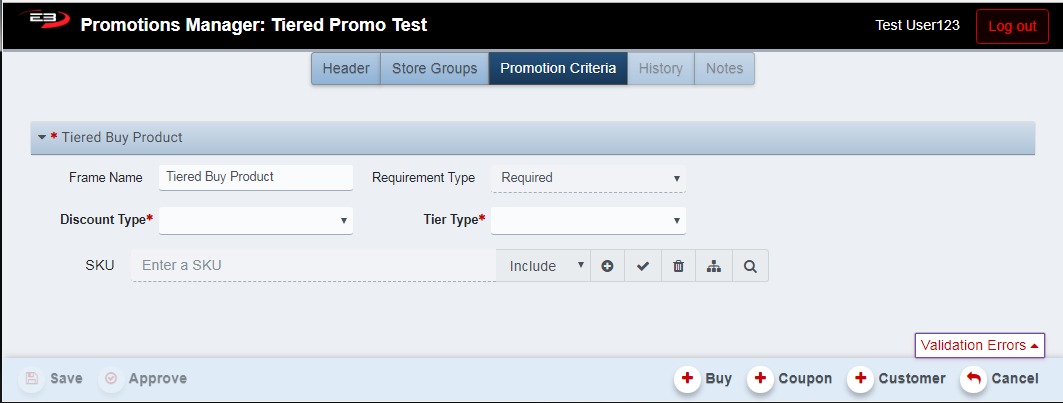
Tiered
For a Tiered promotion, the Promotion Criteria tab looks like this when the promotion is first created, note the additional Buy, Coupon, and Customer buttons for a Tiered promotion.
Screenshot of the Enterprise Promotion Manager application.
- Set the Discount Type field (required) to either % OFF or $ OFF as desired.

Screenshot of the Enterprise Promotion Manager application.
- Set the Tier Type field (required) to either Tier based on QTY purchased or Tier based on AMT purchased.

Screenshot of the Enterprise Promotion Manager application.
-
Once the Tier Type has been selected, the first tier is created.
-
Configure the first tier by entering Max Qty (count) and Init Sav (amount).
-
Add an item to the tier using the same methods as other promotion types.
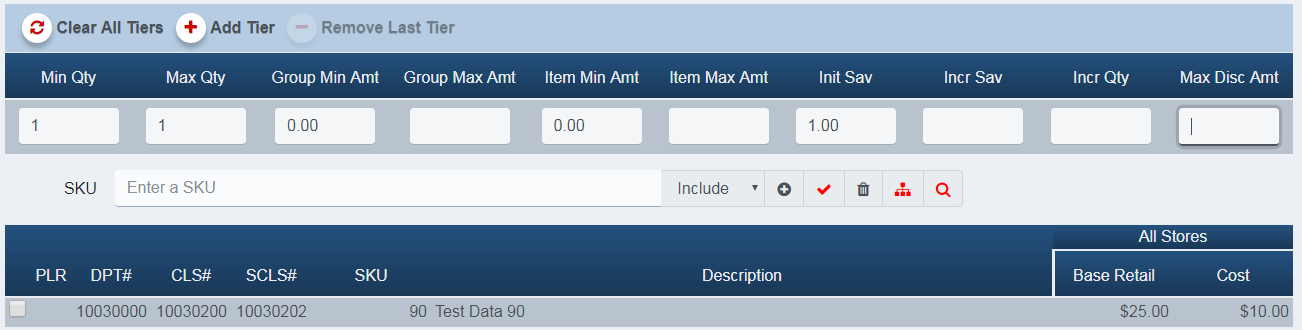
Screenshot of the Enterprise Promotion Manager application.
-
Add additional tiers by clicking the Add Tier button.
-
The Min Qty will be greater than the Max Qty for the previous tier.
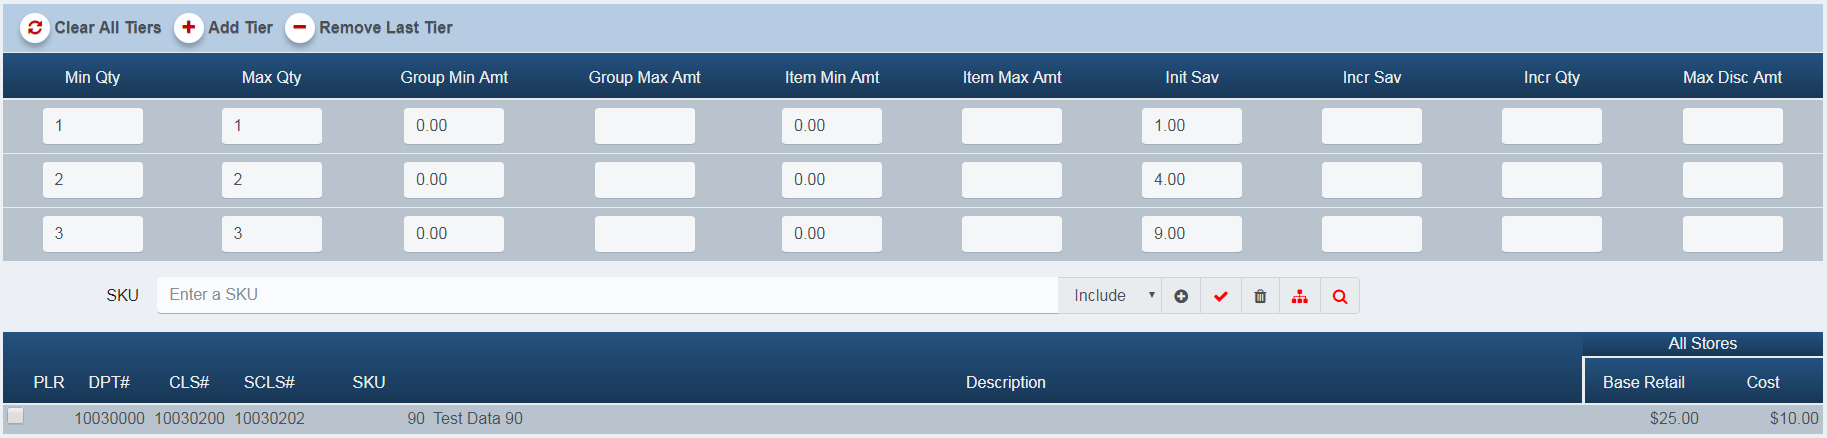
Screenshot of the Enterprise Promotion Manager application.
-
In this example, you get $1.00 off an item if you buy 1, $2.00 off each item for 2, and $3.00 off each item for 3.
-
All of the rules and options for adding items and merchandise hierarchies apply to tiered promotions as well.
-
Note that, unlike Instant Savings and Conditional promotions, tiered discounts can’t be overridden for items.
-
For a tier that spans multiple items between the Min Qty and Max Qty fields, the Incr Sav and Incr Qty values also need to be set (required).
-
Discounts can be limited with the Max Disc Amt field.
-
The following example shows a tier limited by the Max Disc Amt.
-
Purchasing a number of items such that the discount limits at Max Disc Amt, even though there are more items than the theoretical maximum, causes the maximum discount to be divided by the number of items purchased.

Screenshot of the Enterprise Promotion Manager application.
History Tab
The History tab is common to all promotion types. It shows actions taken with the promotion, including creating a new promotion and locking the promotion for editing.
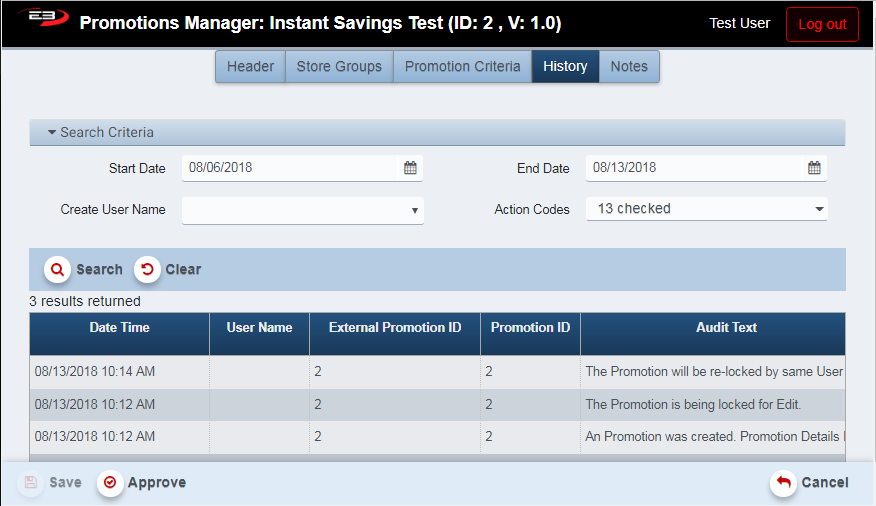
Screenshot of the Enterprise Promotion Manager application.
-
Use the Start Date and End Date fields to narrow the scope of the search to a specific period of time.
-
Start Date defaults to one week ago, End Date defaults to today.
-
Set Create User Name to search by the username of the operator that modified the promotion.
-
Select Action Codes from the list to limit the search to particular actions taken on the promotion.
-
Click Search to search history based on the search criteria.
-
Click Clear to clear the results and set the search criteria to their default values.
-
The lower Approve and Save buttons pertain to the promotion itself, not the history.
Notes Tab
The Notes tab is common to all promotion types. It allows a user to enter plain-text notes related to this particular promotion. Notes can be added to a promotion without having to change the status of the promotion; you don’t have to re-approve to add a note.
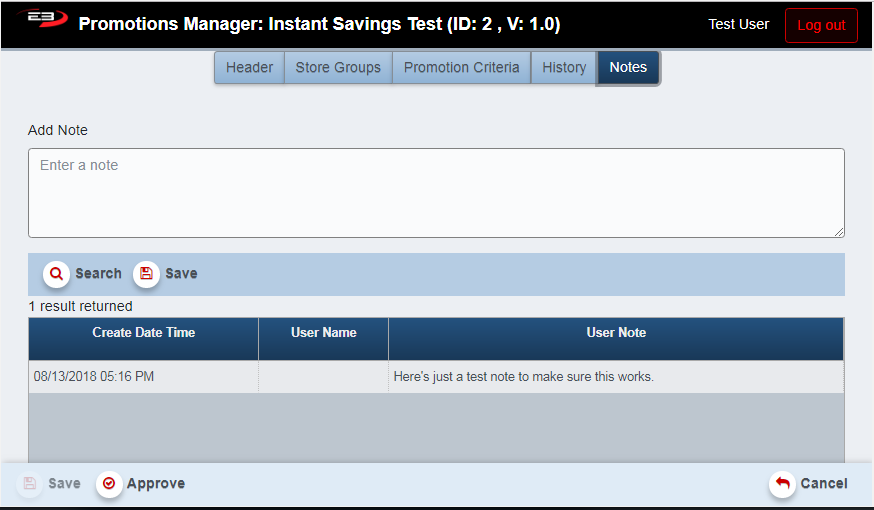
Screenshot of the Enterprise Promotion Manager application.
-
Notes can’t be updated when in View mode for the selected promotion.
-
There are no search criteria, clicking Search returns all notes for this promotion.
-
Type a note in the Add Note field then click the upper Save button to save the note.
-
The lower Approve and Save buttons pertain to the promotion itself, not the note(s).
Common Commands
This section contains commands applicable to all types of promotions.
Edit
-
Using the search criteria, locate the promotion you wish to modify.
-
Highlight the promotion in the search results, the Edit button should now be enabled.
-
Click Edit.
-
The Header tab on the edit screen appears, showing the name of the promotion in the title bar:
Screenshot of the Enterprise Promotion Manager application.
-
See the tab sections listed in section 2.1 for adding a new promotion for information about the tabs.
-
On the Store Groups tab, the Store Group value may not be changed once the promotion has been approved.
-
Notes can be added, see section 7 - Notes Tab for more information.
-
When modifications are finished, use the steps described in section 2.2 for saving and approving the promotion.
View
-
The View function allows the user to view promotions in read-only mode (can’t be edited).
-
Set the search criteria to locate the promotion(s) you wish to view and click Search.
-
Highlight the promotion to be viewed in the search results and click View.
-
Data on all tabs is visible but can’t be modified.
-
Click Exit when finished to return to the search screen.
Copy
-
The Copy function allow the user to make a copy of an existing promotion.
-
Set the search criteria to locate the promotion you wish to copy and click Search.
-
In the search results, highlight the promotion to be copied and click Copy.
-
The same screen as that used for adding and editing appears.
-
The name is the same as the source promotion’s name with an added [1] at the end.
-
Modify the Promotion Name for your new promotion.
-
Change any other parameters as desired.
-
Save and approve the new promotion or cancel to discard the copy.
Cancel
-
The Cancel button is used to cancel a promotion.
-
The promotion must be approved but not yet active.
-
The start time for the promotion must be at least 3 hours in the future.
-
Once a promotion has been cancelled, its status is set to Cancelled.
Stop
-
The Stop button is used to stop a promotion.
-
The promotion must be approved and active.
-
Once a promotion has been stopped, its status is set to Cancelled.
-
If no promotion is selected, the Stop button is disabled.
Delete
-
The Delete button is used to delete a promotion.
-
The promotion must be in Planning, Being Modified, or Submitted state.
-
Highlight the promotion in the results and then click Delete.
-
Once a promotion has been deleted, its status is set to Cancelled.
Opt Out
- Opt Out is not supported in this release.
Export
-
The Export button is used to export the search results to a comma-separated values (CSV) file for use in Excel.
-
Once you have a result set that’s filtered as desired, click the Export button.
-
The file is saved as OfferManagement_yyyy-m-d.csv in the default location.
-
The file location is typically the Downloads folder for the user.
-
If there are no search results, the Export button is disabled.
-
The Print button is used to print the search results to a PDF file for viewing/printing in Adobe Acrobat Reader.
-
Once you have a result set that’s filtered as desired, click the Print button.
-
The file is saved as Promotion Manager.pdf in the default location.
-
The file location is typically the Downloads folder for the user.
-
If there are no search results, the Print button is disabled.
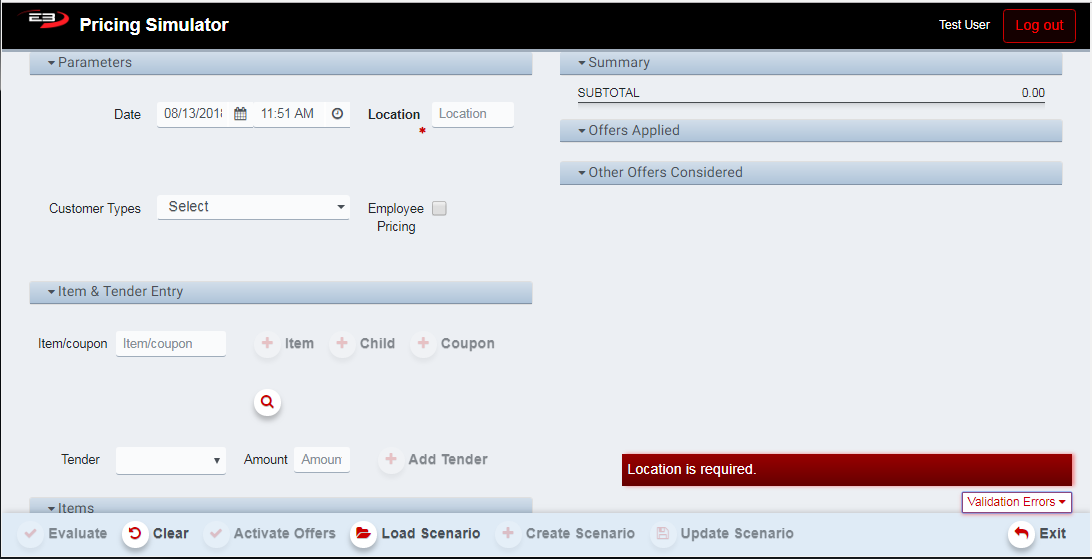
Pricing Simulator
The Pricing Simulator is a tool that’s built into the Enterprise Promotion Manager to allow pre-testing of a promotion before the promotion goes active. The location (i.e. store number) is the only required parameter. The initial screen looks like the following:
Screenshot of the Enterprise Promotion Manager application.
Configuring The Simulation
Enter the fields in the Parameters section.
-
Set the Date (and time) to anything after the start date of the promotion.
-
Set the Location to the desired store number.
-
Select a Customer Type (Bronze, Silver, Gold, Platinum) if required by the promotion.
-
Check the Employee Pricing option if the promotion allows employee discounts.
Enter the fields in the Item & Tender Entry section.
-
For each item or coupon, enter the SKU in the Item/coupon field.
-
For an item, click the plus sign next to Item.
-
For a child item, click the plus sign next to Child.
-
For a coupon, click the plus sign next to Coupon.
-
-
Currently, there are no tenders required for any promotions making the Tender and Amount fields optional.
Running The Simulation
When the simulation is configured and the items are entered, click Evaluate.
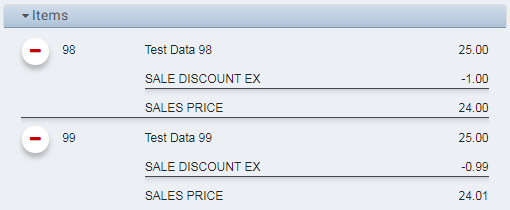
Items (Virtual Receipt)
- The Items group (virtual receipt) shows each line item and what, if any, discounts were applied to that item.
Screenshot of the Enterprise Promotion Manager application.
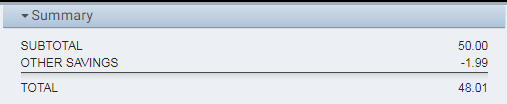
Summary
- The Summary group shows the subtotal for all items plus any savings from promotions.
Screenshot of the Enterprise Promotion Manager application.
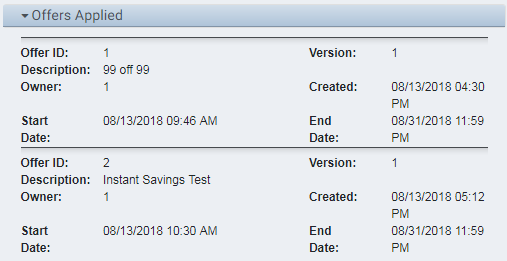
Offers Applied
- The Offers Applied group shows the results of the promotion that was selected to be applied.
Screenshot of the Enterprise Promotion Manager application.
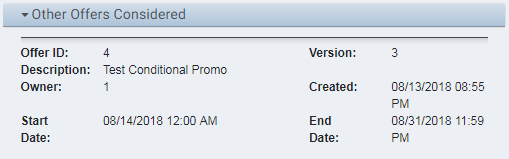
Other Offers Considered
- The Other Offers Considered group shows which, if any, other promotions were considered during promotion evaluation and subsequently discarded in favor of another promotion more favorable to the customer.