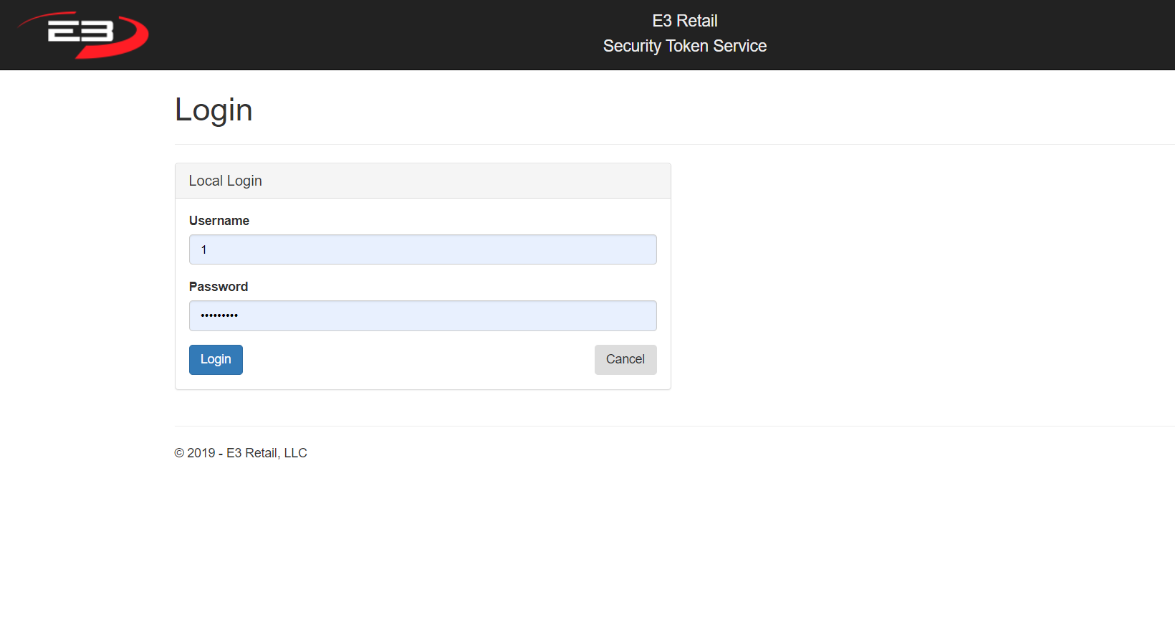
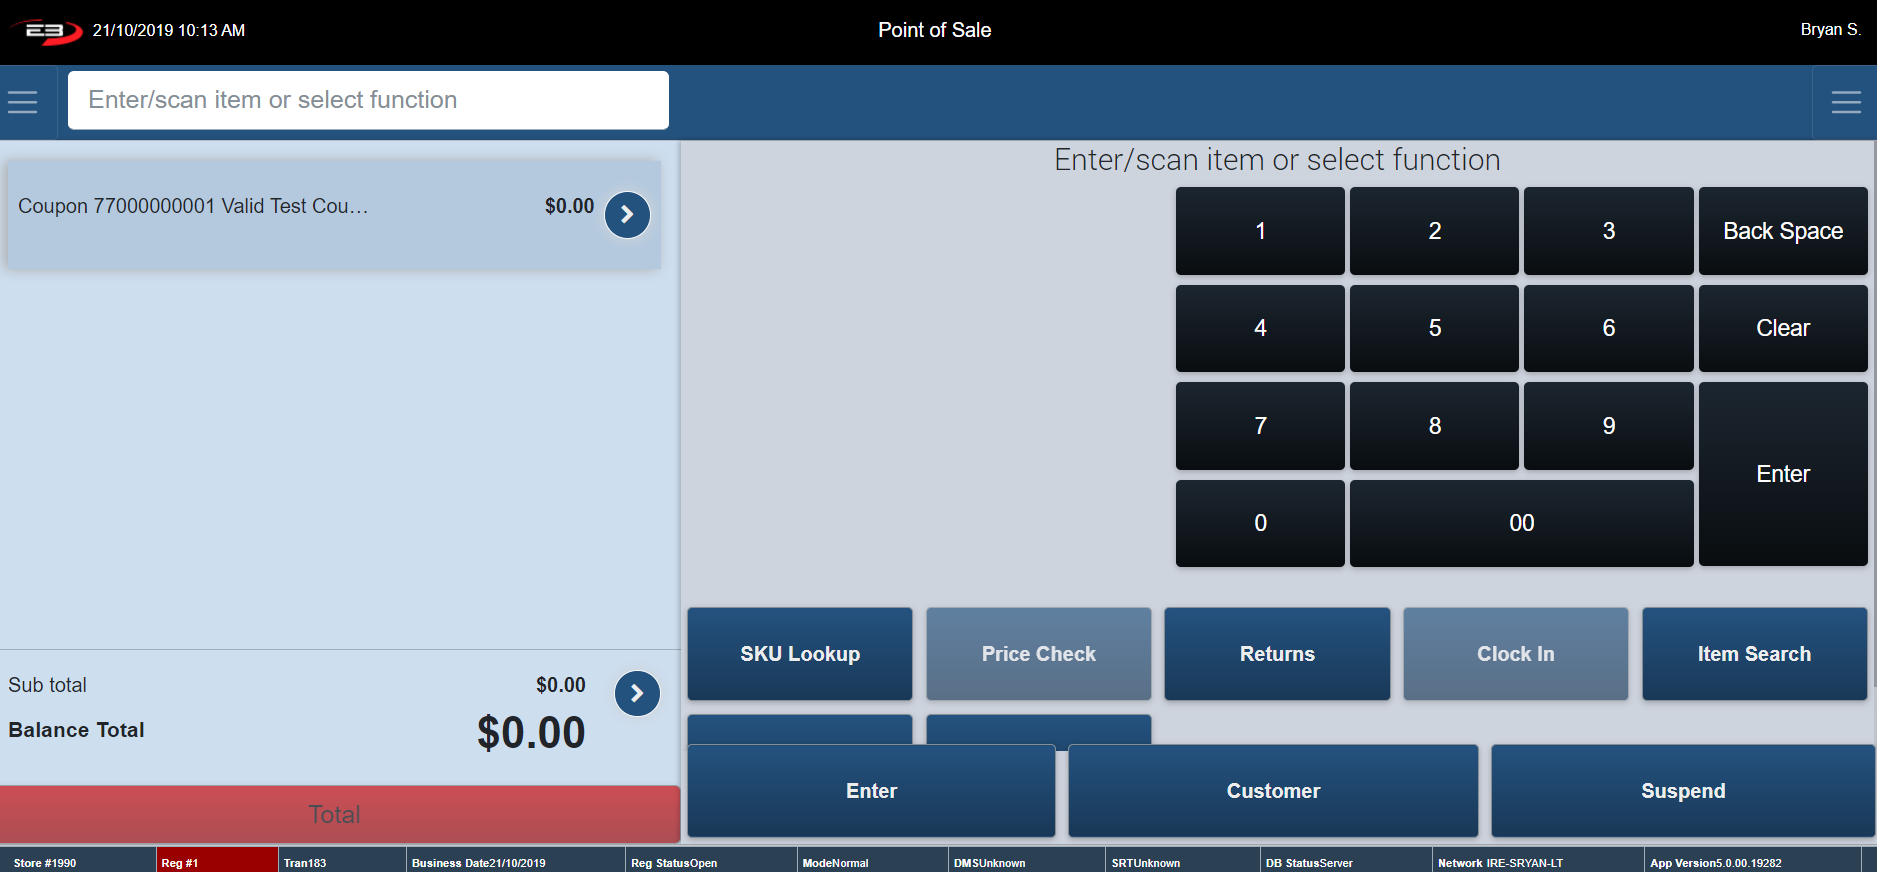
A login dialog box (like shown below) is displayed when Point of Sale is launched. The application asks you for an Employee ID/Username and Password.
The Login may be completed by manually entering in the Username and Password and selecting Login.
Screenshot of the Point of Sale application.
Initial Screen (when register is closed)
An Initial Search Screen (like the one shown below) appears.
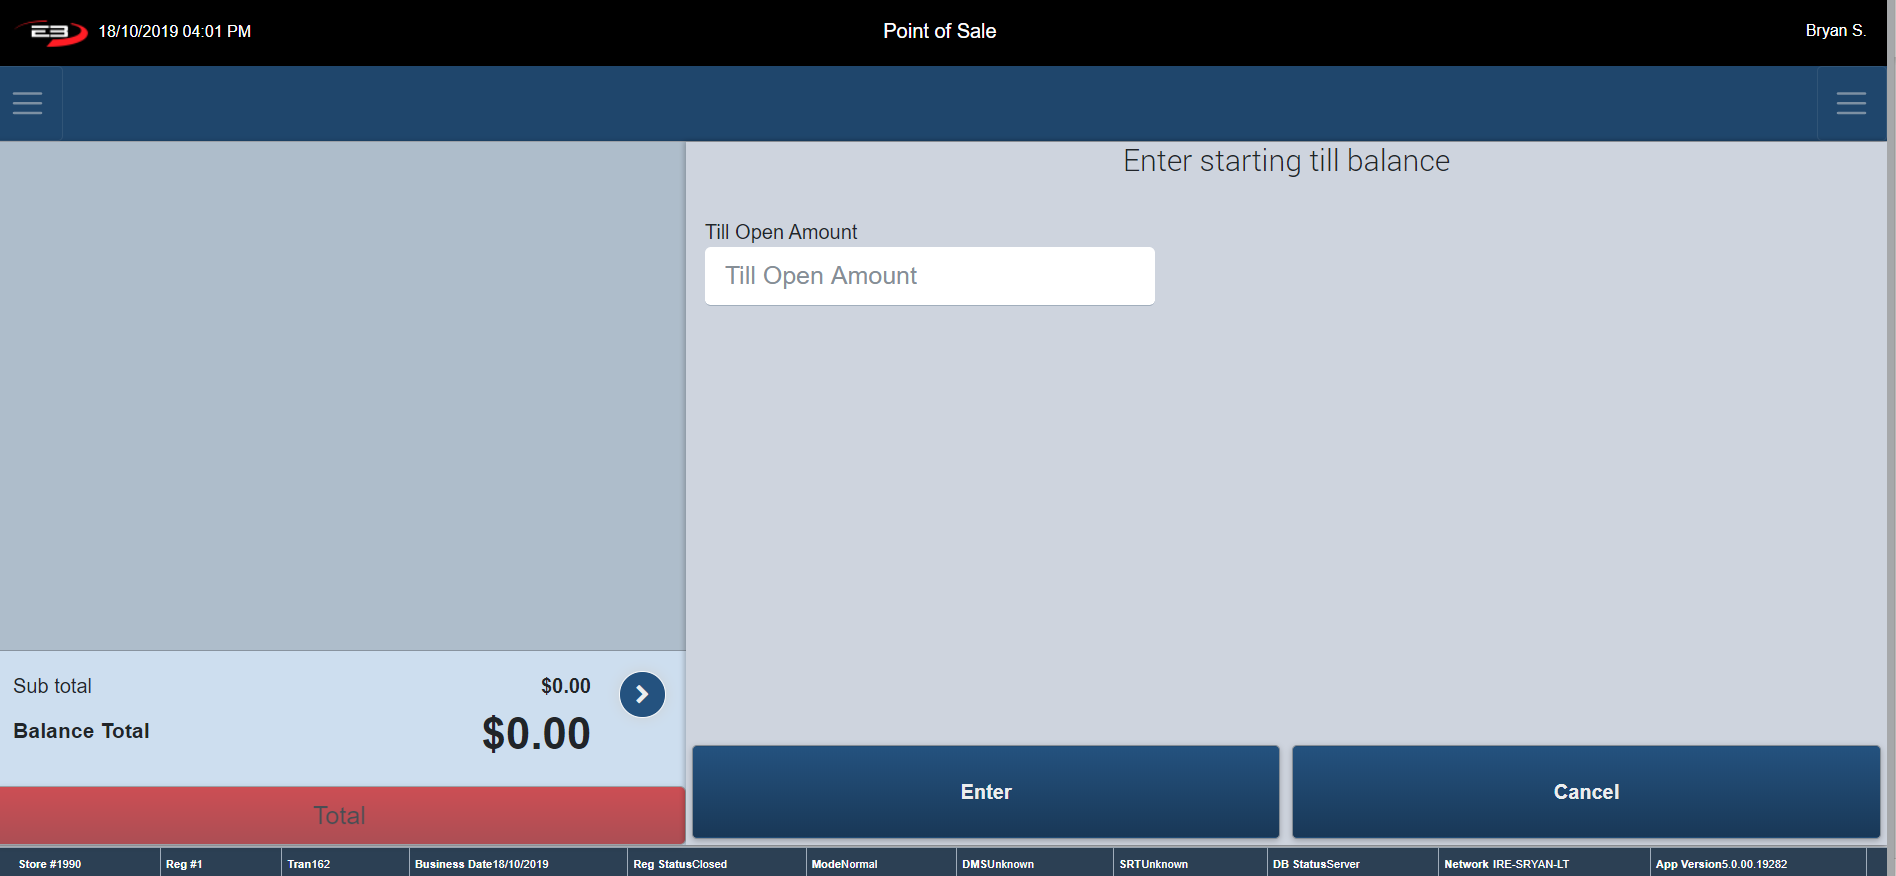
Initially the register is closed - click Enter to open the register or click Log Out to go back to the Login page. The register must be opened before a transaction can be performed.
Screenshot of the Point of Sale application.
The register prompts you to enter in your Starting Till Balance.
Type in your Starting Till Balance and click Enter to continue.
Screenshot of the Point of Sale application.
A confirmation dialog appears, if the amount is right click Enter, if not select Cancel and re-enter the amount.
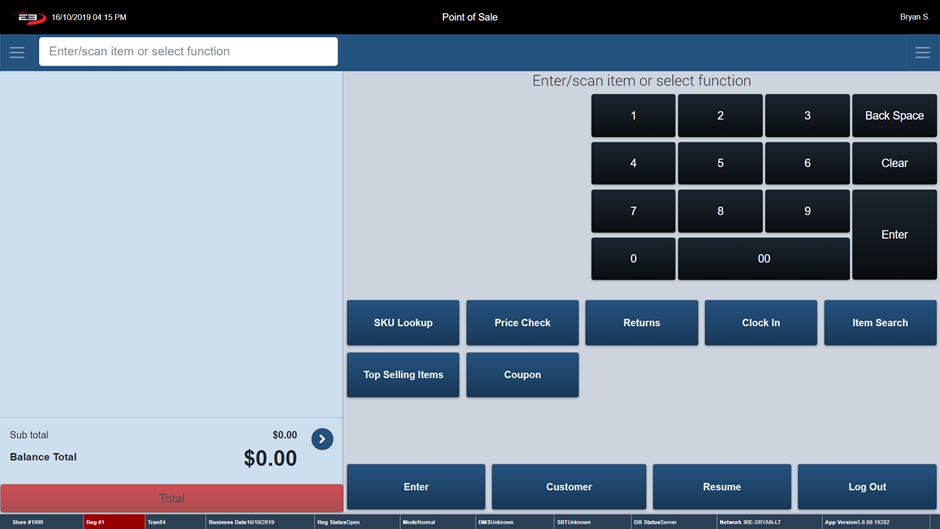
An Item Entry Screen (like the one shown below) appears.
Screenshot of the Point of Sale application.
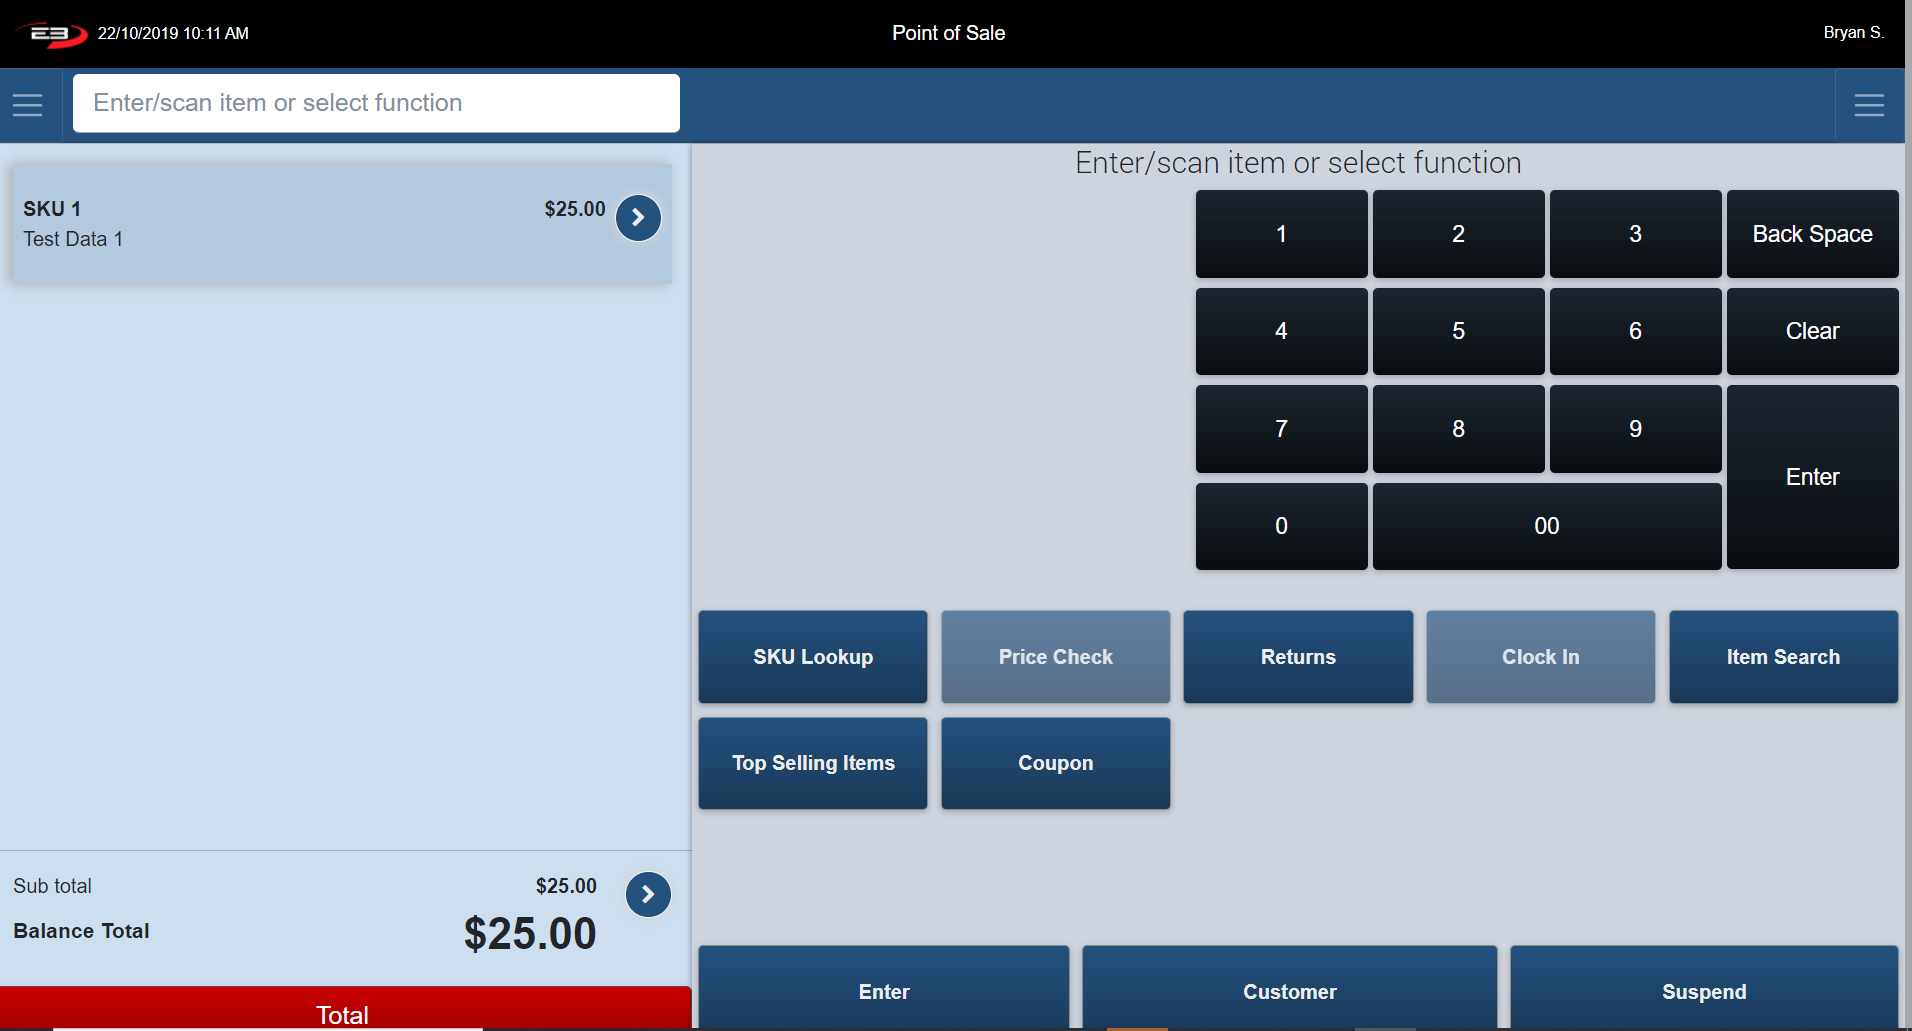
The Item Entry Screen is the home screen of the register. The Item Entry Screen comprises many Point of Sale function keys. These function keys are arranged vertically underneath the keypad.
All buttons on this screen are enabled before and after a transaction. During a transaction, some of these buttons become disabled. The buttons below, although they can become disabled, don’t change.
Screenshot of the Point of Sale application.
When selling items to customers the register remotes to the Item Entry Screen. This is where all the transactions take place. This screen displays again once a transaction is over.
Sales Transaction
When processing a sales transaction, adding an item is the first step. There are many ways in which this can be done:
Scan or manually enter in the item’s barcode
Manually enter the item’s SKU number
Use one of the components listed on the Item Entry Screen.
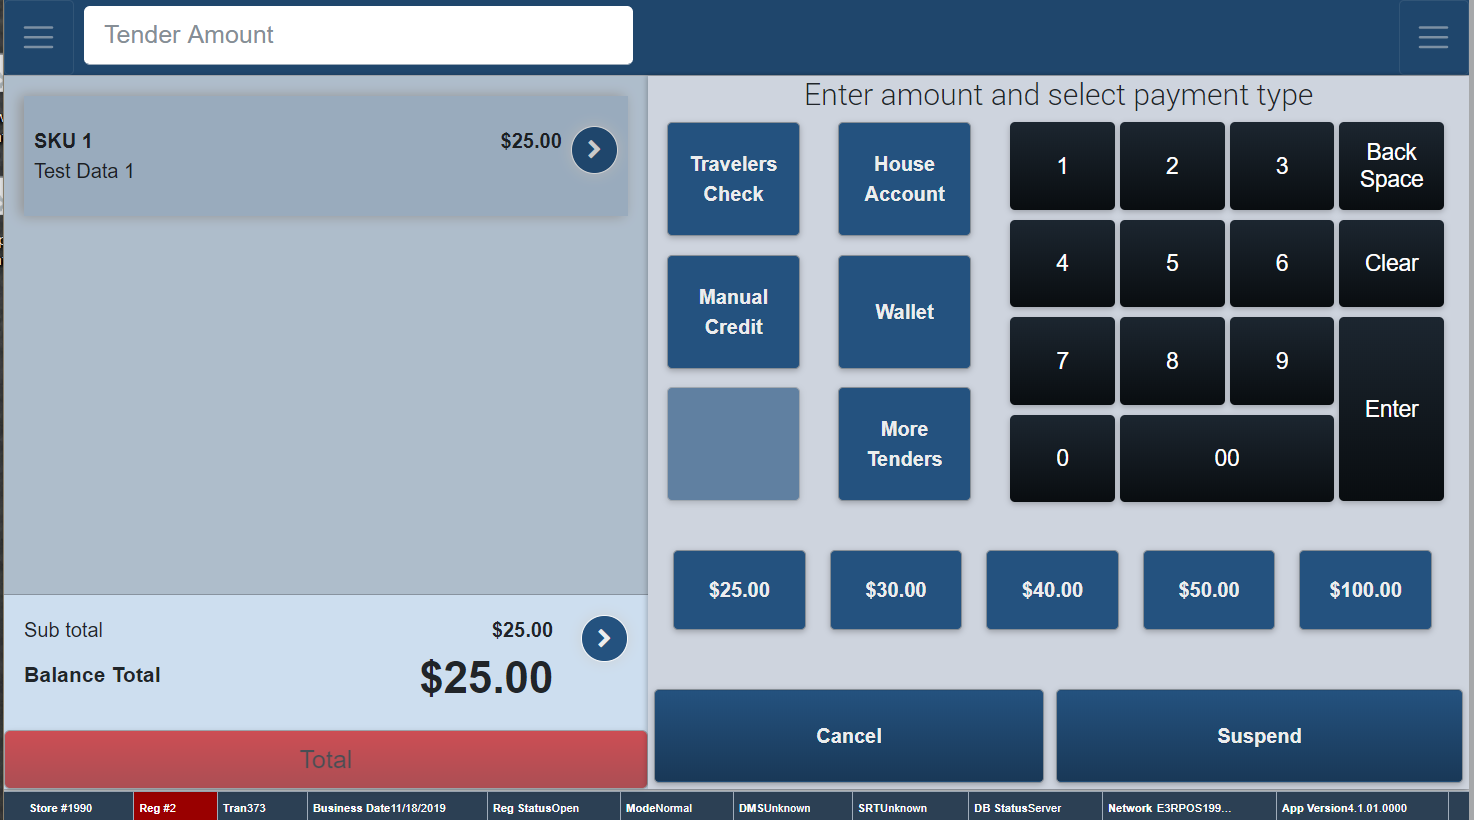
When all Items have been added to the transaction, the transaction is ready for the tender process. This process allows you to accept one or more types of payment for the balance of the sale.
The below tender types are available.
Cash
Check
Mfr. Coupon
Credit/Debit
Travelers Check
Manual Credit (for clients with standalone payment devices)
House Account
Manual Mobile Wallet
Below are the details for the different tender options. All examples below assume that the transaction is ready for payment.
Tendering with Cash
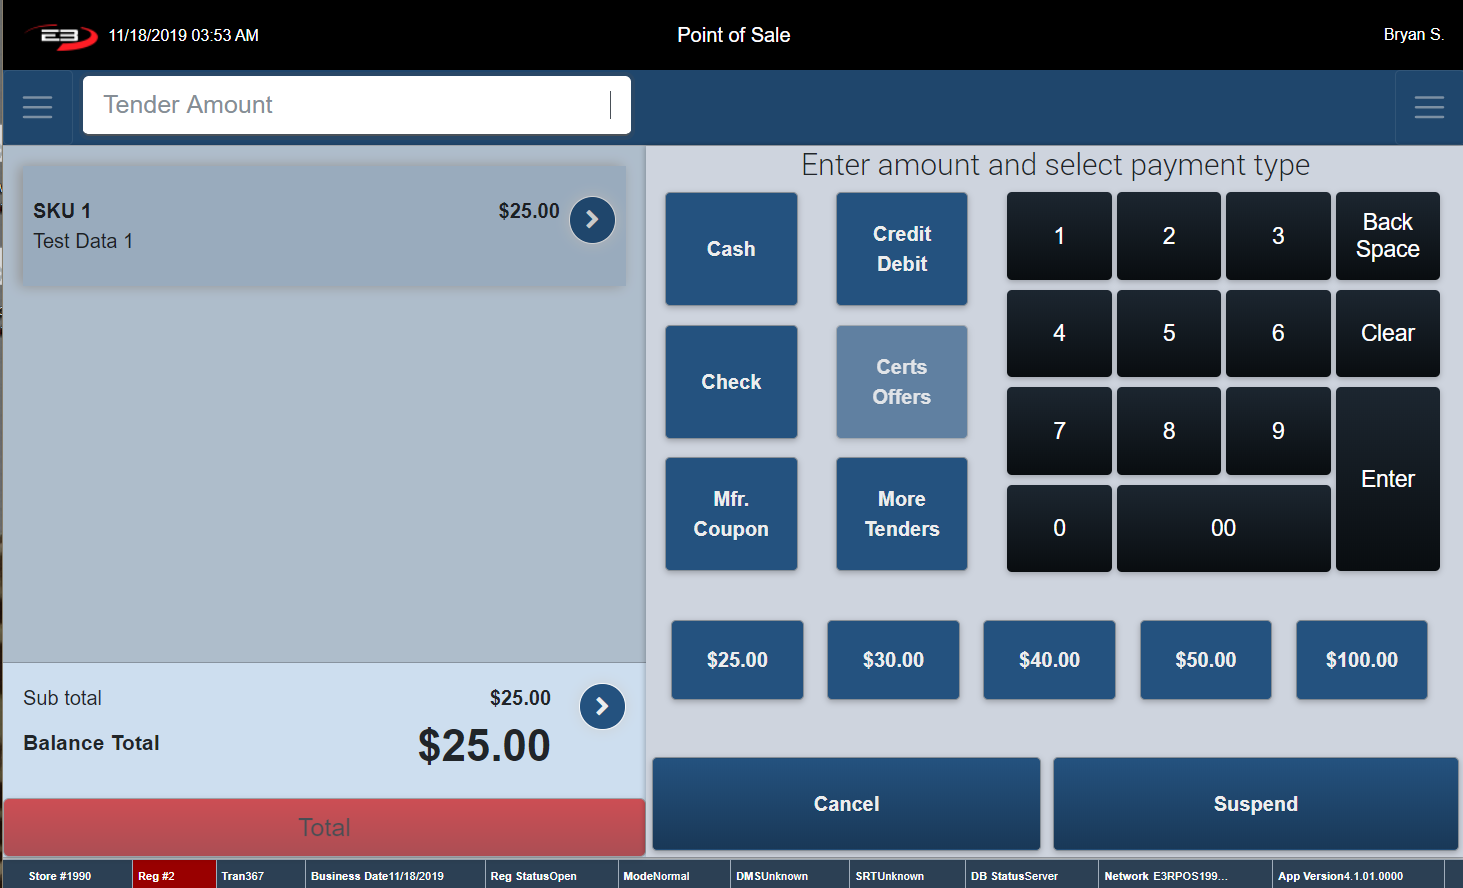
Press the red Total button at the bottom of the Item Entry Screen – the Tender Options Screen is displayed (see below).
Screenshot of the Point of Sale application.
There are two different ways to tender with cash.
Enter in the Payment Amount and select Cash.
Click on one of the denomination buttons shown above.
If the amount of the tender is above the balance:
A screen is displayed which indicates the amount of change due.
The register prompts you to close the cash drawer.
A receipt prints, and the register returns to the Item Entry Screen.
If the tender amount is equal to the balance due:
A receipt prints, and the register returns to the Item Entry Screen.
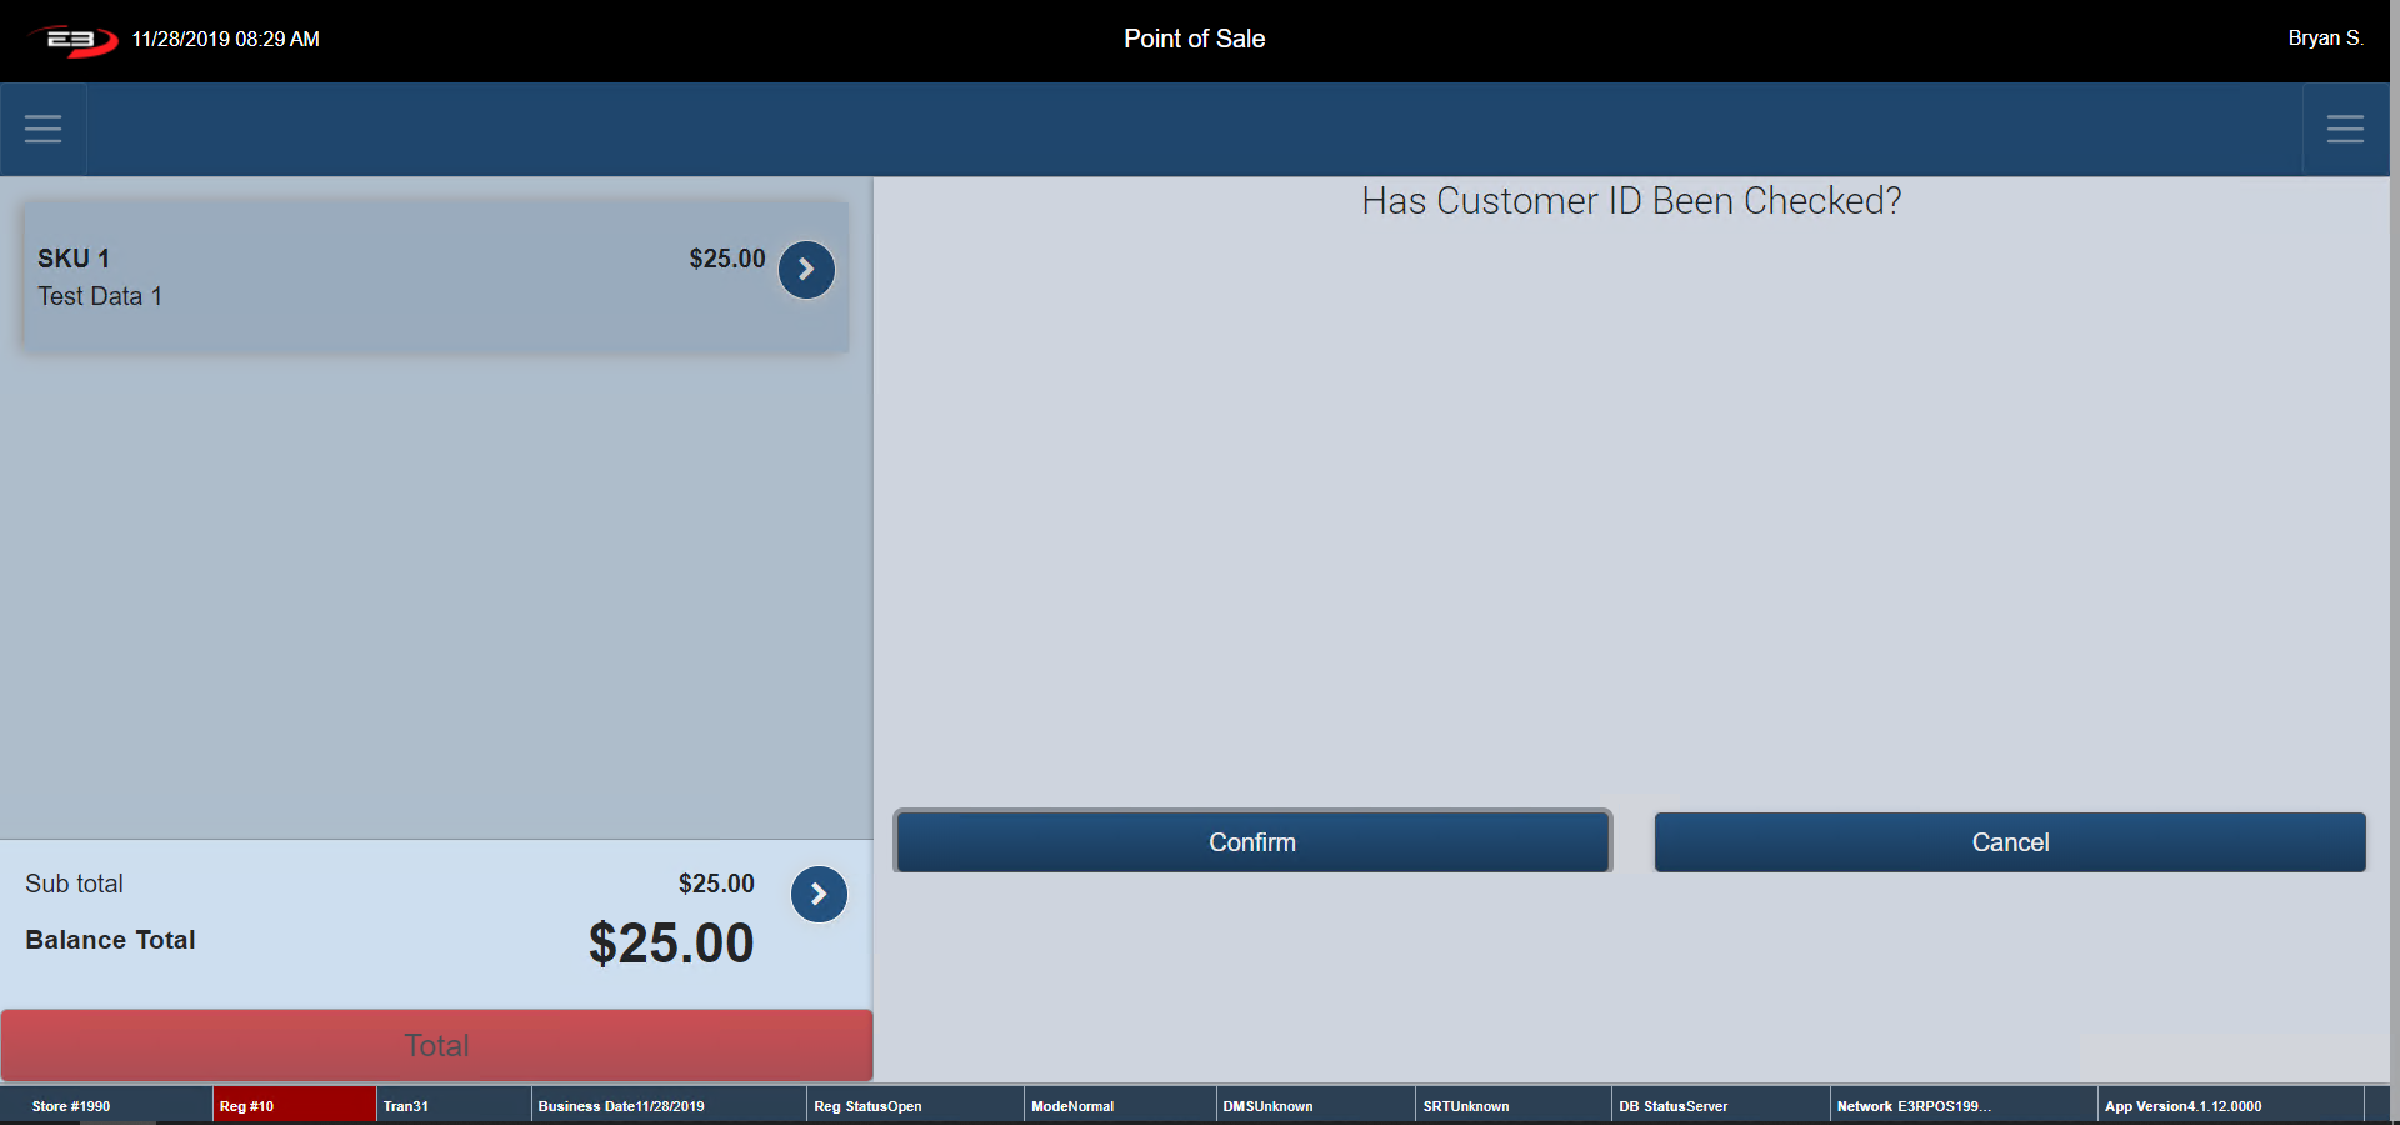
Tendering with Check
Press the red Total button at the bottom of the Item Entry Screen – the Tender Options Screen is displayed (see below).
Screenshot of the Point of Sale application.
Enter in the Payment Amount and click Check.
Screenshot of the Point of Sale application.
The register prompts you to select if the Customer ID has been checked.
Select Confirm for Yes – a receipt prints.
If the customer cannot provide ID, click Cancel. A warning sign saying “Customer ID is not Verified. Payment is cancelled” appears. Click Ok. The register returns to the Item Entry Screen.
Tendering with Credit/Debit
Press the red Total button at the bottom of the Item Entry Screen – the Tender Options Screen is displayed (see below).
Screenshot of the Point of Sale application.
Enter in the payment amount and click Credit/Debit. There are two different ways to tender with Credit/Debit
Insert or Swipe Card
If the card is a Debit Card, the Pin Pad prompts the customer to enter in their pin and press Enter. Once the tender is complete, a receipt prints, and the register returns to the Item Entry Screen.
If the card is a Credit Card, depending on the type of card, the customer may be asked to enter in their pin or else the Signature Capture Screen appears. The Pin Pad prompts the customer to sign the Signature Pad. When the signature is complete, press Enter. The Verify Signature Screen is displayed – click Yes to confirm the signature. If the signature is rejected, the register returns to the Tender Option Screen where another tender can be selected.
Hand Key in the Account
On the Pin Pad, enter the Permanent Account Number (long number), the expiry date and the CVV number of the desired card.
The register prompts the employee to enter in the last 4 digits on the card and click Confirm.
The customer is asked to Confirm the details on the Pin Pad.
The customer is then asked to sign the Pin Pad and a credit slip prints.
Tendering with Mfr. Coupon
Press the red Total button at the bottom of the Item Entry Screen – the Tender Options Screen is displayed (see below).
Screenshot of the Point of Sale application.
When a coupon is used as a form of tender, over tending is not allowed.
Click on Mfr. Coupon, The Coupon Entry Screen appears.
Scan or Manually Enter the Coupon Number.
Depending on the requirements on the coupon:
You may enter too few items; you’ll see Does not meet quantity restrictions for item; click OK.
If you enter the correct number of items, you’ll see Check the expiration date and select OK or Cancel; click OK. (Cancel goes back to tender selection.)
The coupon will not show up in the Transaction Tab at this point, but the balance due will go down by the coupon amount.
If you try to enter the same coupon again, you’ll see Coupon is not allowed, click OK.
Tender the transaction with an alternate tender type.
The receipt states that the coupon has been entered for a value of $2.00.
Tendering with Travelers Check
Press the red Total button at the bottom of the Item Entry Screen – the Tender Options Screen is displayed. Click More Tenders to bring up alternate tender types (see below).
Screenshot of the Point of Sale application.
Enter the total amount of all traveler checks present and click Travelers Check.
Travelers Checks are in increments of 5 dollars.
If the amount of the tender is above the balance:
A screen is displayed which indicts the amount of change due.
The register prompts you to close the cash drawer.
A receipt prints, and the register returns to the Item Entry Screen.
If the tender amount is equal to the balance due
A receipt prints, and the register returns to the Item Entry Screen.
Tendering with Manual Credit
Press the red Total button at the bottom of the Item Entry Screen – the Tender Options Screen is displayed. Click More Tenders to bring up alternate tender types (see below).
Screenshot of the Point of Sale application.
Enter in the Tender Amount and click Manual Credit.
Enter in the Last Four Digits and the Approval Code (6-digit number).
Click Confirm – a receipt prints, and the register returns to the Item Entry Screen.
Click Cancel – the register returns to the Tender Type Option Screen.
Tendering with House Account
Press the red Total button at the bottom of the Item Entry Screen – the Tender Options Screen is displayed. Click More Tenders to bring up alternate tender types (see below).
Screenshot of the Point of Sale application.
Click House Account – The register returns to the House Account Home Screen.
Enter in the House Account Name and click Search.
Highlight the relevant House Account and click Select.
Select the appropriate Contact.
The Signature Capture Screen appears.
The register prompts the customer to sign the Signature Pad.
When the signature is complete, press Enter.
The Verify Signature Screen is displayed – click Yes to confirm the signature. If the signature is rejected, the register returns to the Tender Option Screen where another tender can be selected.
A receipt prints, and the register returns to the Item Entry Screen.
Tendering with Manual Mobile Wallet
Press the red Total button at the bottom of the Item Entry Screen – the Tender Options Screen is displayed. Click More Tenders to bring up alternate tender types (see below).
Screenshot of the Point of Sale application.
Enter in the Payment Amount and click Wallet.
Choose the Wallet Type from the drop-down box provided.
Enter in the Transaction Reference Number (Note: this number is a 6-digit number).
Click Confirm – a receipt prints, and the register returns to the Item Entry Screen.
Click Cancel – the register returns to the Tender Type Option Screen.
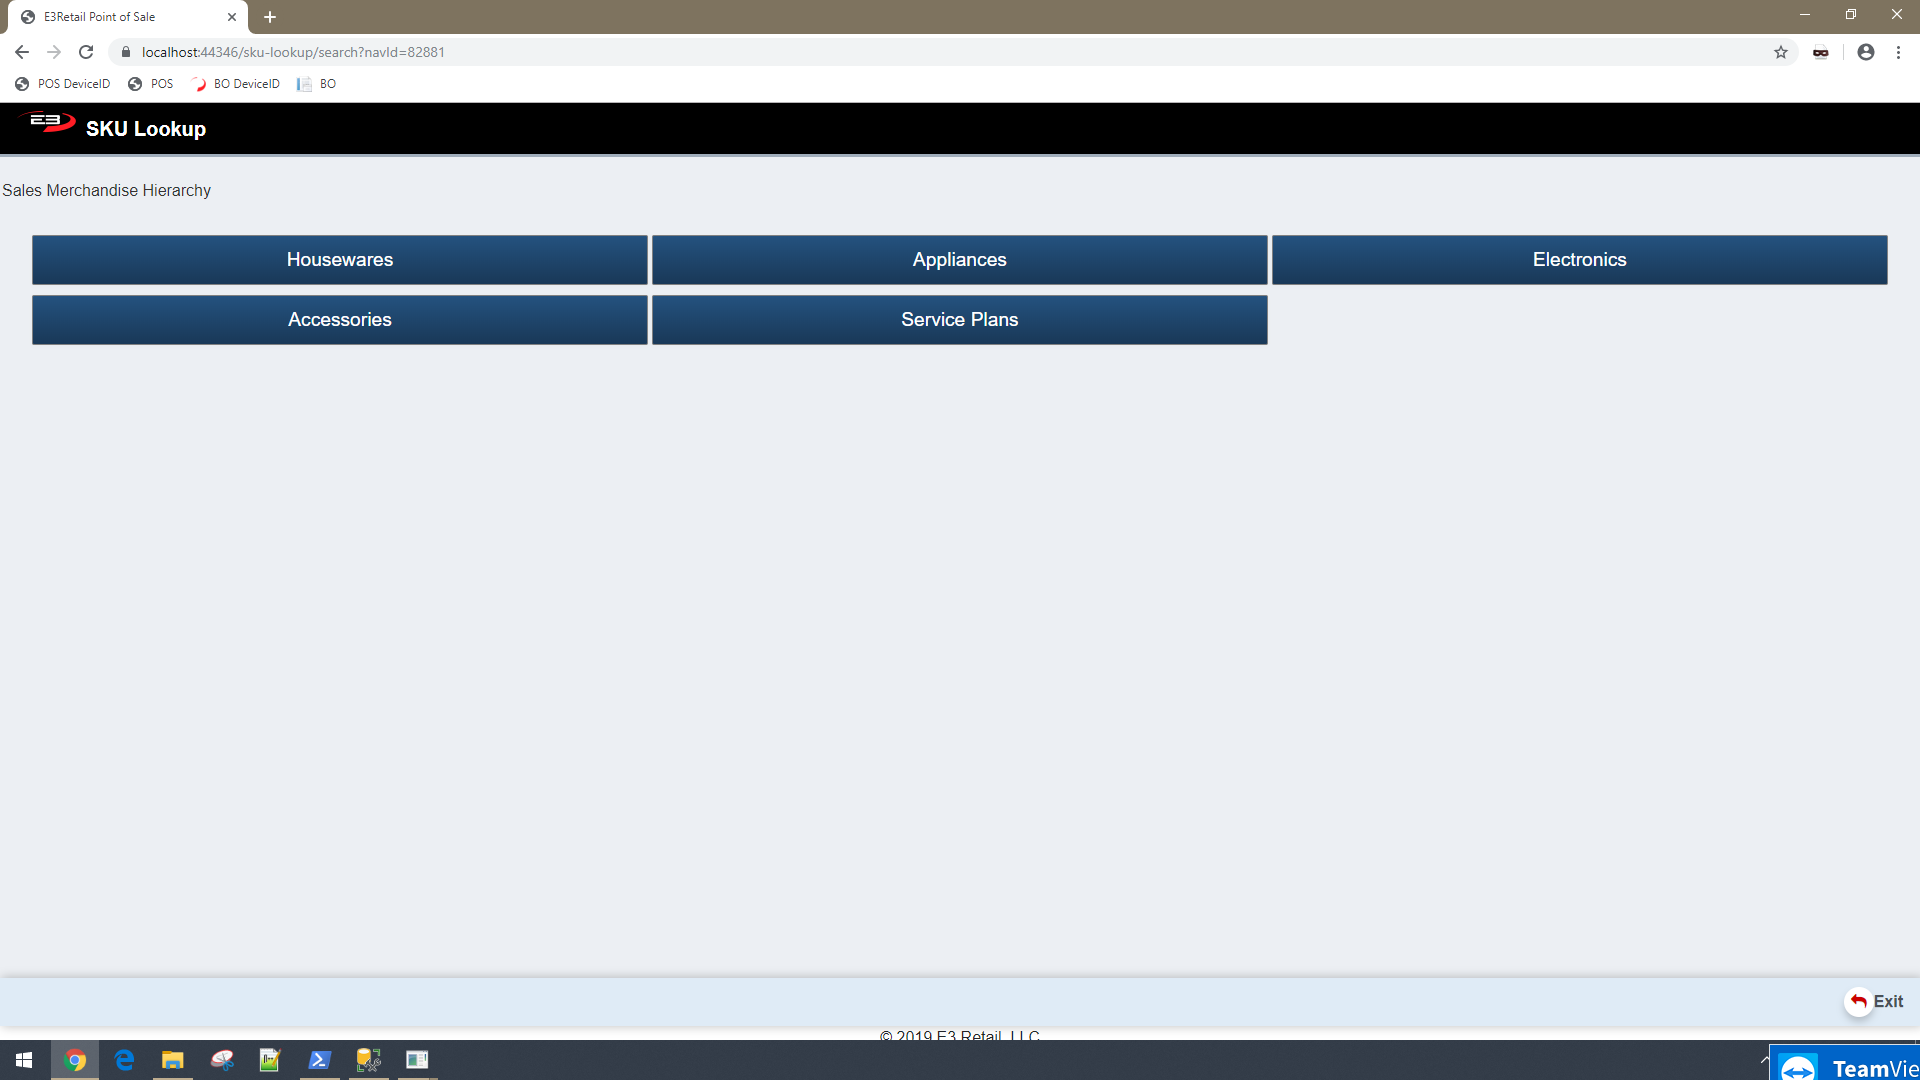
SKU Lookup (Item Drill Down) Menu
SKU Lookup lets you search for a Stock Keeping Unit (SKU) using a Sales Merchandise Hierarchy.
From the Item Entry Screen, click the “SKU Lookup” button – the following screen appears.
Screenshot of the Point of Sale application.
This function should be used when you do not know the SKU number and you do not have a barcode to scan.
A Sales Merchandise Hierarchy is a reporting structure which tracks and manages sales and inventories of products.
It allows you to classify the range of products that your company has for sale. Each Department is divided into Classes and then Subclasses. Choosing a department/class and subclass helps to limit search results.
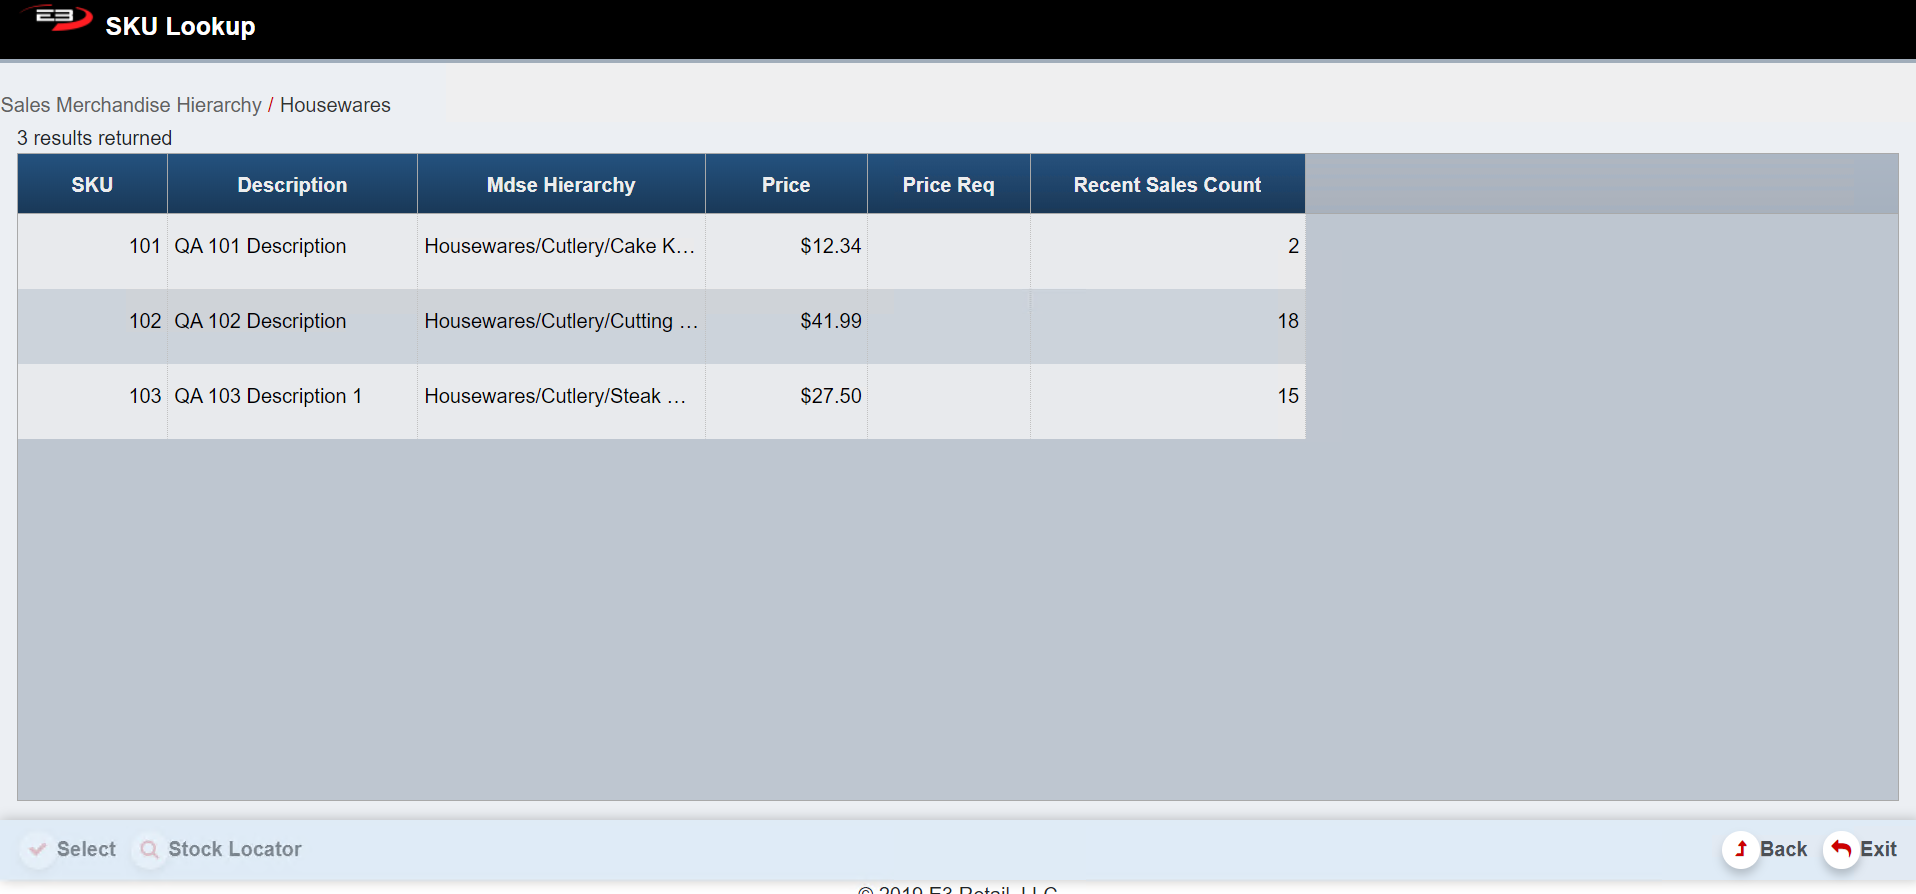
Click on the subclass of your choice, select Search and the below results screen appears.
Click Back. The register returns to the previous department/class.
Screenshot of the Point of Sale application.
Results Table
The Results Grid contains the following fields:
SKU: The products stock keeping unit number
Description: Gives a brief description of the products
Mdse Hierarchy: Breakdown of the products merchandise hierarchy
Price: the amount required for payment
Price Reqd: The price required flag (true or false)
Recent Sales Count: a count of the amount of stock the company has at this specific time and of an individual SKU
Highlight a specific item to enable the select button. Click Select, the register returns to the Item Entry Screen where a transaction can take place.
The Stock Locator function is used to identify other locations (stores, distribution centers, etc.) where the item is currently in stock**.**
Click Clear to clear any results and to reset the search criteria back to their default values.
Click Exit, the register returns to the Item Entry Screen.
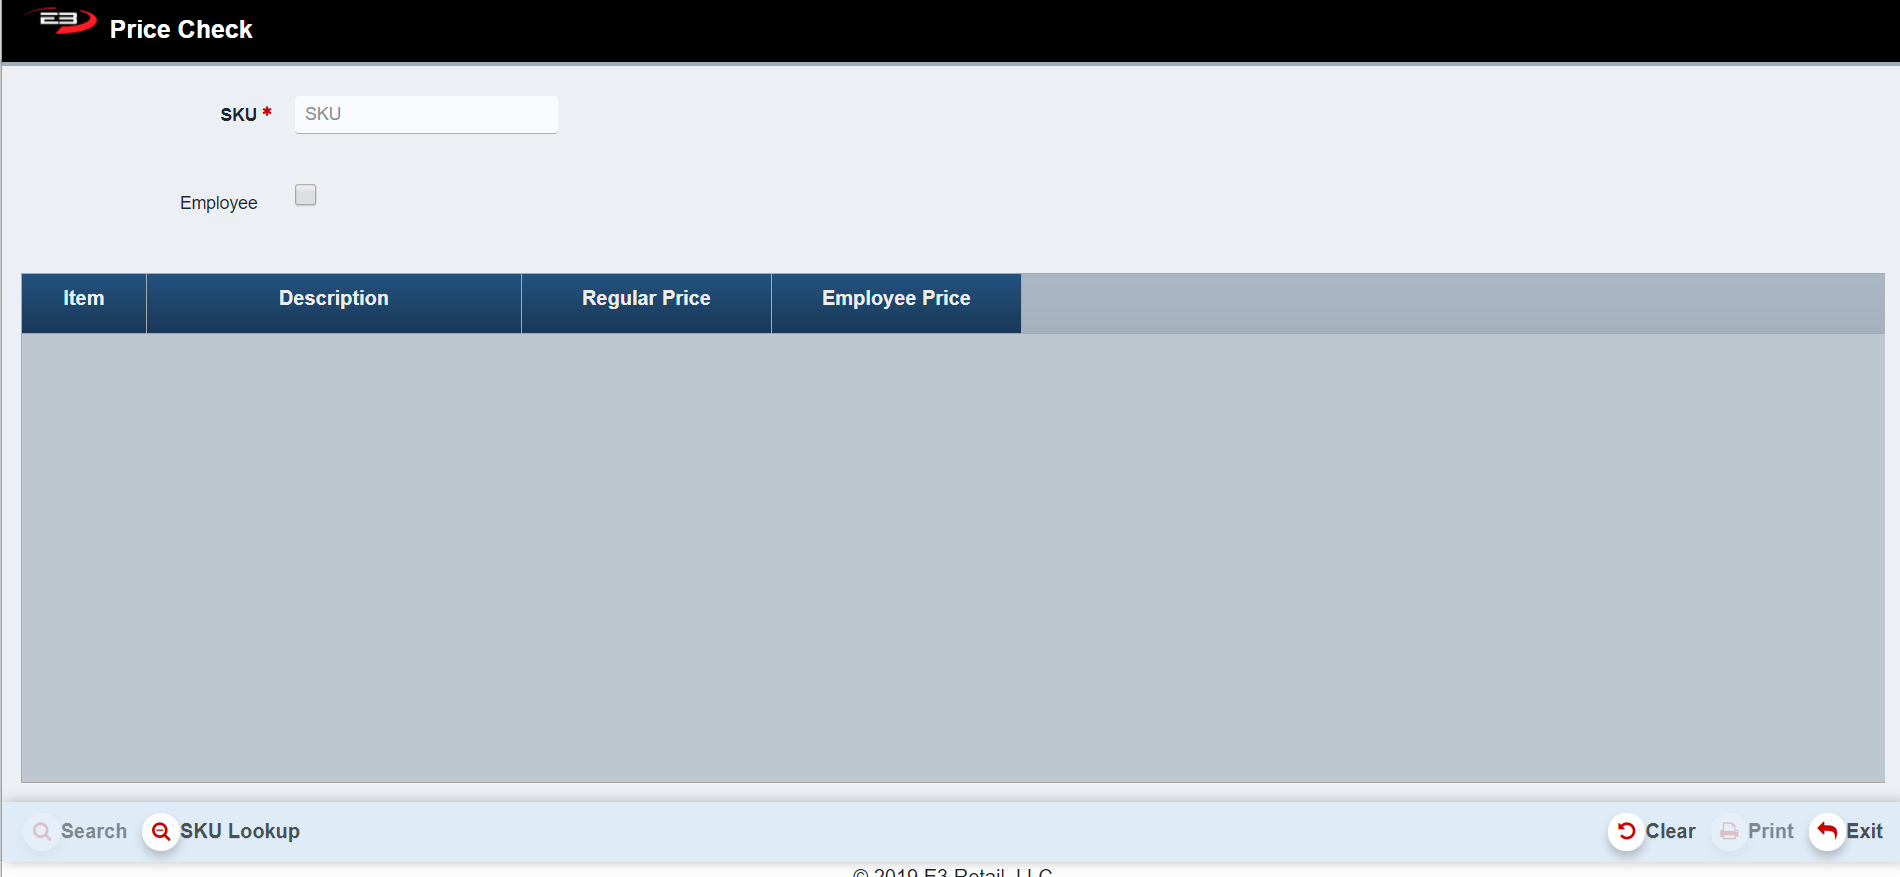
Price Check
The function Price Check allows you to check the price of a product or service.
From the Item Entry Screen, click the “Price Check” button – the following screen appears (Search and Print are enabled once results are searched).
Screenshot of the Point of Sale application.
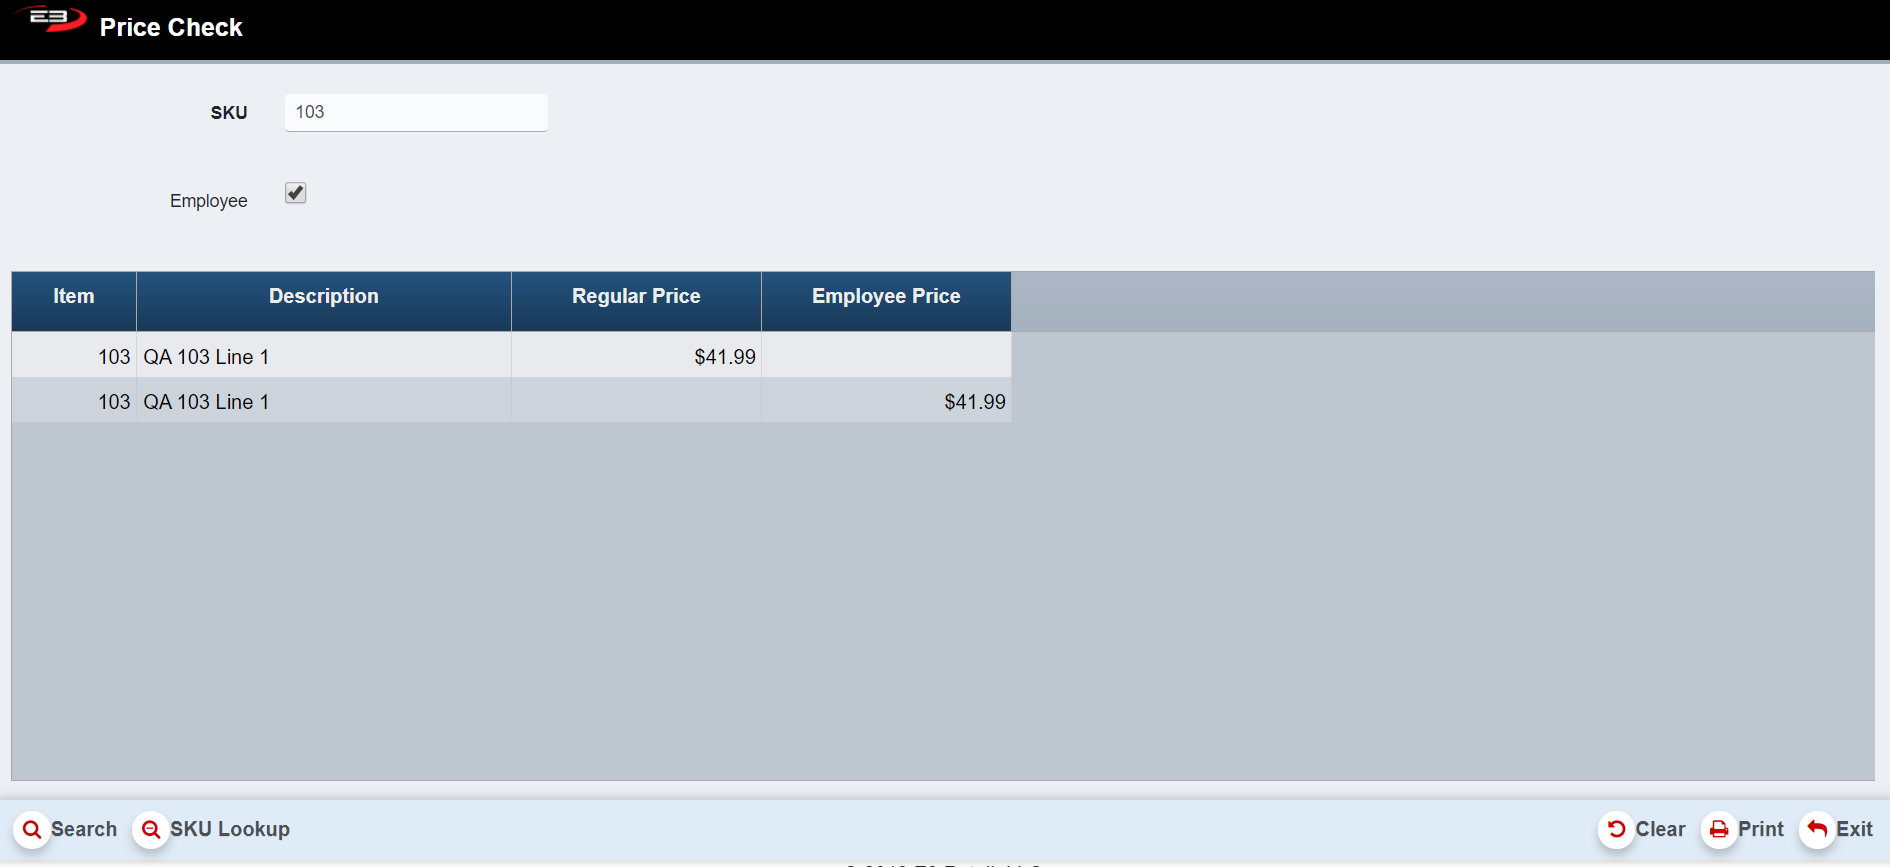
Enter in a SKU number and click Search (click Employee box to search for a SKU price for an employee)
The Results of the search appear in the results grid like the one shown below.
Screenshot of the Point of Sale application.
Results Table
The results grid contains the following fields:
SKU: The products stock keeping unit number
Description: Gives a brief description of the products
Regular Price: Set price for customers
Employee Price: Set price for employees
If you do not have the SKU number, select the SKU Lookup button at the bottom left of the register screen. The register remotes to the SKU Lookup page previously explain.
Each time you search a SKU number, the results combine to make a list of previously searched Price Checks.
Click Print to print the Price Check list.
Click Clear to erase any results. This resets the search criteria back to their default values.
Click Exit, the register returns to the Item Entry Screen.
Manual Returns
The Manual Returns function allows a customer to bring back merchandise for a refund or in exchange for a different product.
From the Item Entry Screen, click Manual Returns – the following screen appears.
Screenshot of the Point of Sale application.
The register prompts you to enter the SKU manually, Scan the barcode or use one of the functions (SKU Lookup etc.) to proceed with the transaction. Note: the “Return” button and “Coupon” button are now disabled.
Screenshot of the Point of Sale application.
Enter in the SKU number manually and click Enter. The below Refund Option Screen appears prompting you to select a refund option for the return (Use the arrows to navigate to the next page for alternate reason codes).
Screenshot of the Point of Sale application.
Once a reason code is selected, the register returns to the Item Entry Screen to continue with the transaction. Note: Price Check and Clock Out are also now disabled.
Screenshot of the Point of Sale application.
To refund the money to the guest, click Total. The Tender Option Screen appears. Use the desired tender type to complete the transaction.
If the customer is looking to exchange the returned item, click the “Sales” button to return to sales mode and continue with the transaction.
Clock Out/Clock In
The Clock Out/Clock In button appears on the Item Entry Screen as seen below (Note you are already clocked in from Logging in and opening your register).
Screenshot of the Point of Sale application.
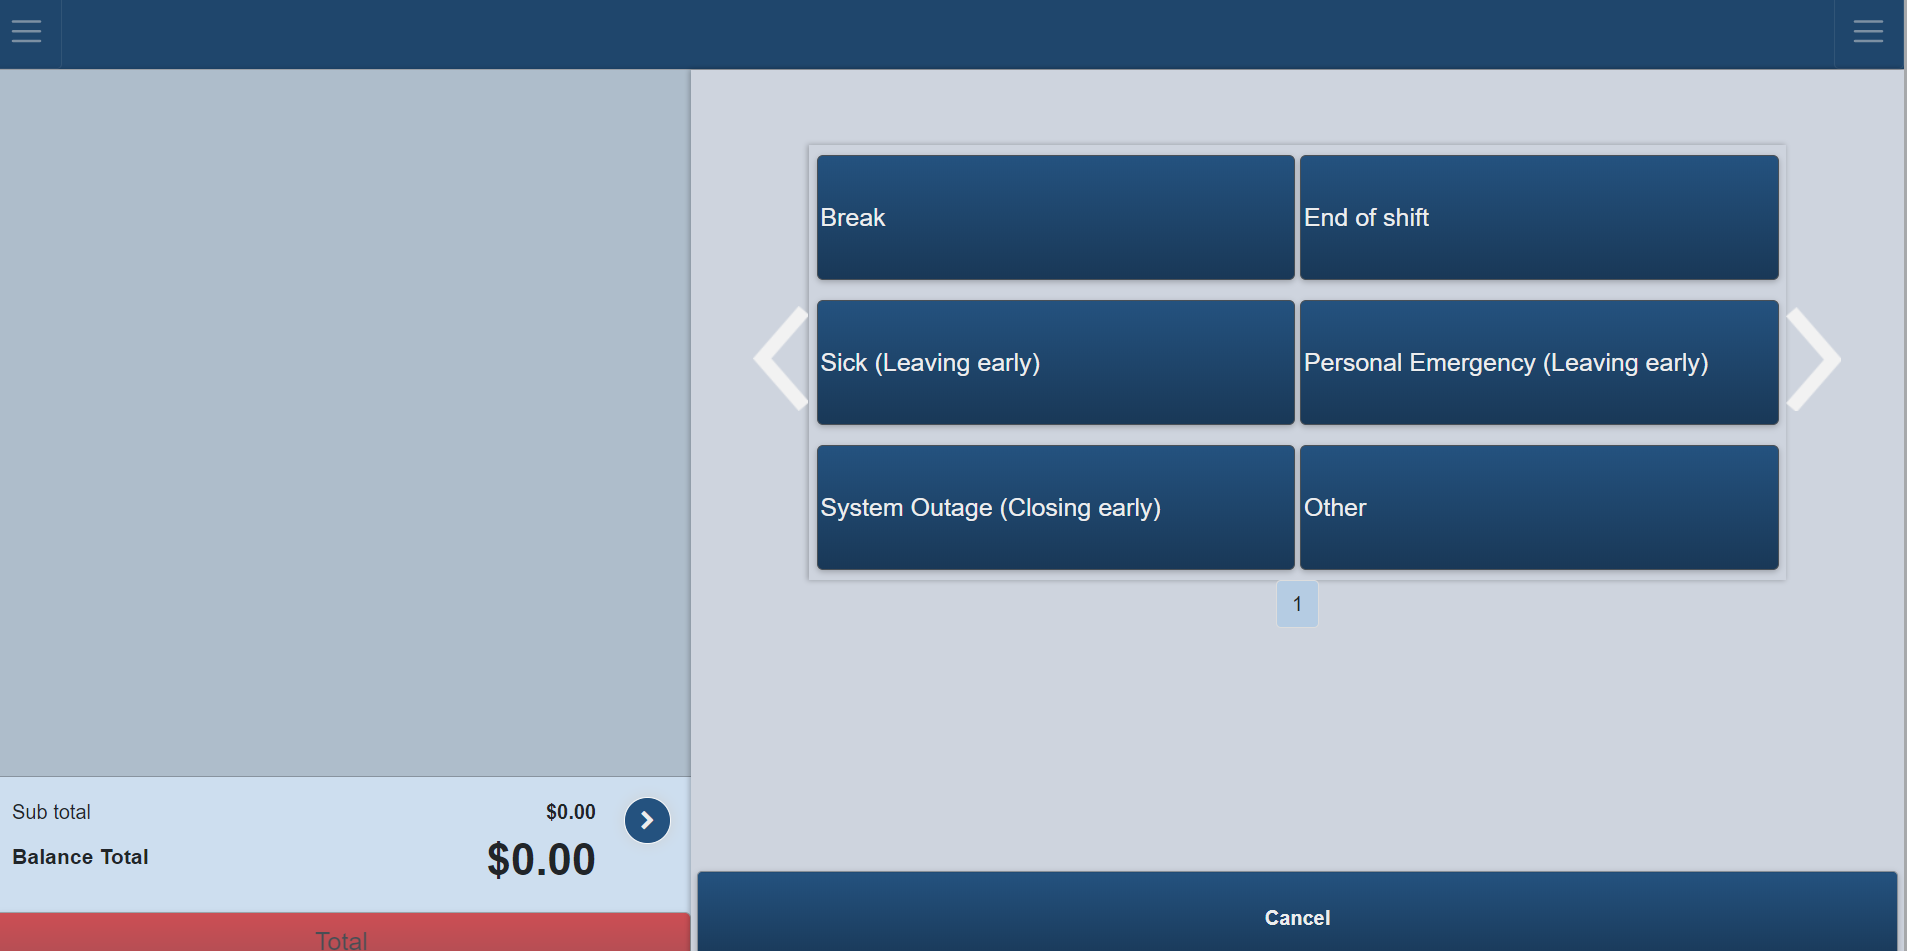
Select Clock Out. The register prompts you to choose a reason code.
Click on the relevant Reason Code. The register logs off automatically.
Screenshot of the Point of Sale application.
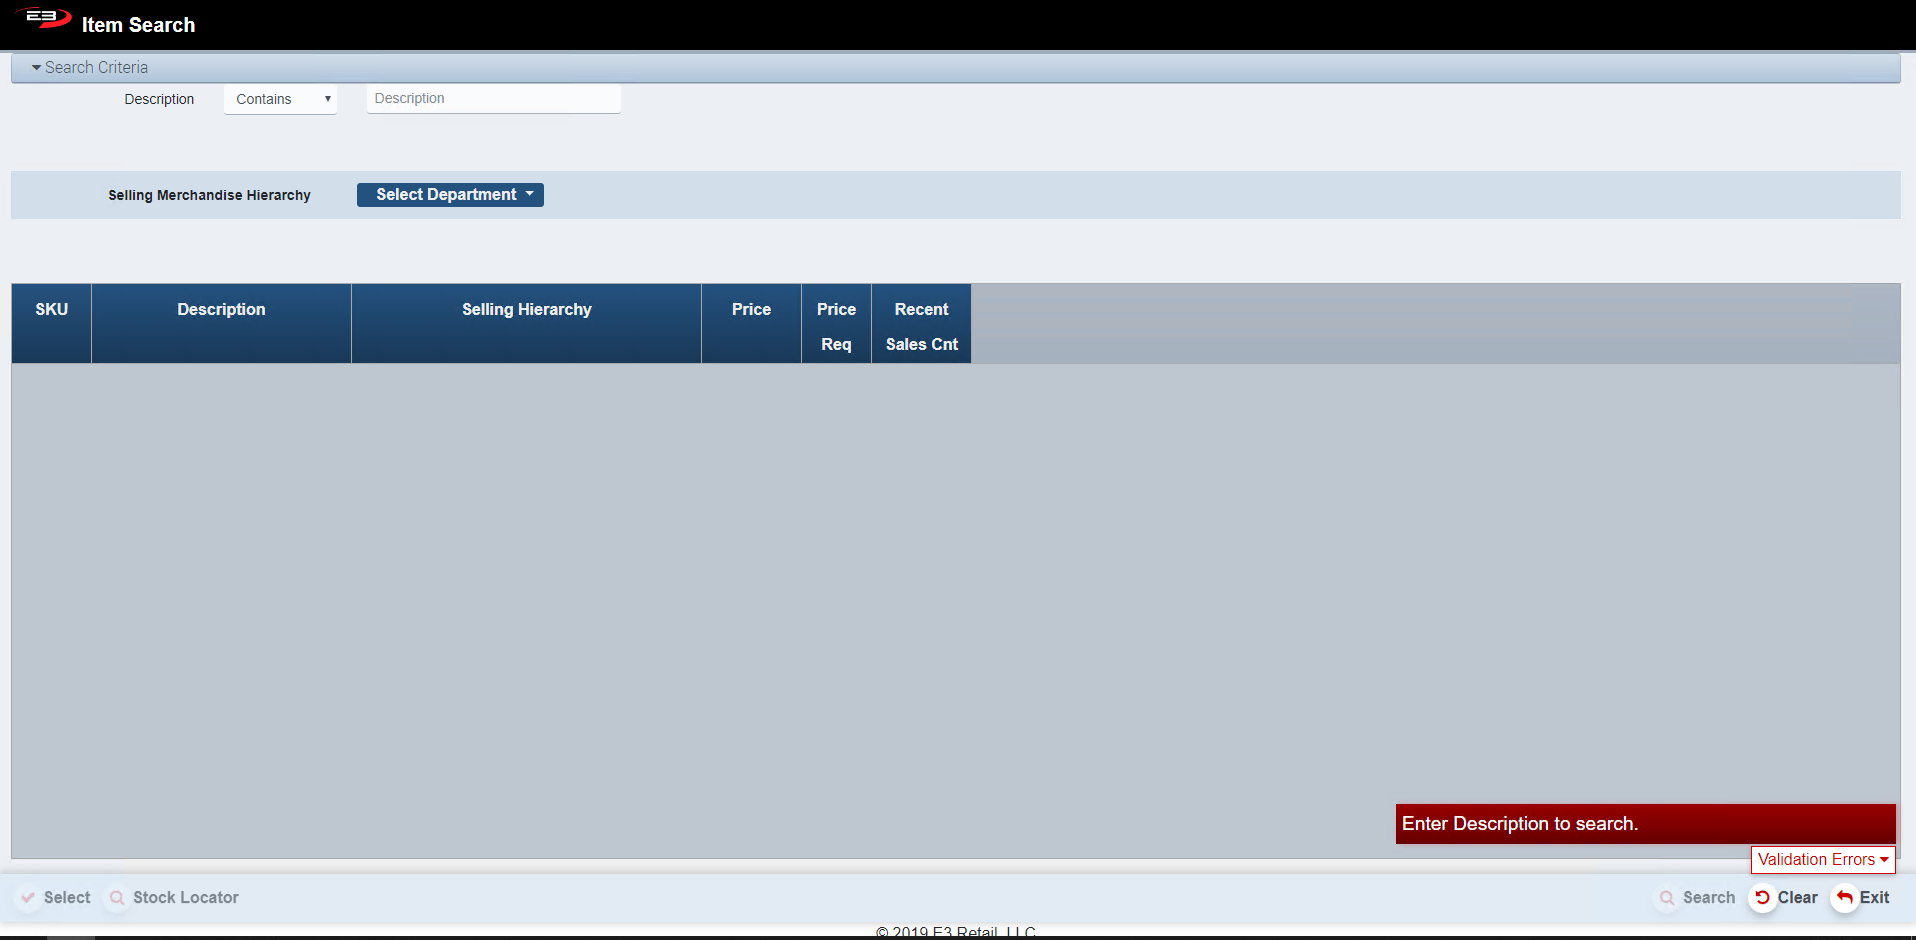
Item Search
The Item Search buttons allows you to search for an item by its Description therefore limiting results.
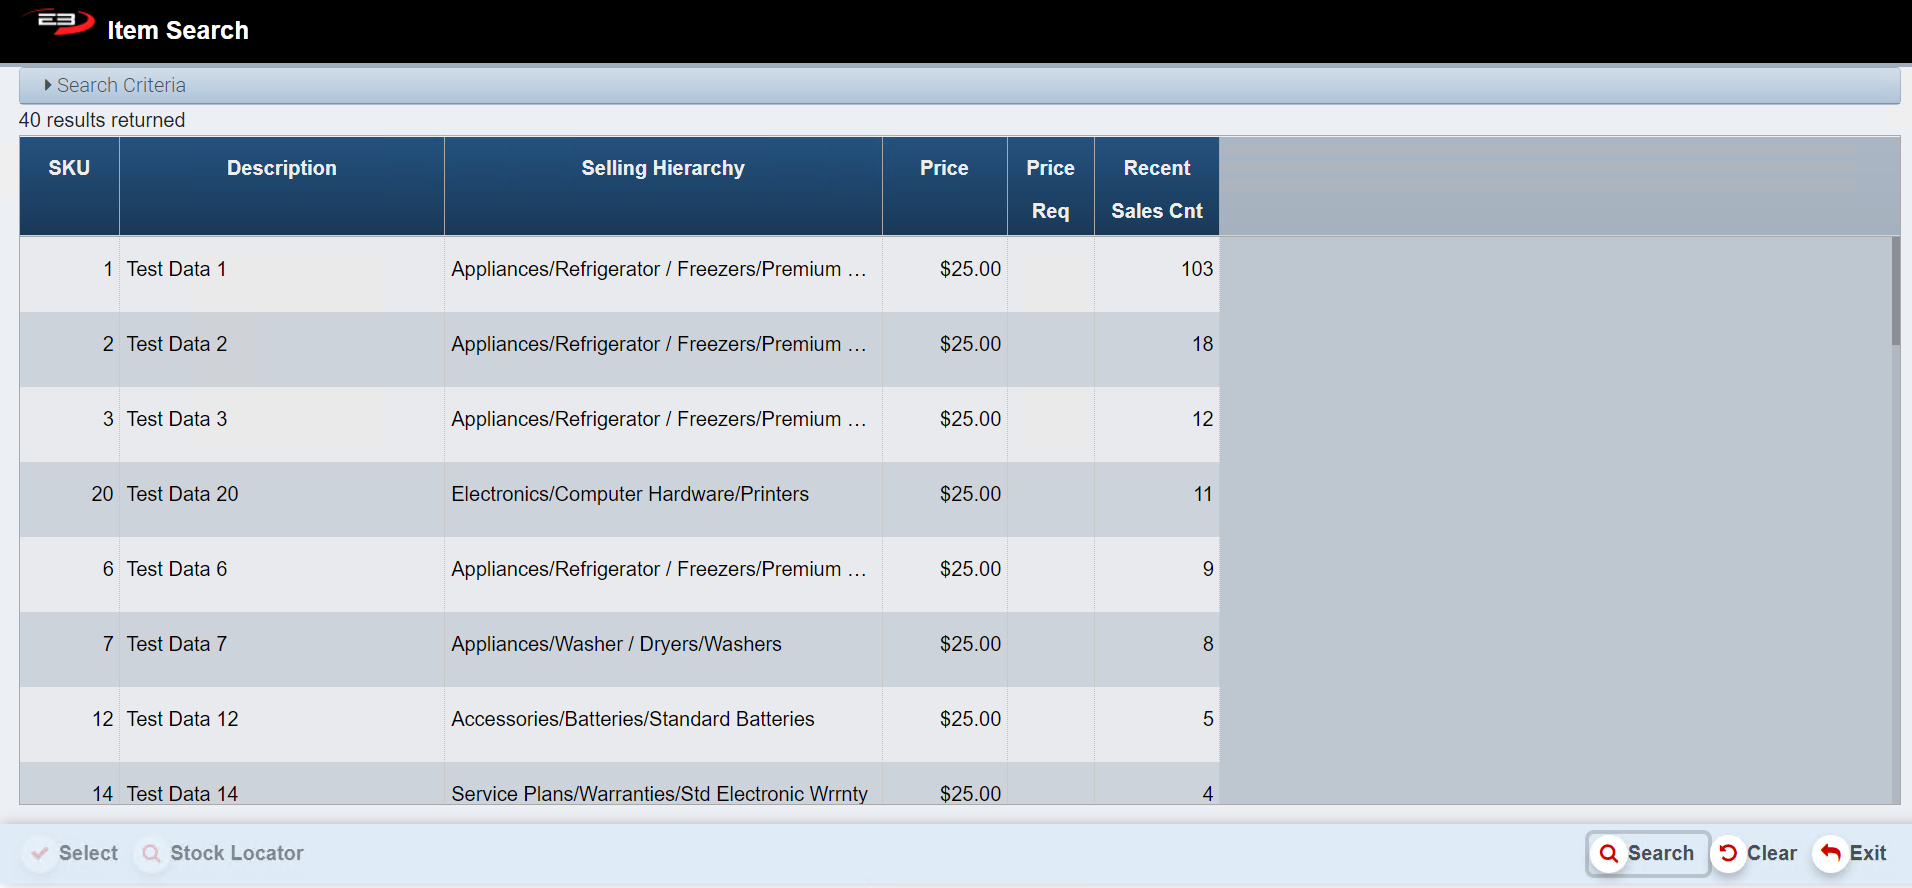
From the Item Entry Screen, click Item Search– the following screen appears.
Screenshot of the Point of Sale application.
The searched description must be a length of at least 3 letters otherwise a Validation Error message is displayed.
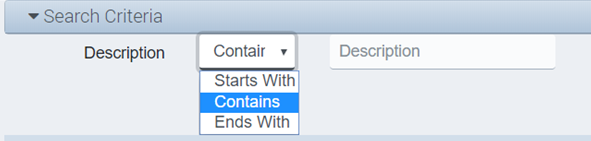
Select any of the below commands and enter in your Description to search for results.
Screenshot of the Point of Sale application.
The register gives the option of using the Selling Merchandise Hierarchy to limit your results further.
This function, as explained in the previous SKU Lookup section, allows you to search for a product by its Department/Class/Subclass.
Screenshot of the Point of Sale application.
Entered in the above search criteria, select Search and a Results Table like the one below appears.
Screenshot of the Point of Sale application.
Results Table
The Results Grid contains the following fields:
SKU: The products Stock Keeping Unit Number
Description: Gives a brief description of the Product
Selling Hierarchy: Breakdown of the Products Merchandise Hierarchy
Price: the amount required for payment
Price Req: The price required flag (true or false)
Recent Sales Count: a count of the amount of stock the company has at this time of this individual SKU
Highlight a specific item to enable the Select button. Click Select, the register returns to the Item Entry Screen where a transaction can take place.
The Stock Locator function is used to identify other locations (stores, distribution centers, etc.) where the item is currently in stock**.**
Click Clear to clear any results and to reset the search criteria back to their default values.
Click Exit, the register returns to the Item Entry Screen.
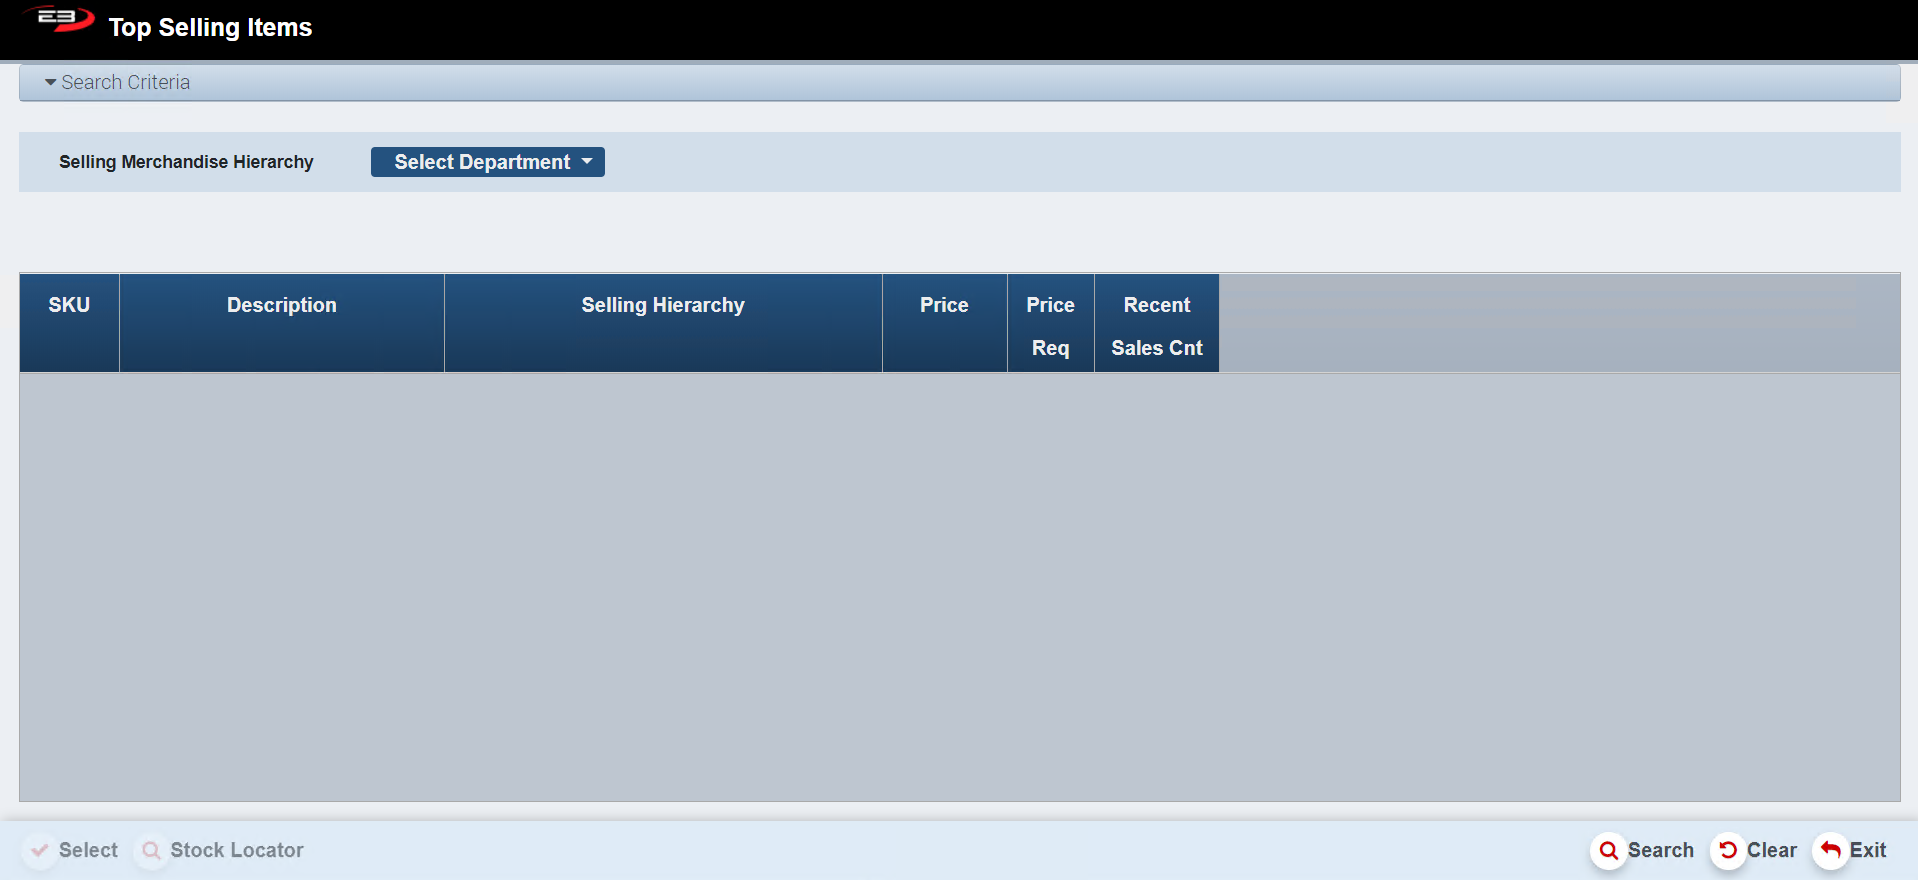
Top Selling Items
The Top Selling Item function allows you search for the Top Selling SKU’s by a using the Sales Merchandise Hierarchy.
From the Item Entry Screen, click on Top Selling Items – the following screen appears.
Screenshot of the Point of Sale application.
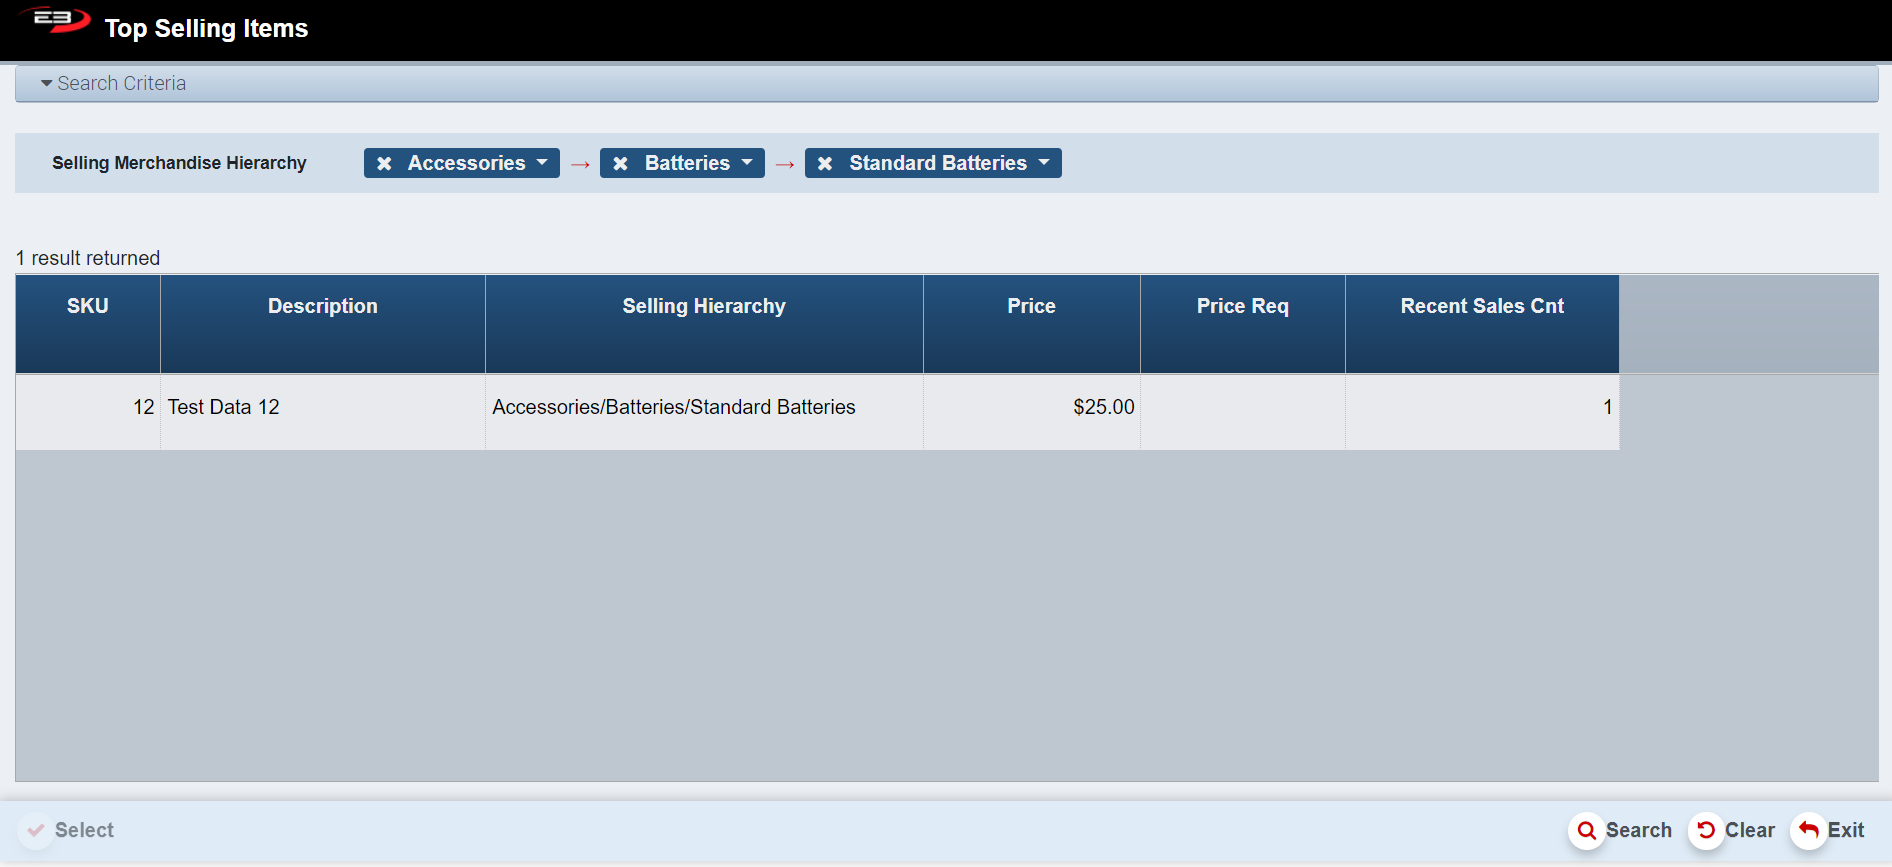
This function, as explains in the previous SKU Lookup section, allows you to search for a product by its Department/Class/Subclass.
Screenshot of the Point of Sale application.
Enter in the above Search Criteria, select Search and a Results Table like the one below appears.
Screenshot of the Point of Sale application.
Results Table
The Results Grid contains the following fields:
SKU: The products Stock Keeping Unit Number
Description: Gives a brief description of the Product
Selling Hierarchy: Breakdown of the Products Merchandise Hierarchy
Price: the amount required for payment
Price Req: The price required flag (true or false)
Recent Sales Count: a count of the amount of stock the company has at this time of this individual SKU
Highlight a specific item to enable the Select button. Click Select, the register returns to the Item Entry Screen where a transaction can take place.
The Stock Locator function is used to identify other locations (stores, distribution centers, etc.) where the item is currently in stock**.**
Click Clear to clear any results and to reset the search criteria back to their default values.
Click Exit, the register returns to the Item Entry Screen.
Coupon
From the Item Entry Screen, click the Coupon button – the following screen appears.
Screenshot of the Point of Sale application.
All coupons on the system show up in the Results Table as seen above.
When the search criteria are set as desired, click Search.
Results can be limited by either entering the Coupon Number, a Description of the Coupon and/or by using the Start and End Date and selecting Search.
Highlight the Coupon being applied to the sale and click Select.
The applied Coupon shows up in the Transaction Tab on the Item Entry Screen as seen below.
Screenshot of the Point of Sale application.
Stock locator
Navigate to the “Stock Locator” button through SKU Lookup, Item Search and Top Selling Item – all these functions are located on the Item Entry Screen.
The Stock Locator function is used to identify other locations (stores, distribution centers, etc.) where the item is currently in stock**.**
The search criteria (see below) shows information on the SKU being located.
Screenshot of the Point of Sale application.
Enter in “City” and/or “State” to limit the search results.
The search criteria “SKU or PLU”, “Item Description” and “Store Stock on Hand” cannot be edited in the Stock Locator function. Note: to edit these, select Exit and choose alternate search criteria.
Click Search. The following Results Table appears, as shown below.
Screenshot of the Point of Sale application.
Click Exit, the register returns to the previous function.
Click Clear to clear any results and to reset the search criteria back to their default values.
Customer
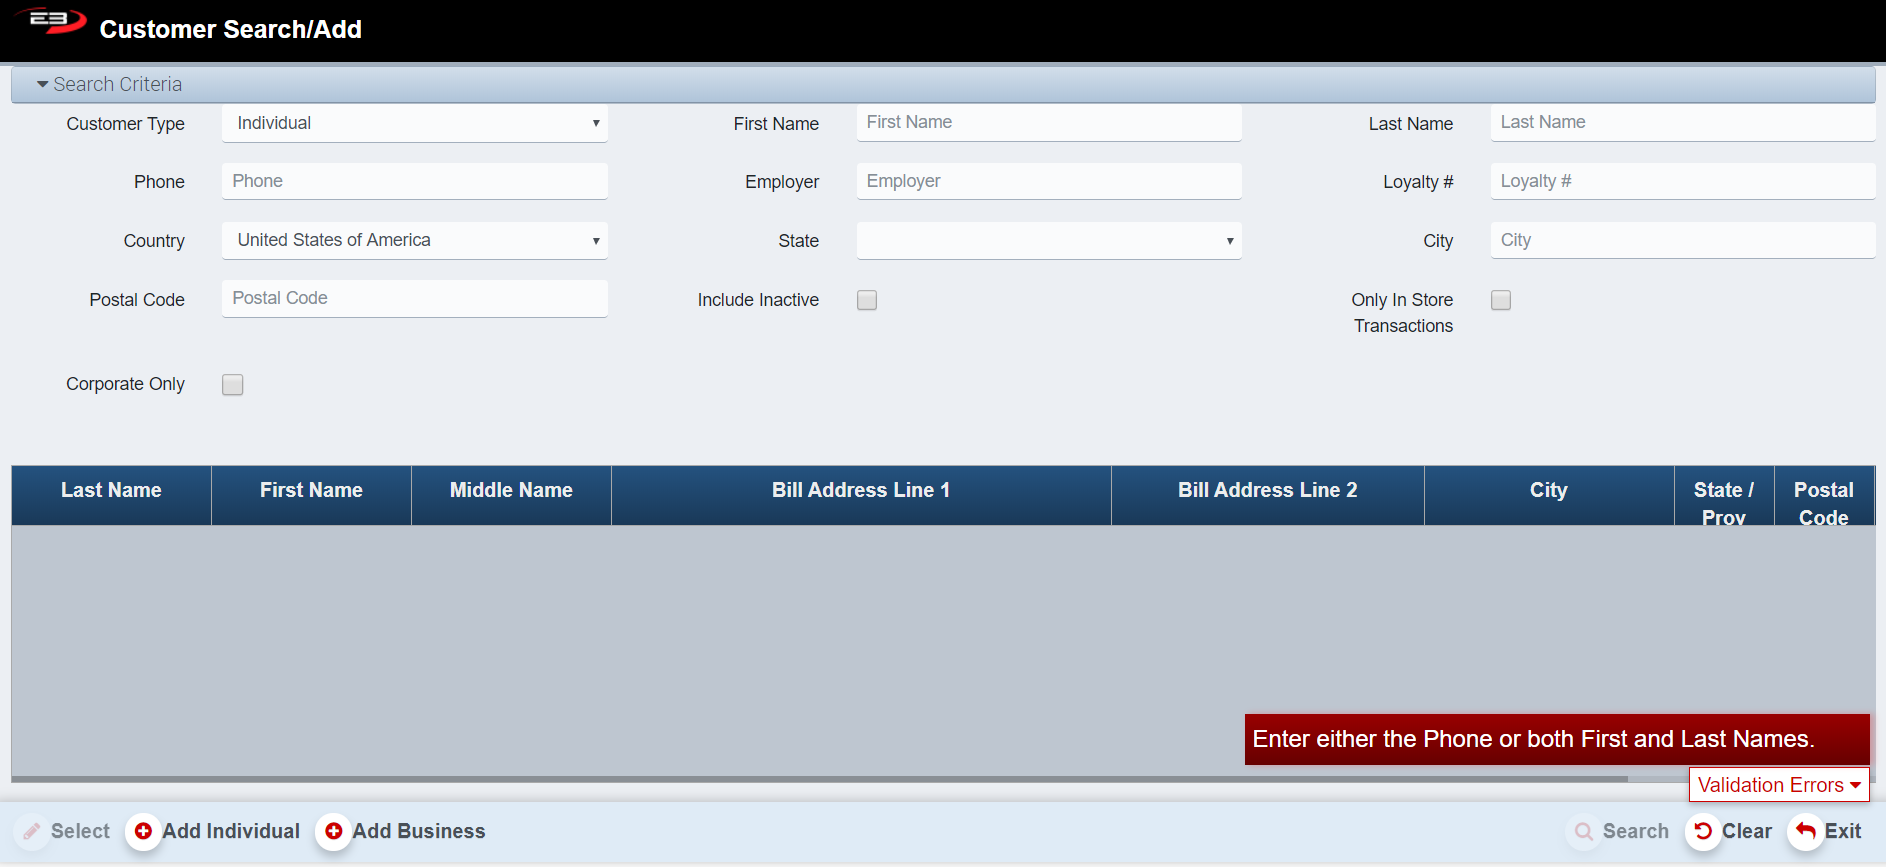
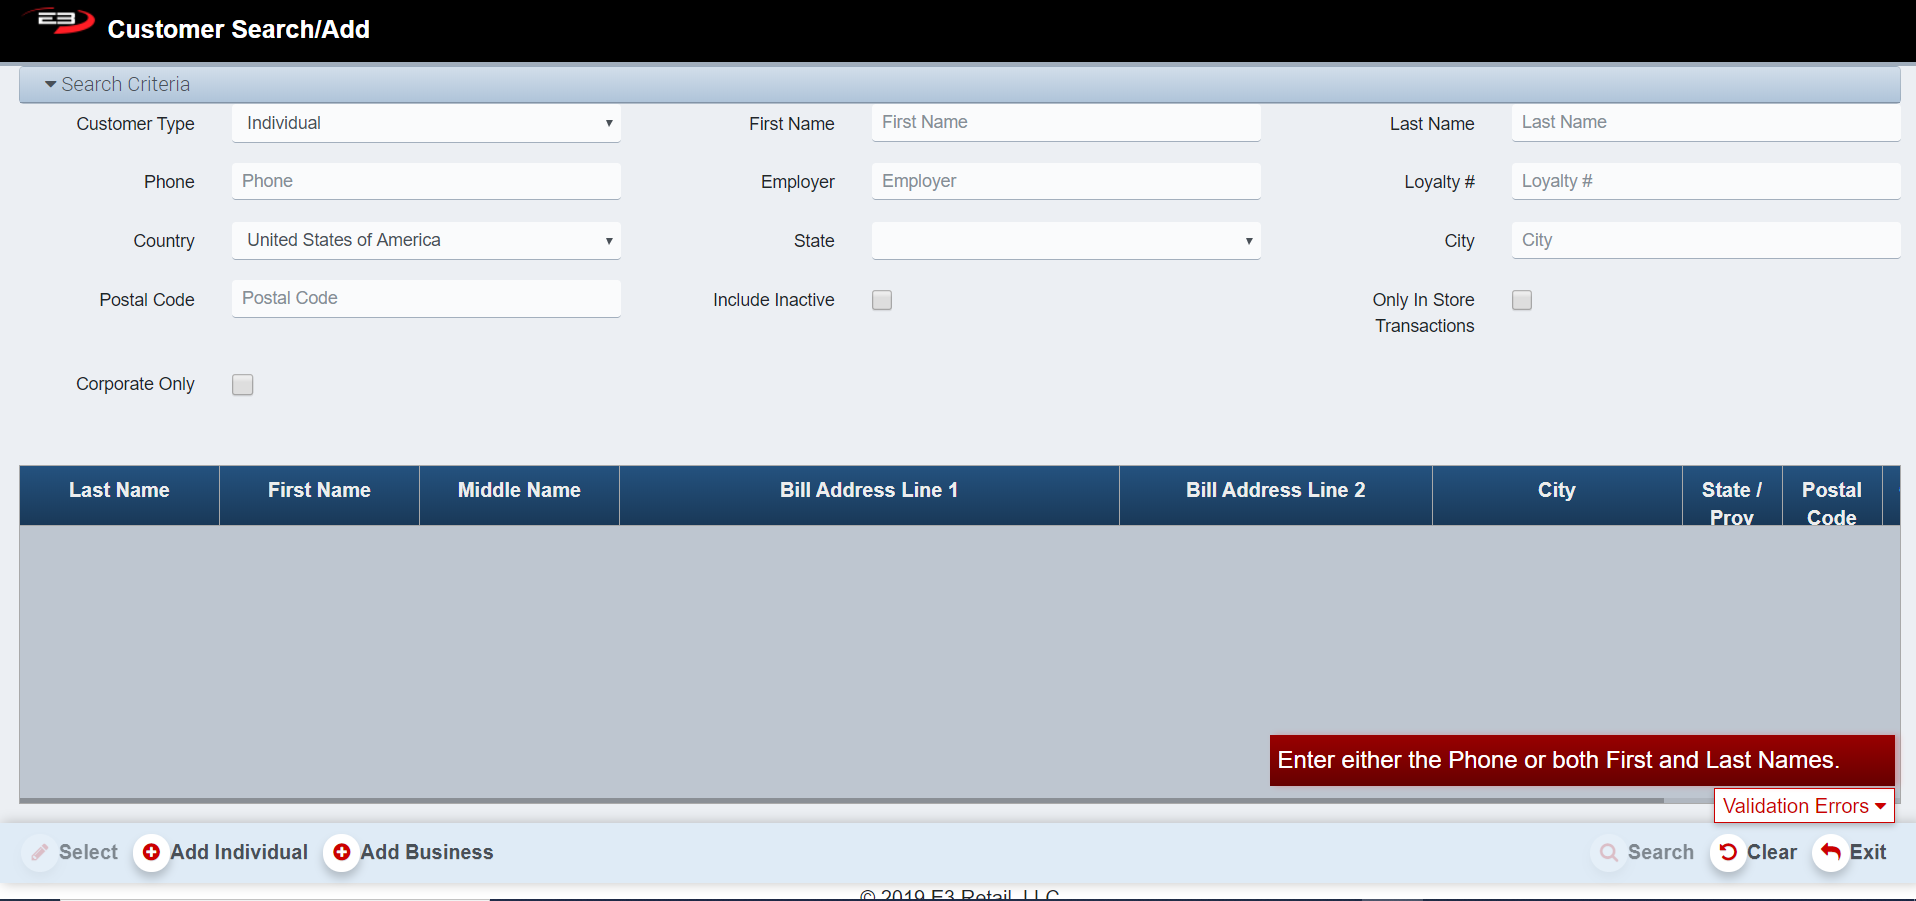
From the Item Entry Screen, click the Customer button – the following screen appears.
Screenshot of the Point of Sale application.
The Customer Search screen defaults to the Customer Type: Individual hence if searching for a business use the dropdown box to change Individual to Business.
To enable the search button, enter in either the individuals phone number or first and last**.** name. This removes the validation error.
Click Search –a results screen like the one below appears.
Screenshot of the Point of Sale application.
Adding a Customer to a Transaction
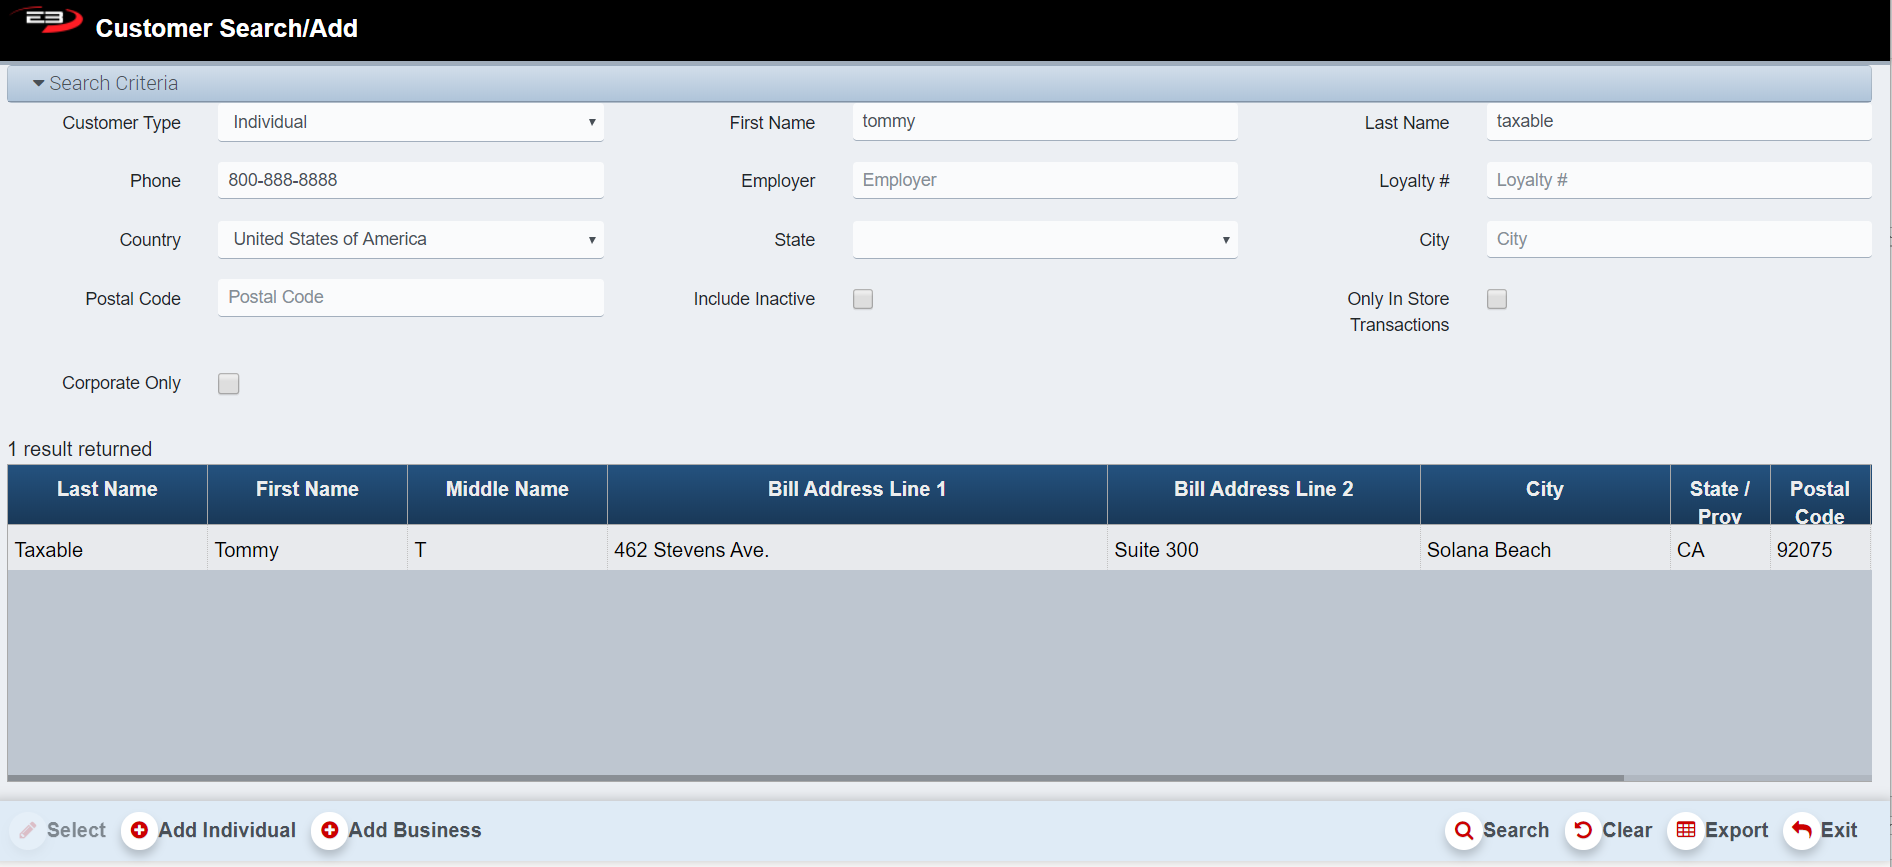
Enter in the Customer’s Name or Phone Number into the search screen and click Select (Note: to add a business change “Customer Type” to “Business”).
Select the Confirm Selection button at the bottom left corner of the register’s screen.
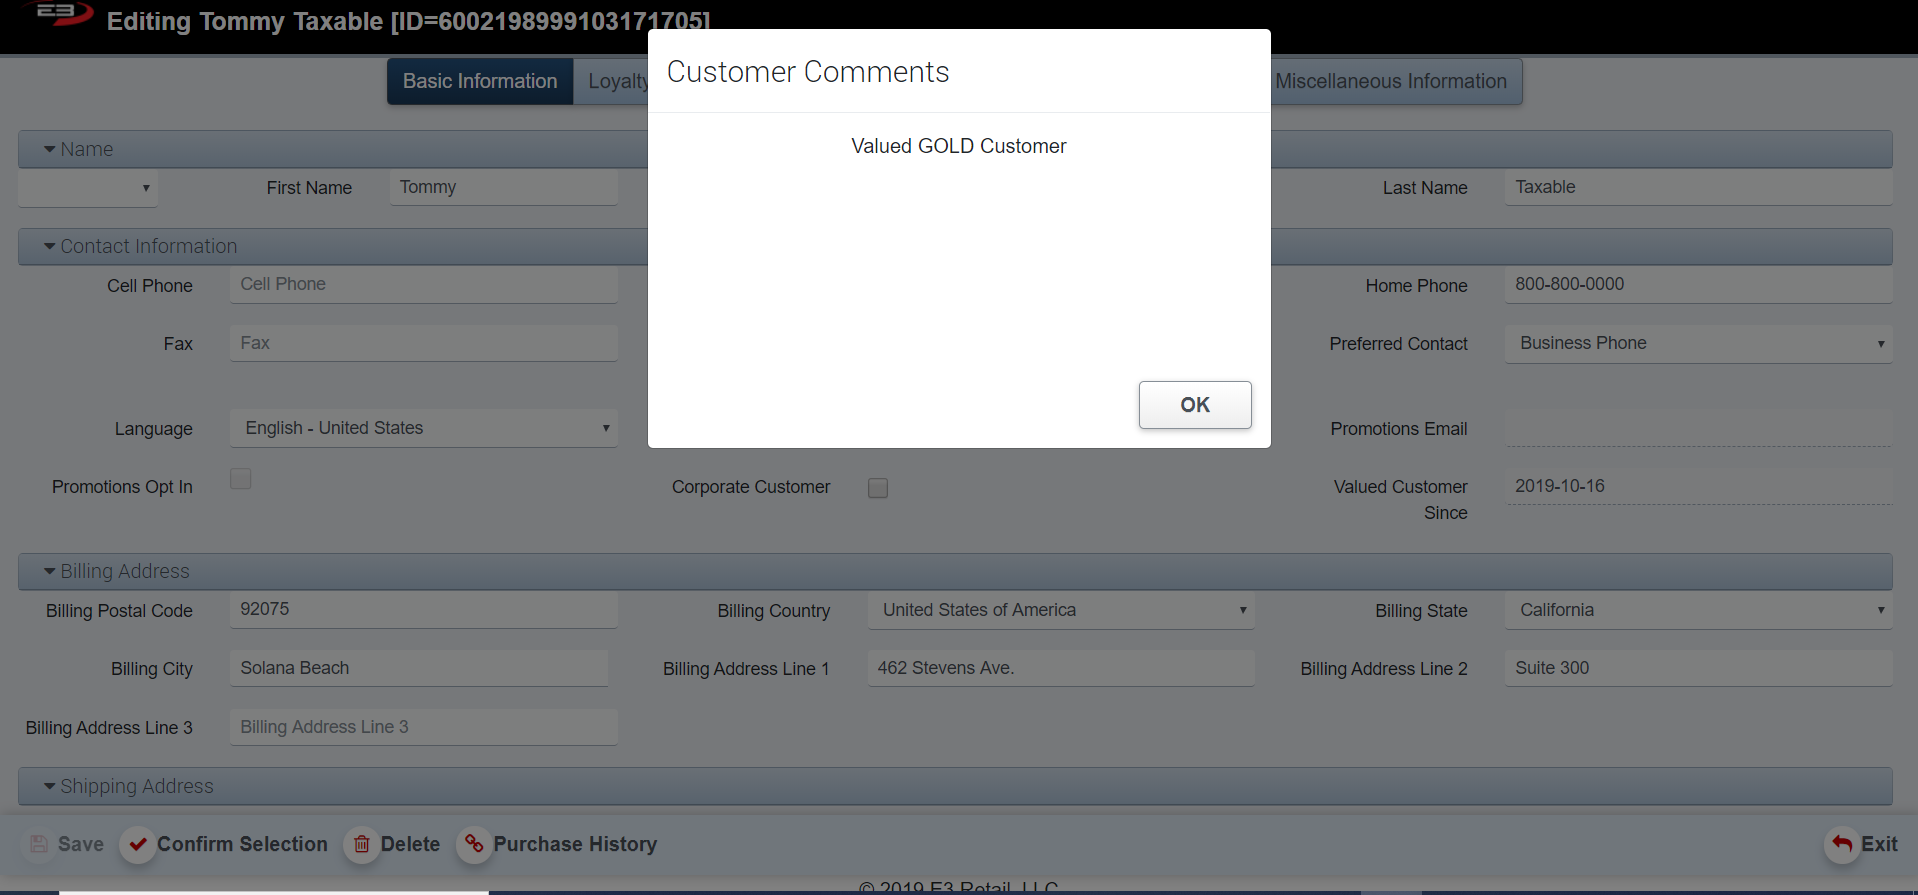
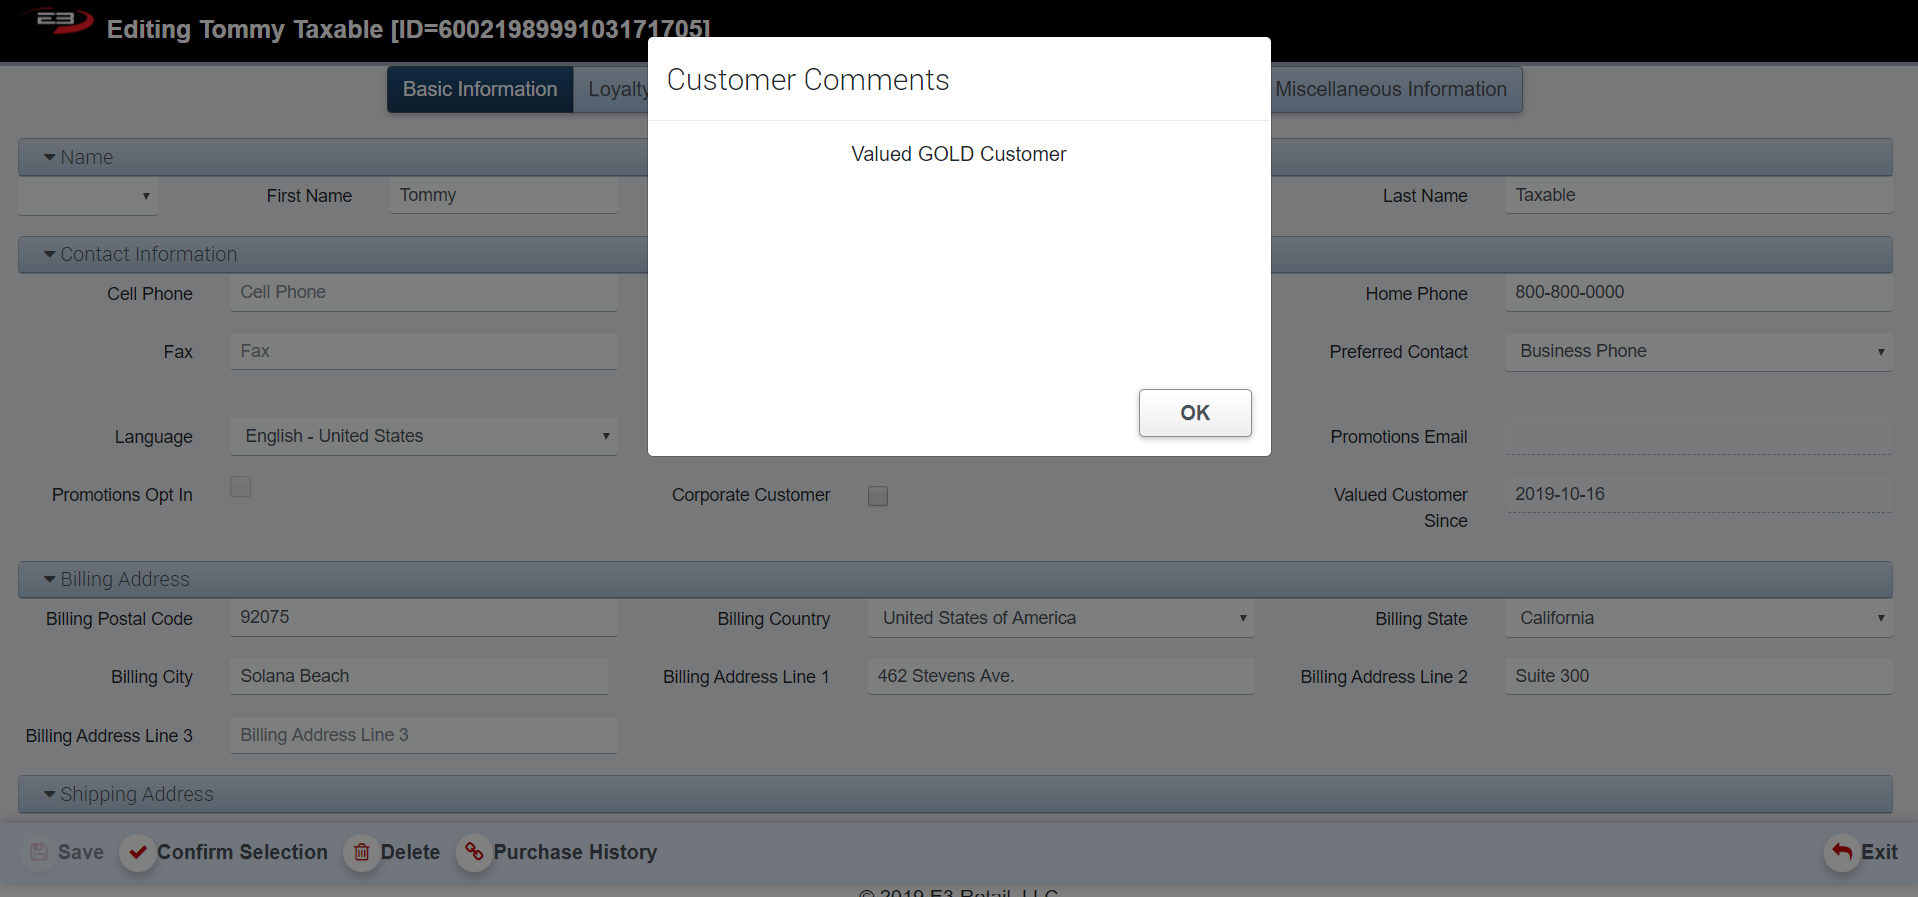
When a customer is selected on the register, any comments on their profile are displayed in a pop-up window.
The customer’s name appears in the POS Title Bar above the keypad (see below).
If the customer has any loyalties attached to his account, they now apply to the transaction. These loyalties still apply even if the customer is changed throughout the transaction.
Screenshot of the Point of Sale application.
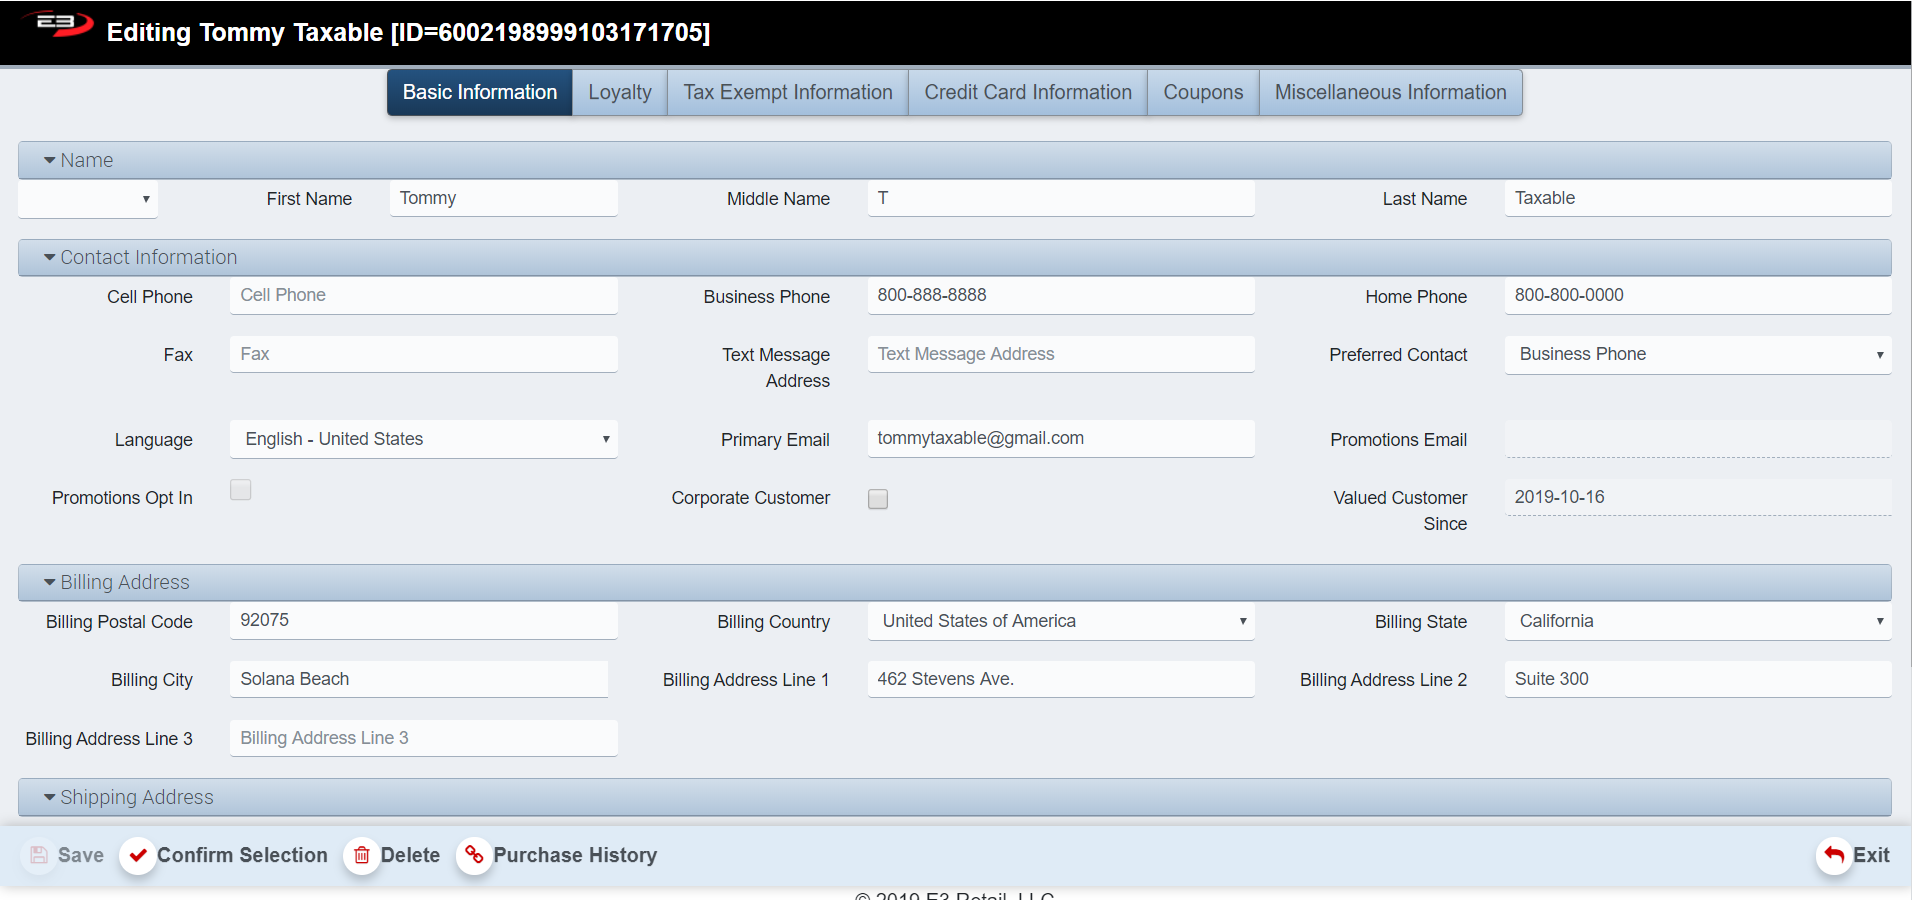
Editing/Deleting a Customers Profile
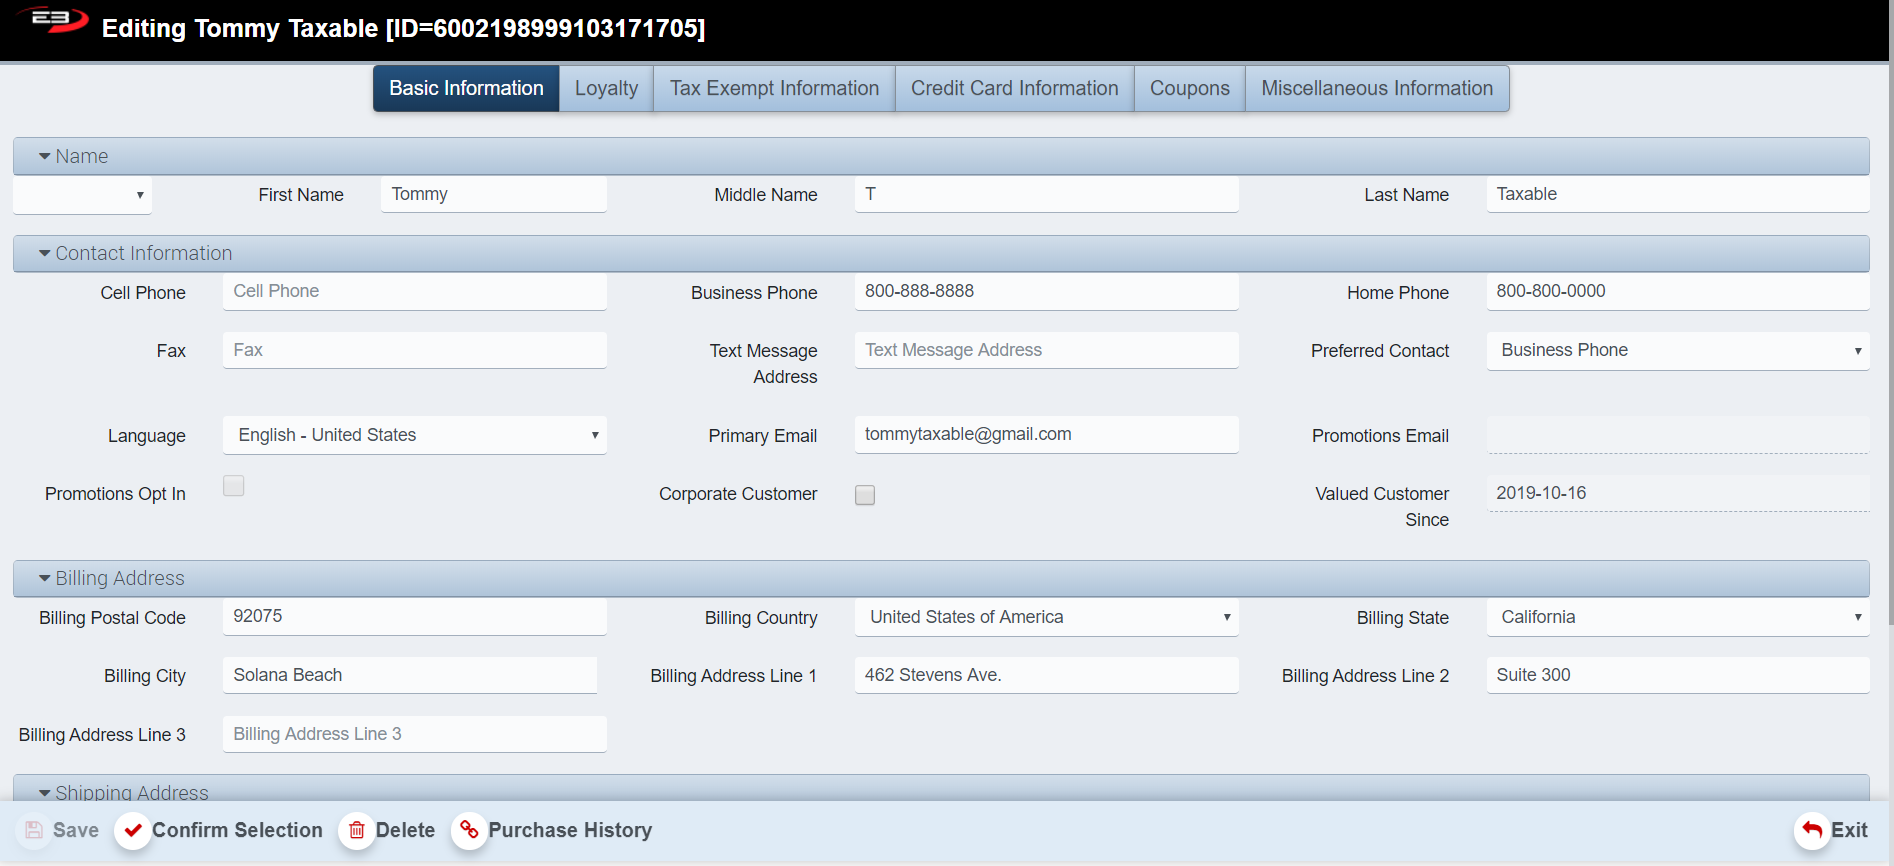
To Edit or Delete a customer’s profile, enter in the customer’s name or phone number in the search screen and click Select (to edit or delete a business change “Customer Type” to “Business”).
Highlight their name and click Select – the following screen appears.
Screenshot of the Point of Sale application.
To edit or add to an Individuals profile, enter in the information into the designated boxes and click Save (see Enterprise Customer Maintenance User Guide for more in detailed guidelines).
To delete the individual’s profile, click Delete.
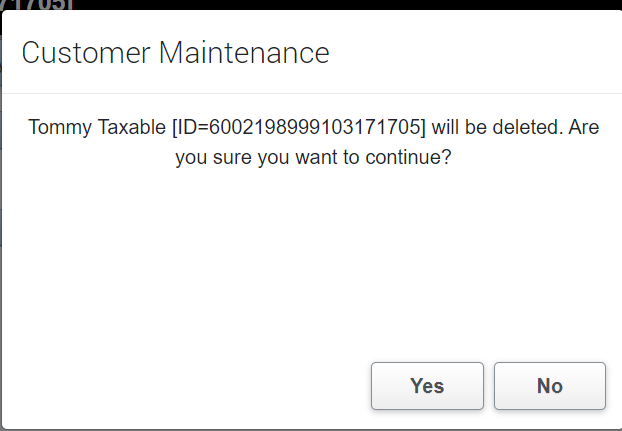
The below Confirmation Dialog appears asking you to confirm deleting the profile.
Click Yes to continue or No to return to the Editing Customer Screen (Note: Once this is verified, it cannot be undone).
Screenshot of the Point of Sale application.
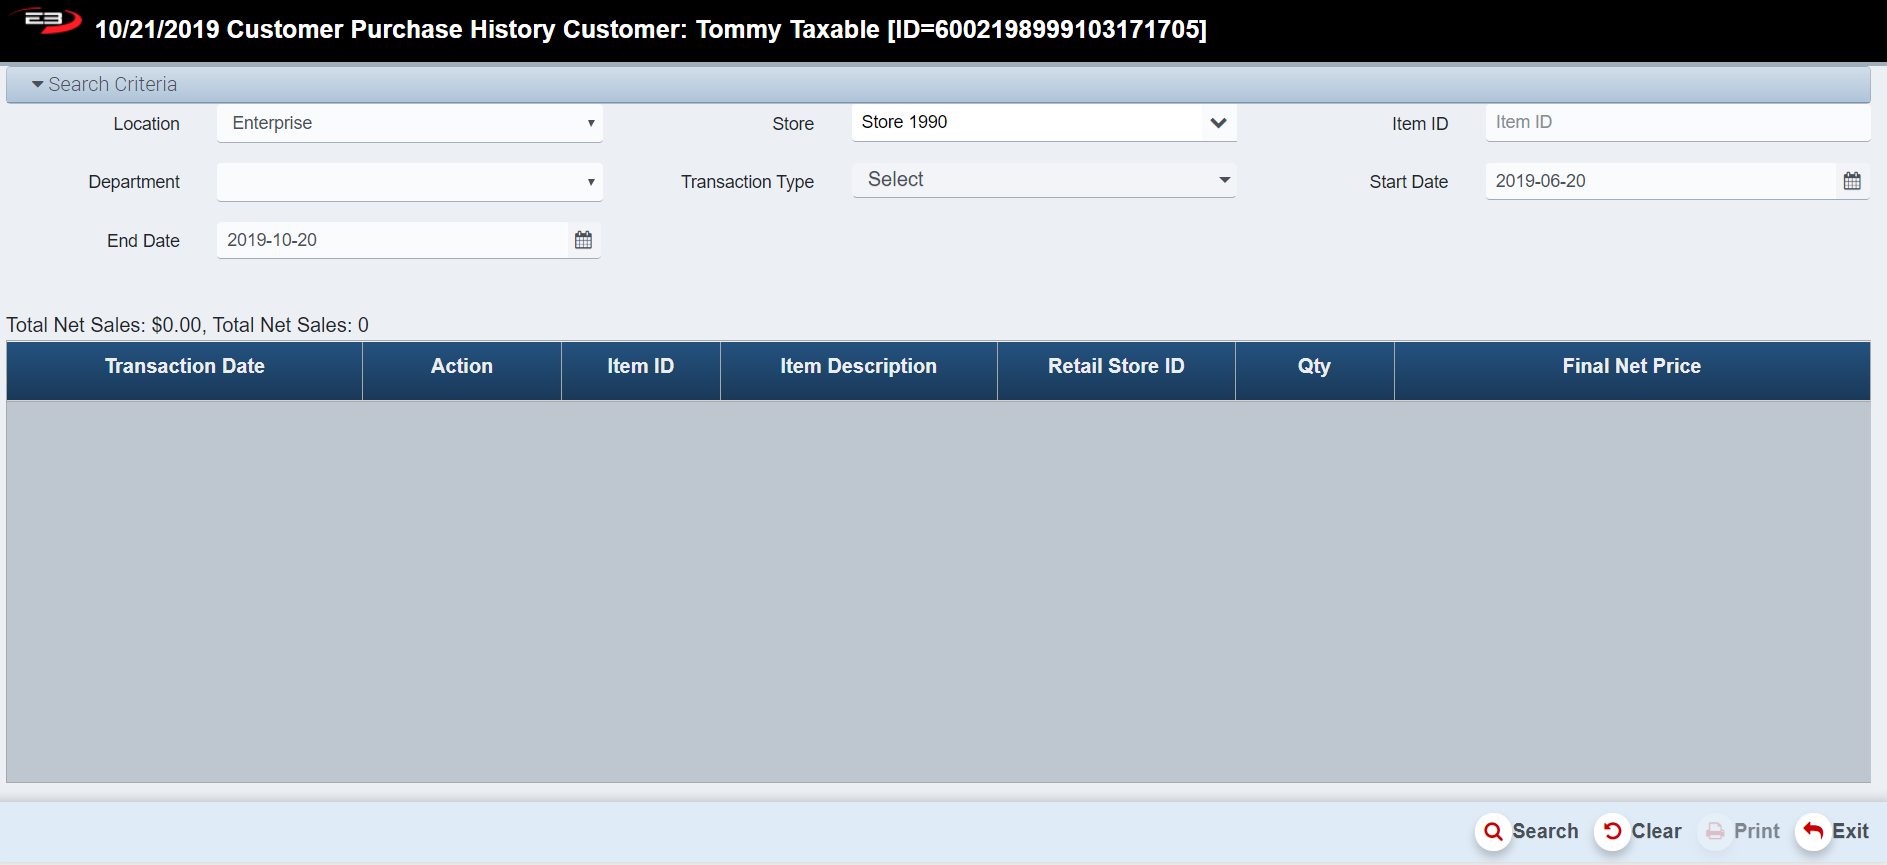
View Customers Purchase History
Enter in the Individuals name or phone number in the customer search screen and click Select (Note: To view the purchase history of a business, change the “Customer Type” to “Business”).
Highlight the customer’s name and click Select.
Select Purchase History - the following screen appears.
Screenshot of the Point of Sale application.
Enter in results for the search criteria to limit the results.
Click Clear to reset the search criteria back to their default values.
The Print function allows the user to save the report as an Acrobat PDF file for viewing/printing in Adobe Acrobat Reader. Once you have a result set that’s filtered as desired, click the Print button.
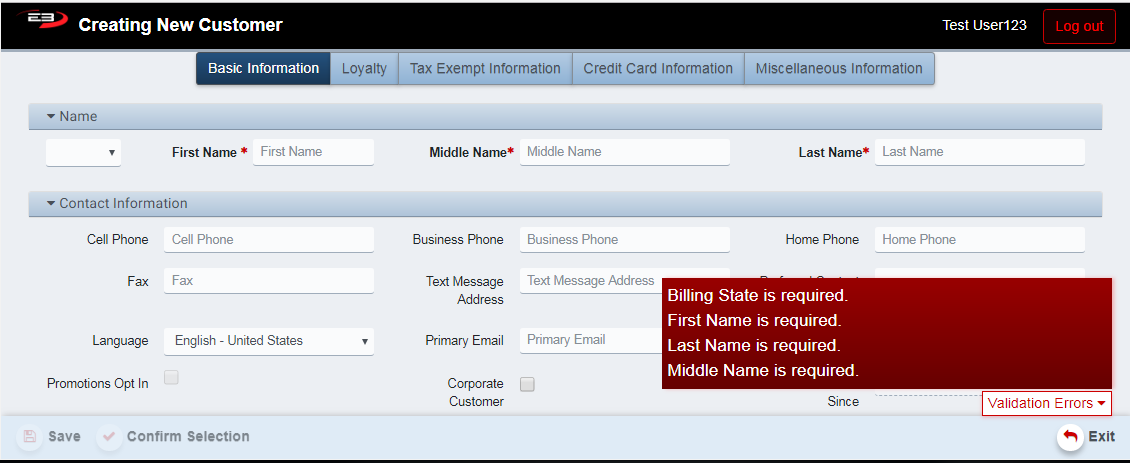
Add Individual Customer
To add an Individual customer, click the Add Individual button in the main customer search screen.
The following Creating New Customer Screen that looks like this appears:
Screenshot of the Point of Sale application.
Required fields are First Name, Middle Name, Last Name, and Billing State.
All other fields are optional for adding an Individual customer.
See Enterprise Customer Maintenance User Guide, Section 5- Common Tabs for entering information on the remaining tabs.
When you are finished adding the individual customer, click Save to save your new individual customer.
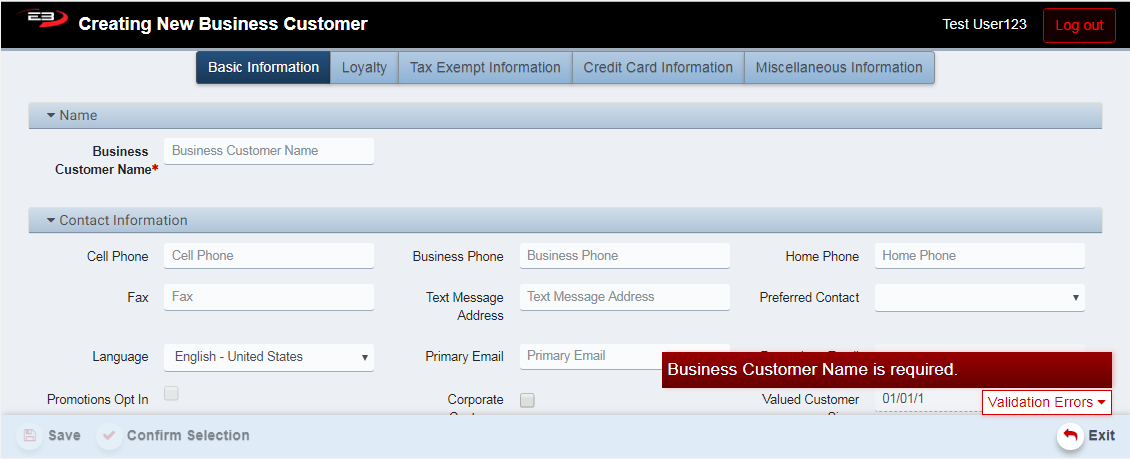
Add Business Customer
The process for adding and editing a Business customer is very similar to the Individual customer processes. The main difference is the required fields
To add a Business customer, click the Add Business button.
The following Creating New Business CustomerScreen that looks like this appears:
Screenshot of the Point of Sale application.
The only required field is the Business Customer Name field.
All other fields are optional for adding a Business customer.
See Enterprise Customer Maintenance User Guide, Section 5- Common Tabs for entering information on the remaining tabs.
When you are finished adding the business customer, click Save to save your new business customer.
Export
The Export function allows the user to save the search results as a comma-separated values (CSV) file for use in Excel. Once you have a result set that’s filtered as desired, click the Export button. The file is saved as Customer_yyyy-m-d.csv in the default location, typically the Downloads folder for the user.
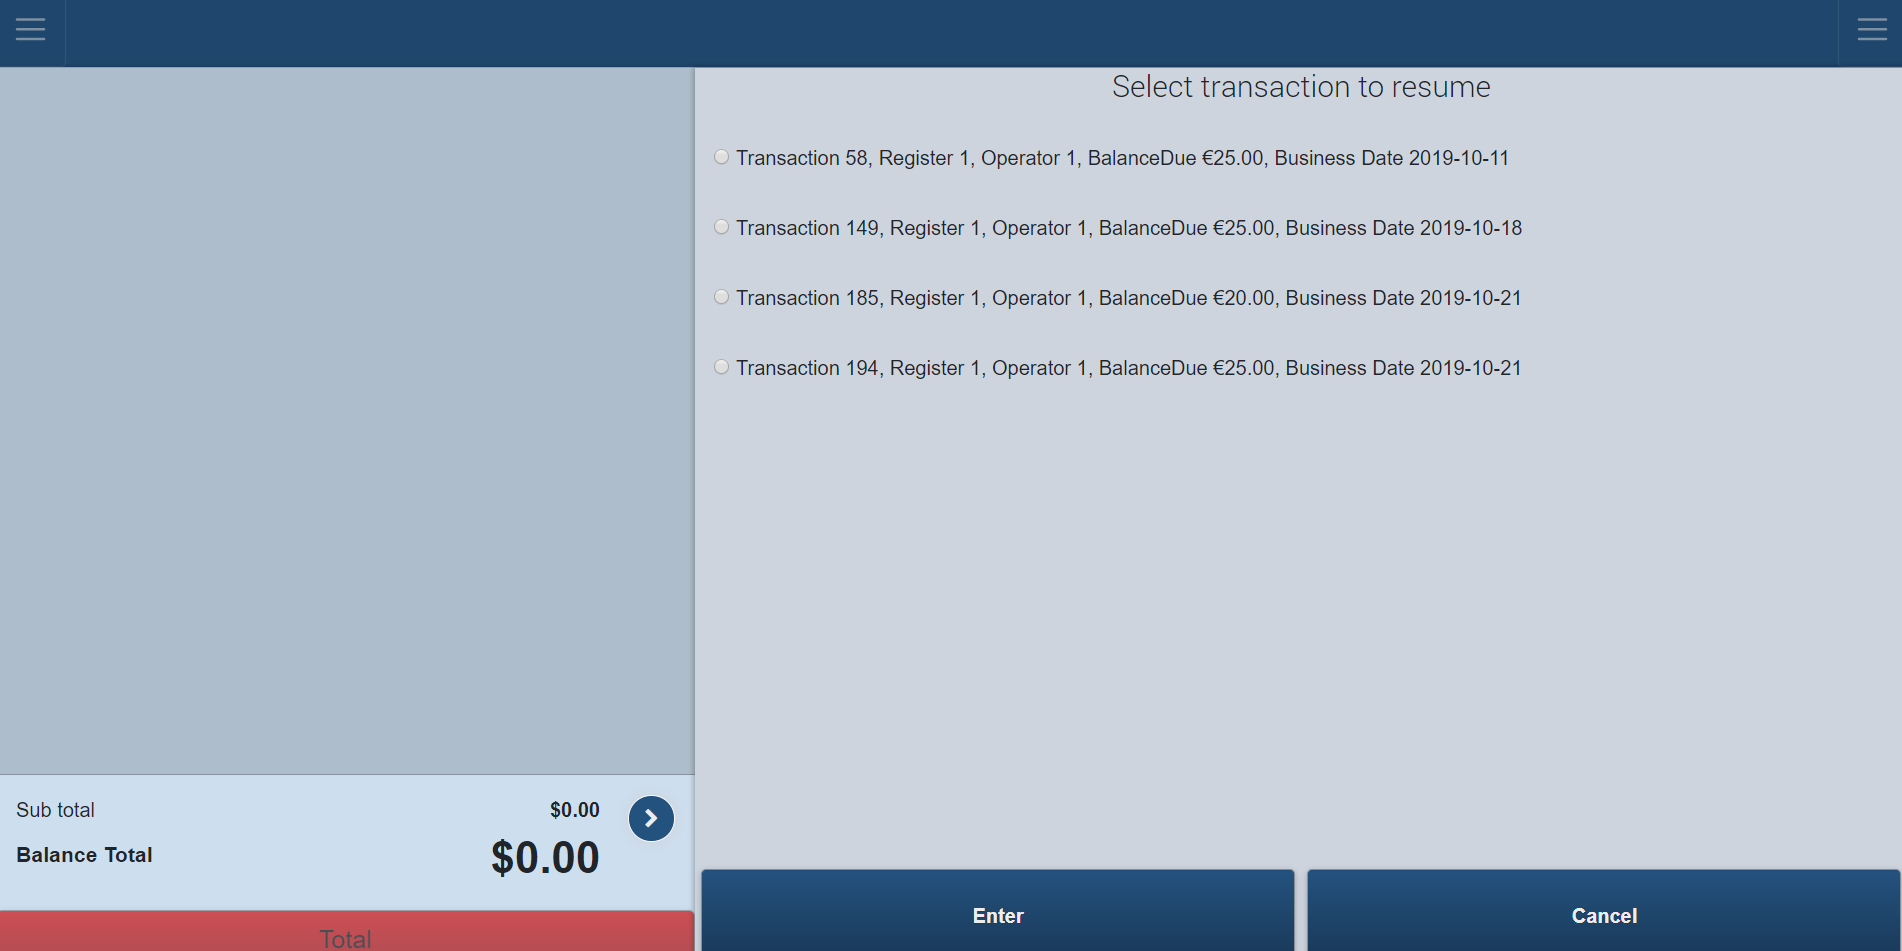
Resume/Suspend
The Resume/Suspend button is another function on the Item Entry Screen. Employees can use this function to suspend in-progress transaction and then resume them later.
The Resume/Suspend button changes from Resume/Suspended depending on the register’s performance. If you are in the middle of a transaction the button appears as Suspend. Once a transaction is in progress you can choose to suspend it.
From the Item Entry Screen, click the Suspend button – the following screen appears.
Suspended transactions should be resumed before the register is closed however; they can be carried over for X days where X is configurable depending on the store.
Screenshot of the Point of Sale application.
Two receipts print off. The receipts printed should be used to identify and recall the suspended transaction in the future.
The register returns to the Item Entry Screen.
On the Item Entry Screen, click the Resume button – the following screen appears with a list of all the suspended transactions on it.
Screenshot of the Point of Sale application.
Use the receipt printed previously to confirm the transaction number. Click the white circle beside the transaction and press Enter.
The register returns to the selected, previously suspended transaction.
Log Out
The Log Out Button logs the register off but does not close the register (Note: To close the register -Go to Item Entry Screen. Click the LeftSupportMenu- Admin -CloseResigeter).
From the Item Entry Screen, click the Log Out button – the following screen appears.
Screenshot of the Point of Sale application.
An employee should Log Out of the register whenever leaving the register for security reasons.
Clocking out for breaks etc. logs the register off automatically.
Logging Out returns the register to the Initial Log In Screen.
Left Support Menu
Customer Services
House Account
House Accounts are set up to allow customers to get the product now and pay later. Payments can be made on an account at any time through the Payment on House Account function.
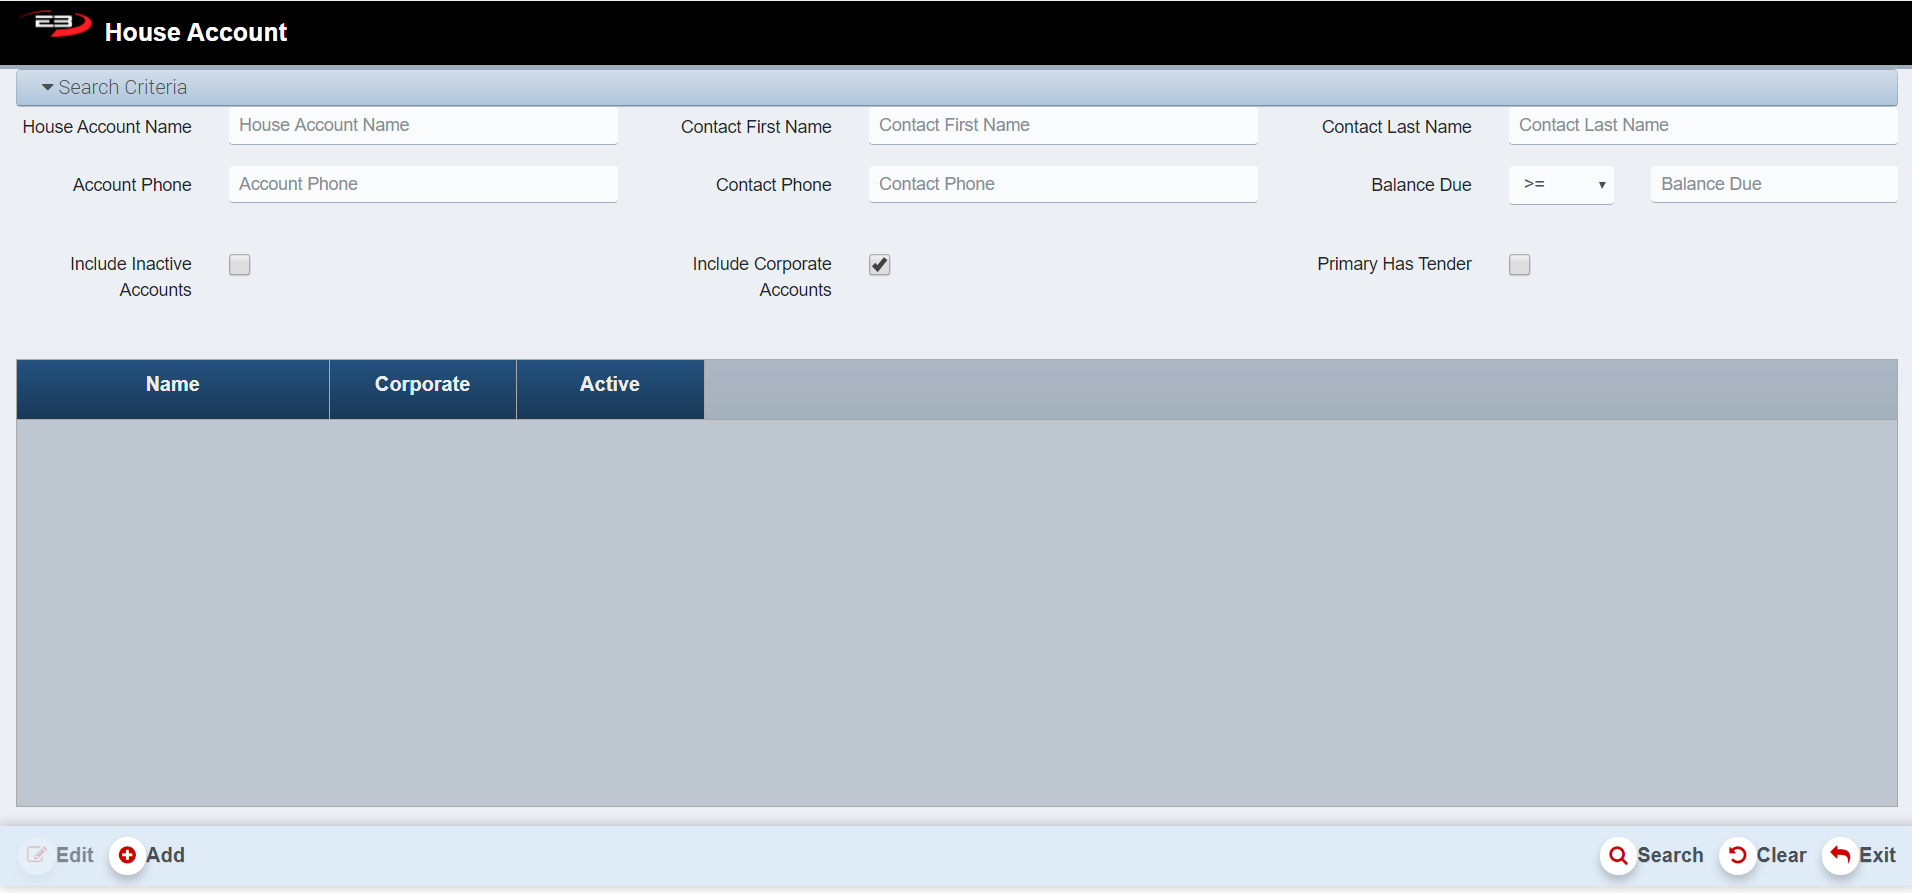
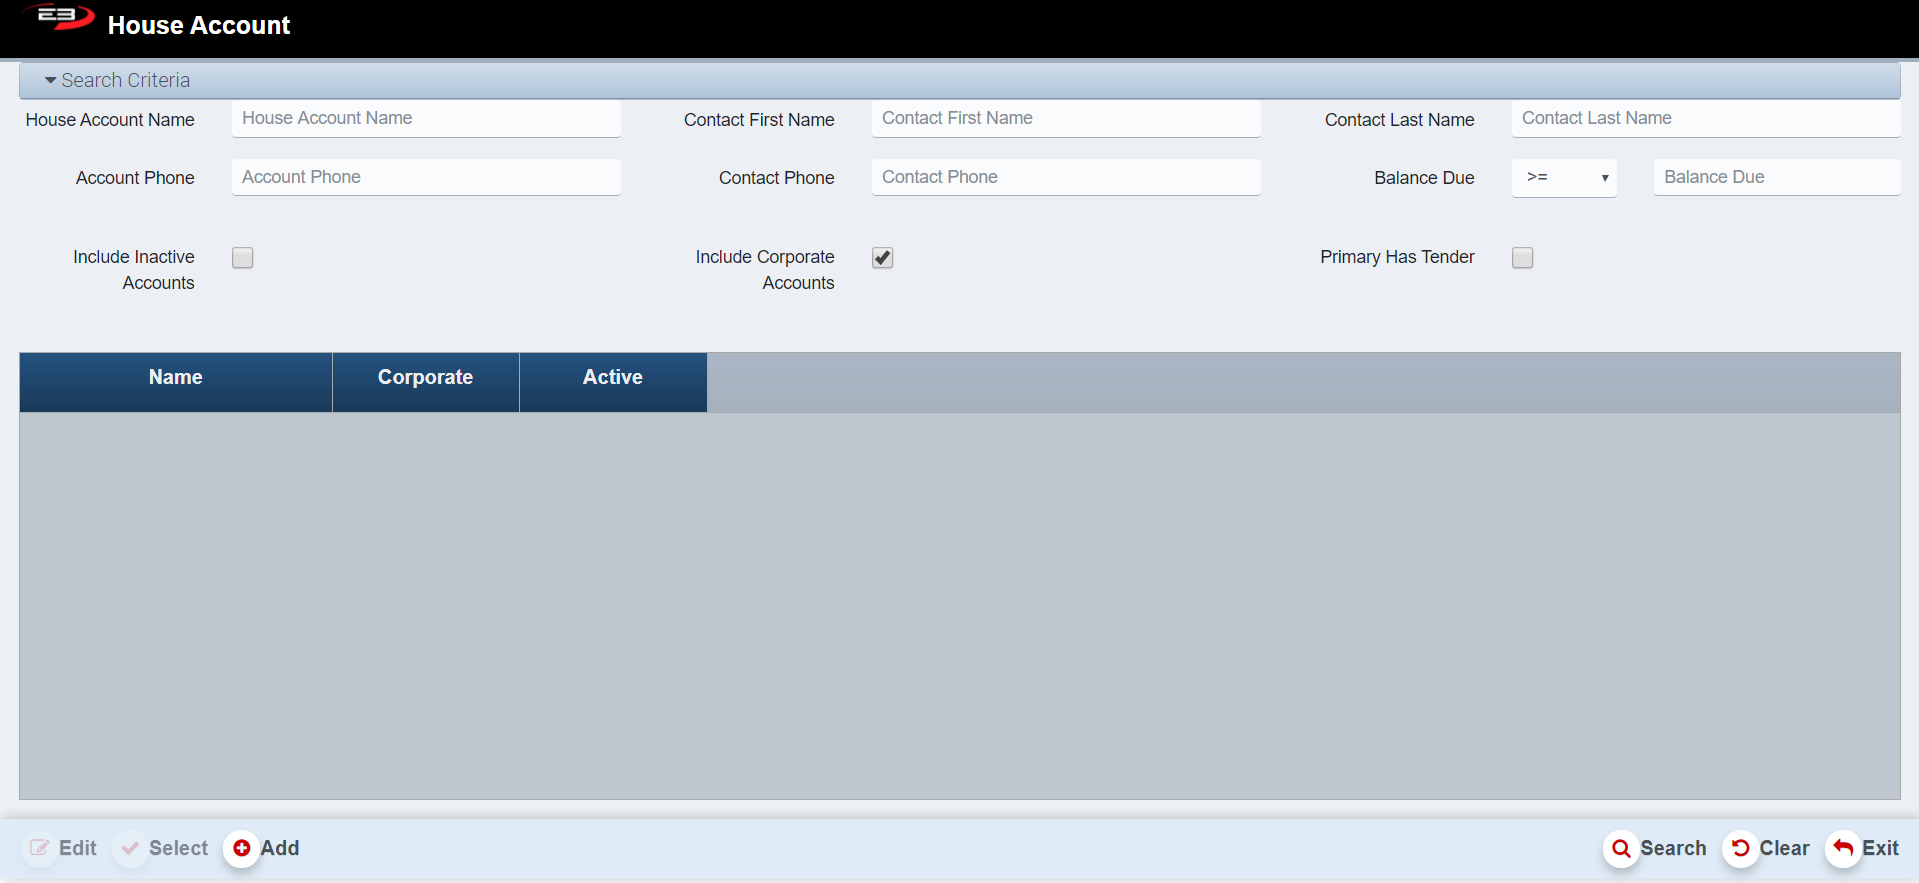
From the Item Entry Screen, click the Left Support Menu and select Customer Services/House Account - an initial search screen (like the one shown below) appears.
Screenshot of the Point of Sale application.
Adding A House Account
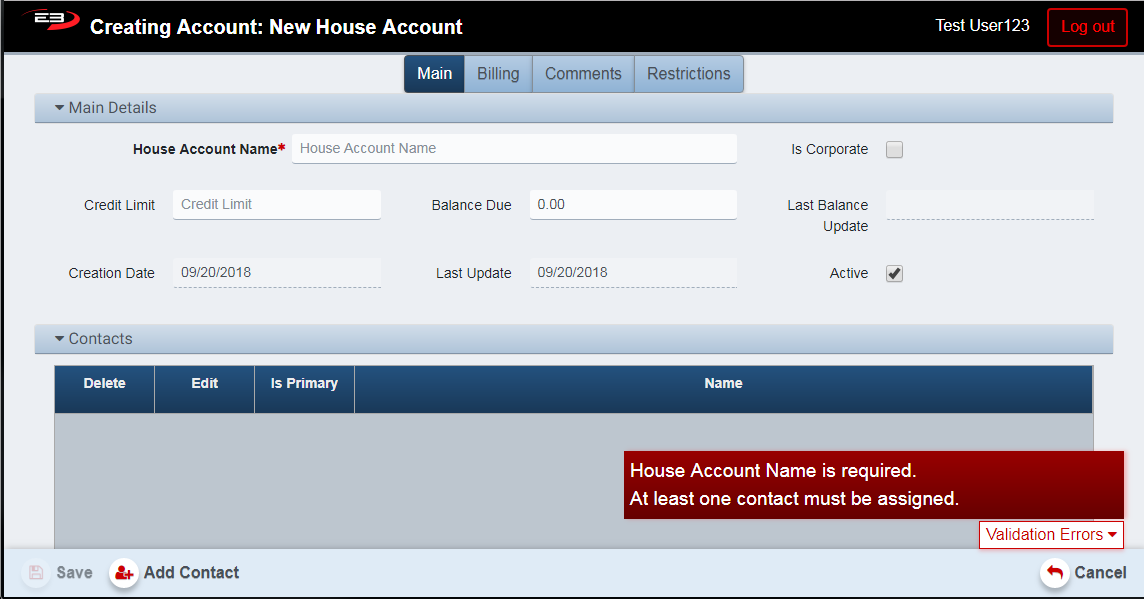
To add a house account, simply click on the Add Contact button at the bottom of the search screen. The House Account Creation Screen is displayed with the main tab selected.
Screenshot of the Point of Sale application.
The House Account Name is a required field, it must start with a letter, and is limited to 40 characters.
Check the Is Corporate box to make the house account visible to all stores, otherwise the house account will only be visible to the store on which it was created.
Enter an amount in the Credit Limit field to specify the maximum balance due before payment warnings are generated when the account charges exceed the limit. If this is not specified, the credit amount is unlimited.
The Balance Due field indicates how much is due on the account; you can enter this when creating the account, otherwise this is managed by the system that increases the value when charges are made and reduces the value when payments are made against the account.
The Last Balance Update field is read-only and indicates when the balance most recently changed by charging or making payments.
The Creation Date is read-only and indicates when the account was created.
The Last Update date is read-only and indicates when the account was last updated.
The Active option defaults to checked (the account is active), this can be changed to deactivate the account.
See section 3,4 and 5 of the Enterprise House Account Maintenance User Guide for information about the Billing, Comments and Restriction tab.
Adding A Contact to The Account
To add a contact to a house account, click the Add Contact button at the bottom of the screen.
At least one contact, designated as the primary contact, is required.
The Customer Search/AddScreen from Enterprise Customer Maintenance is displayed.
Enter either a phone number or the first two characters of both first and last names then click Search.
The list of customers matching the criteria is displayed.
Highlight the customer you with to add in the results and then click Select.
The record for the customer you wish to add is displayed.
You can make changes to the customer if needed and then click Save to save the updates.
Once you have the desired customer, click Confirm Selection to add the customer to the house account.
The contact list appears showing the primary contact.
When the contact selection has been confirmed, the Contacts list looks like this:
Screenshot of the Point of Sale application.
A contact can be deleted if it is not the primary contact by clicking the trash can icon under Delete.
A contact can be edited by clicking the pencil icon under Edit.
You can add additional contacts using the same process. and changing the Is Primary option as desired.
If only a single contact is present, it defaults to primary and you can’t change the Is Primary option.
If you have multiple contacts for this account, you can change the primary by clicking the Is Primary checkbox.
Payment on House Account –
From the Item Entry Screen, click the Left Support Menu and select Customer Services, Payment on House Account - an initial search screen (like the one shown below) appears.
Screenshot of the Point of Sale application.
Click Payment if the customer is simply paying money off their account.
The House Account Search Screen explained previously appears.
Screenshot of the Point of Sale application.
Enter in the name of the House Account and press Search.
Note: Edit and select are disable until a search has taken place.
Click the Clear button to clear all search fields.
Once the search has taken place, highlight the House Account and click Select.
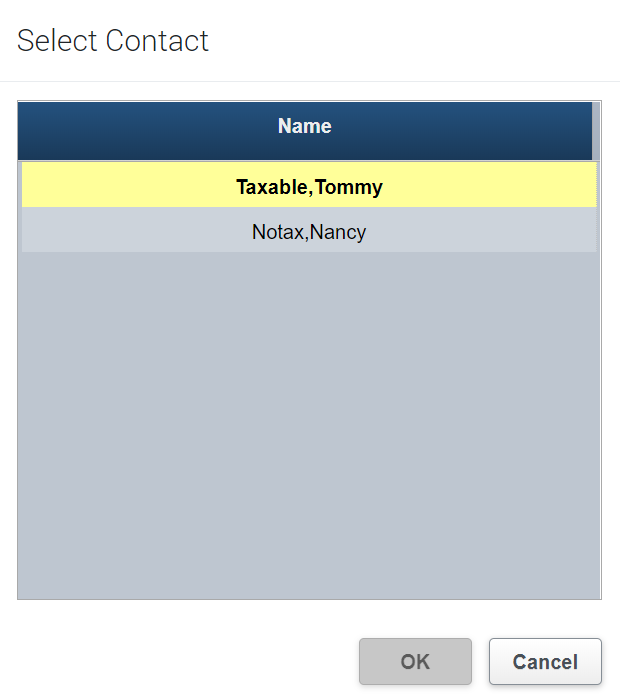
If the House Account has Contacts attached to it, the register prompts you to Select a Contact.
Screenshot of the Point of Sale application.
Highlight the relevant contact’s name and press OK.
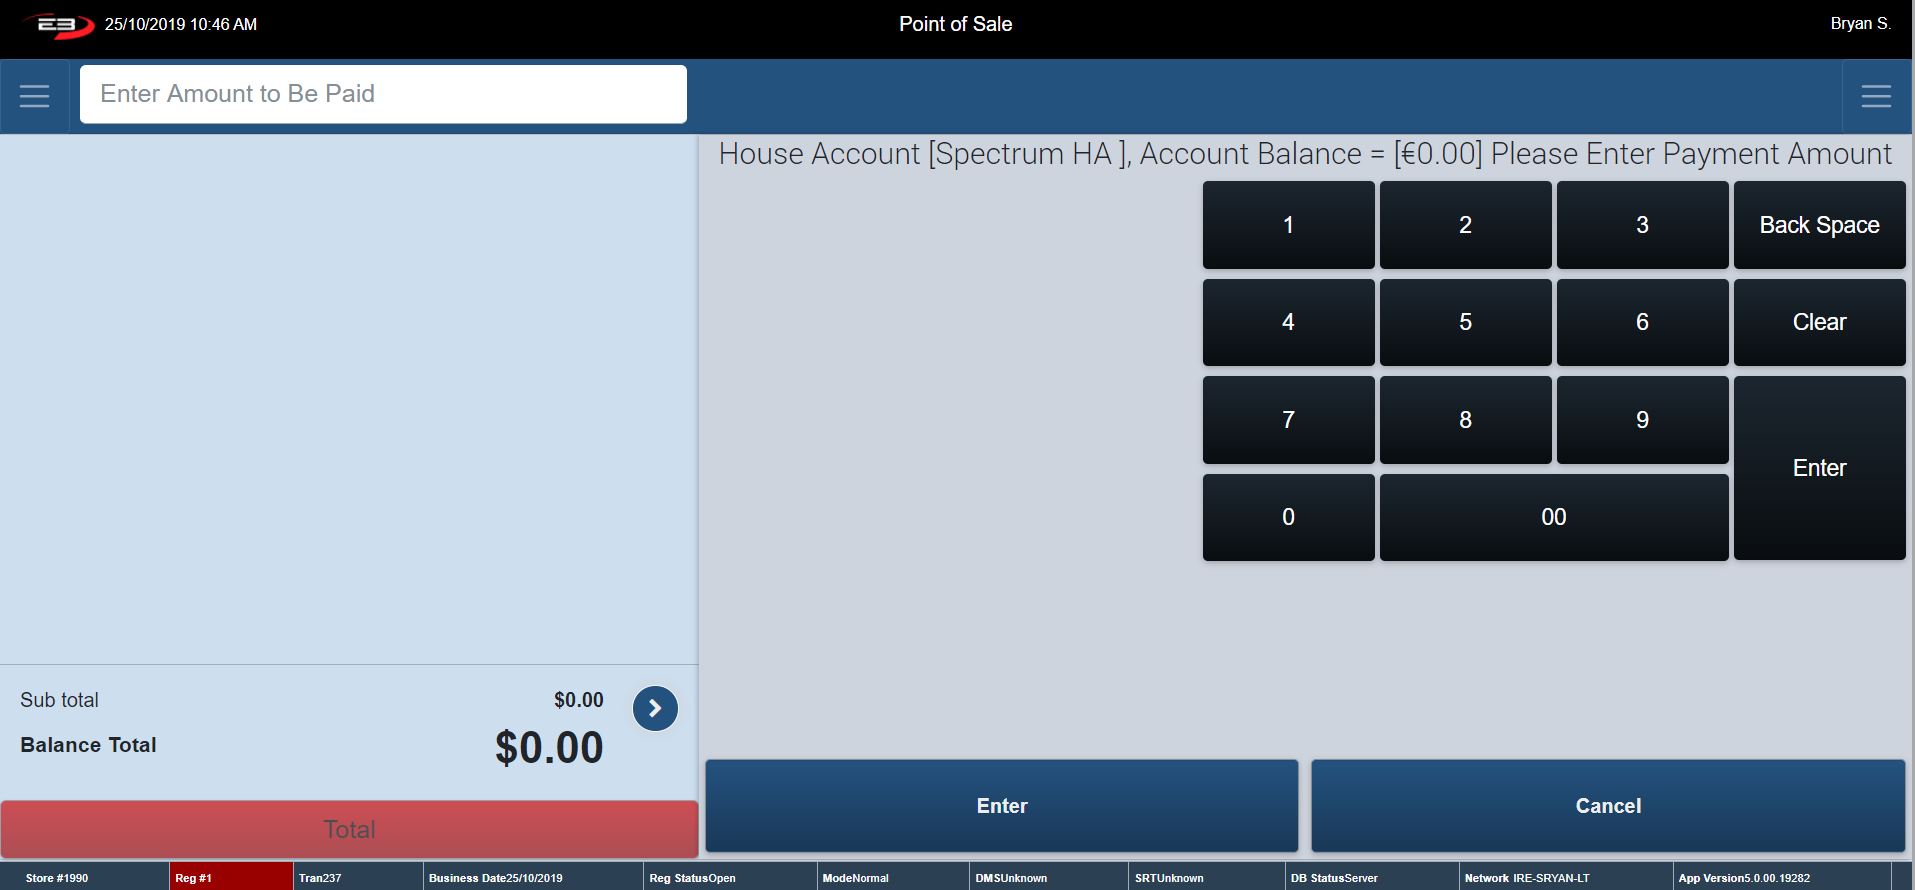
The following screen appears stating the Account Balance at present.
Type in the payment amount and click Enter.
Screenshot of the Point of Sale application.
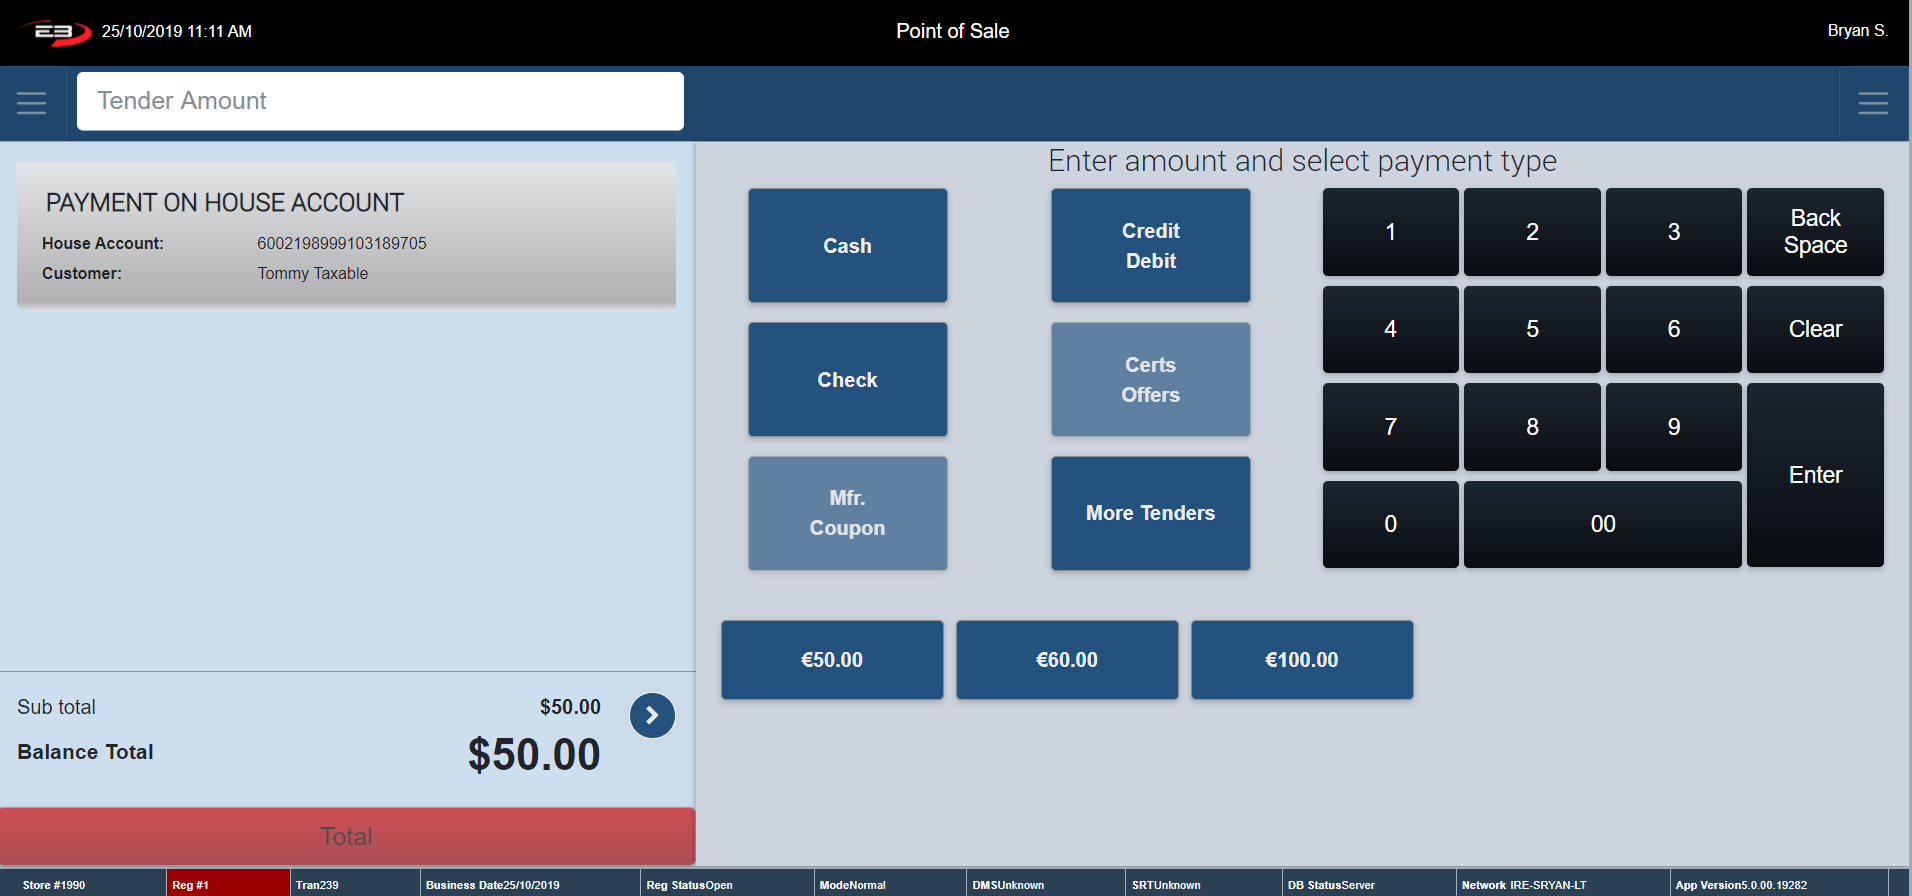
Enter in the amount and select a Tender Type.
The normal procedure carried out during a sale takes place.
At this point the transaction has been processed. If you wish to cancel you must go to the Transaction Context Menu and perform a Transaction Void.
Screenshot of the Point of Sale application.
If change is to be given from cash – the amount shows up on the screen.
The receipt prints once payment is processed.
The register returns to the Item Entry Screen.
If you are refunding money onto a house account, click the Refund button.
The House Account Search Screen explained previously appears.
Screenshot of the Point of Sale application.
Enter in the name of the House Account and press Search.
Note: Edit and select are disable until a search has taken place.
Click the Clear button to clear all search fields.
Once the search has taken place, highlight the House Account and click Select.
If the House Account has contacts attached to it, the register prompts you to Select a Contact.
Screenshot of the Point of Sale application.
Highlight the relevant contact and press OK.
The below screen appears stating the Account Balance at present.
Screenshot of the Point of Sale application.
Type in the Payment Amount and click Enter.
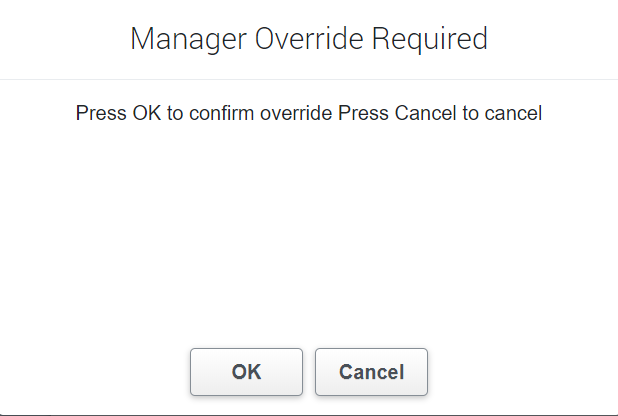
At this point a Manger Override is required.
Screenshot of the Point of Sale application.
This can only be confirmed by a manager or someone with a manager’s authority.
Click Cancel to cancel the override.
To confirm the override, a manager needs to click OK.
Screenshot of the Point of Sale application.
Enter in the refund amount and select the Tender Type.
The normal refund procedure is carried out.
At this point the transaction has been processed. To cancel you must go to the Transaction Context Menu and perform a Transaction Void.
If the tender type cash is chosen, the cash draw opens.
The receipt prints once the refund is processed.
The register returns to Item Entry Screen.
Admin
Post Void
This section allows you to Post Void a transaction therefore it cancels, or deletes entirely, a previously completed transaction.
The distinction between this Post Void, Trans Void and Item Void is that a Post Void is used on a transaction that was already completed, versus one that is still in the process of being completed (Trans Void) or just a void on a singular item in a transaction (Item Void).
A Post Void can only be done on a transaction that took place on that same day.
NOTE: A Post Void can not be done on a Payment onto a House Account. A Refund on House Account must be completed instead.
From the Item Entry Screen go to Left Support Menu – Admin
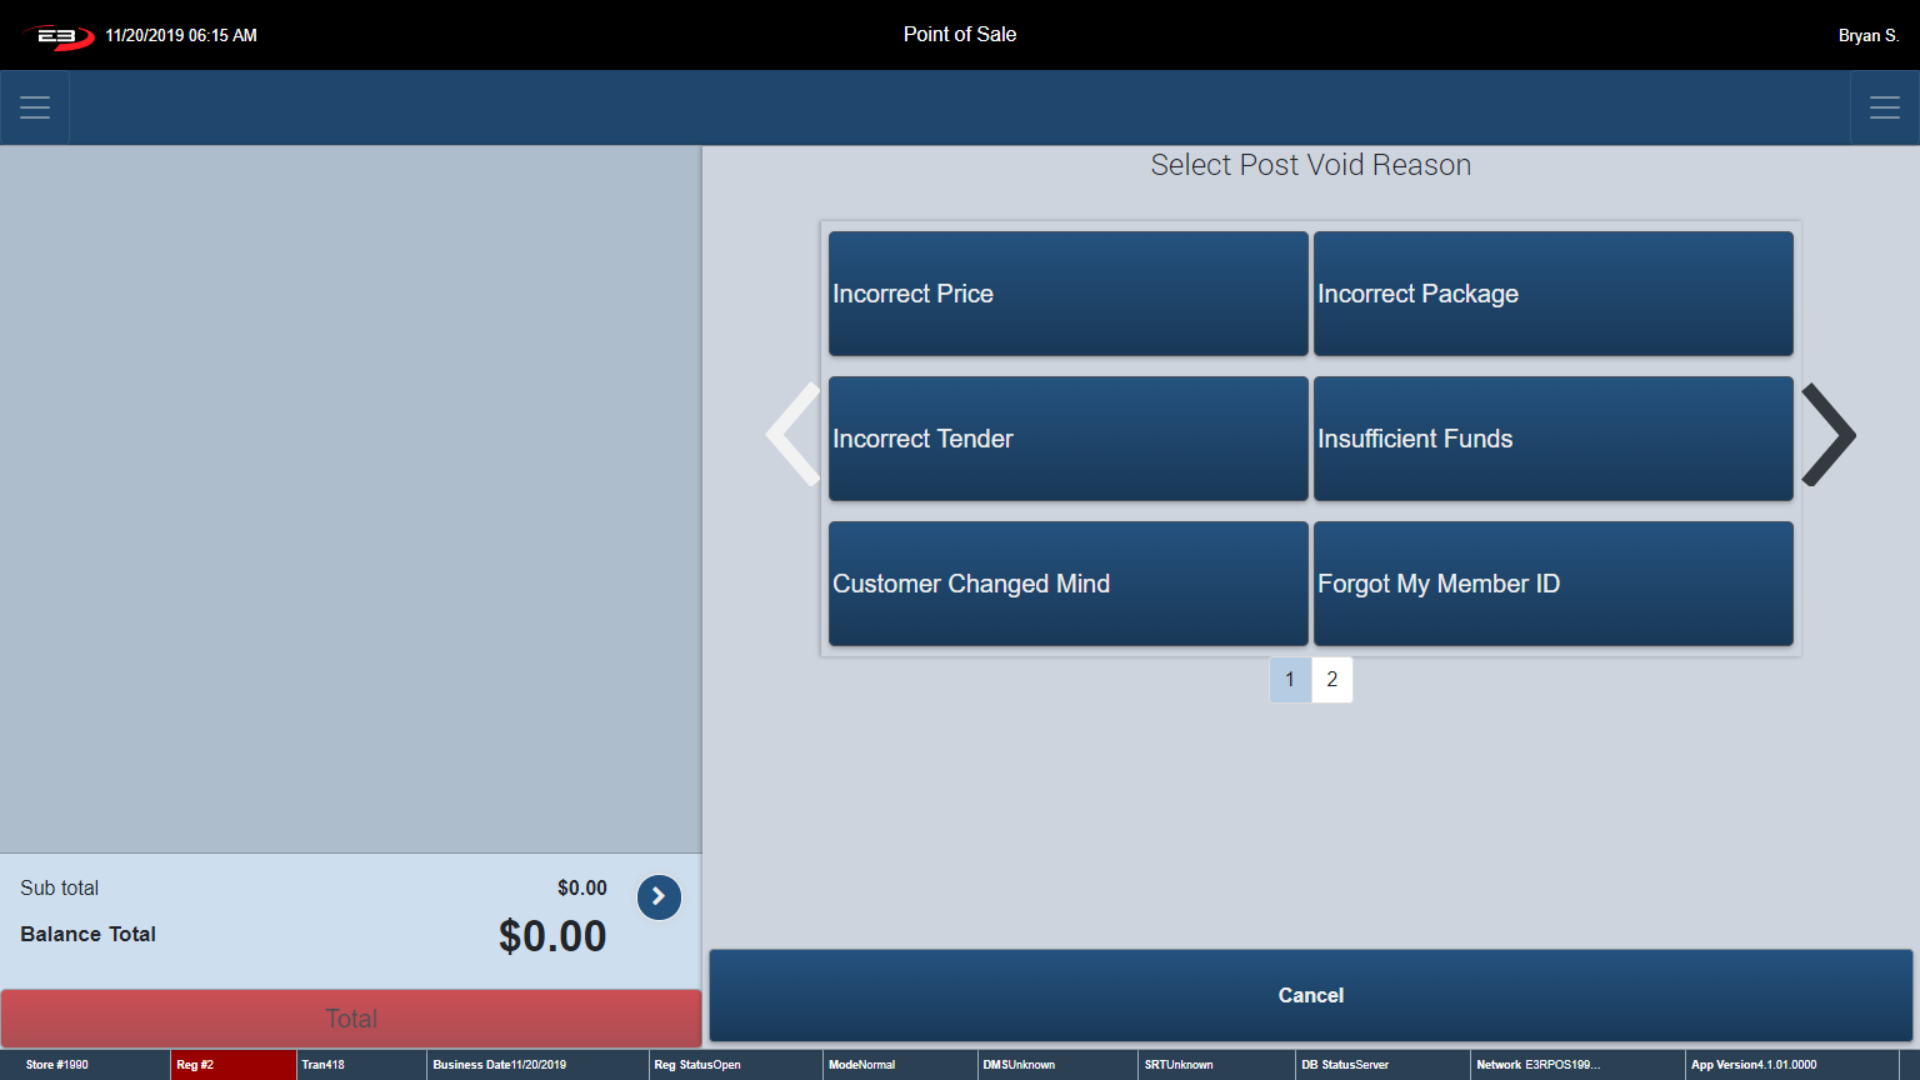
Click Post Void - the below screen appears.
Screenshot of the Point of Sale application.
The register prompts you to select a Post Void Reason.
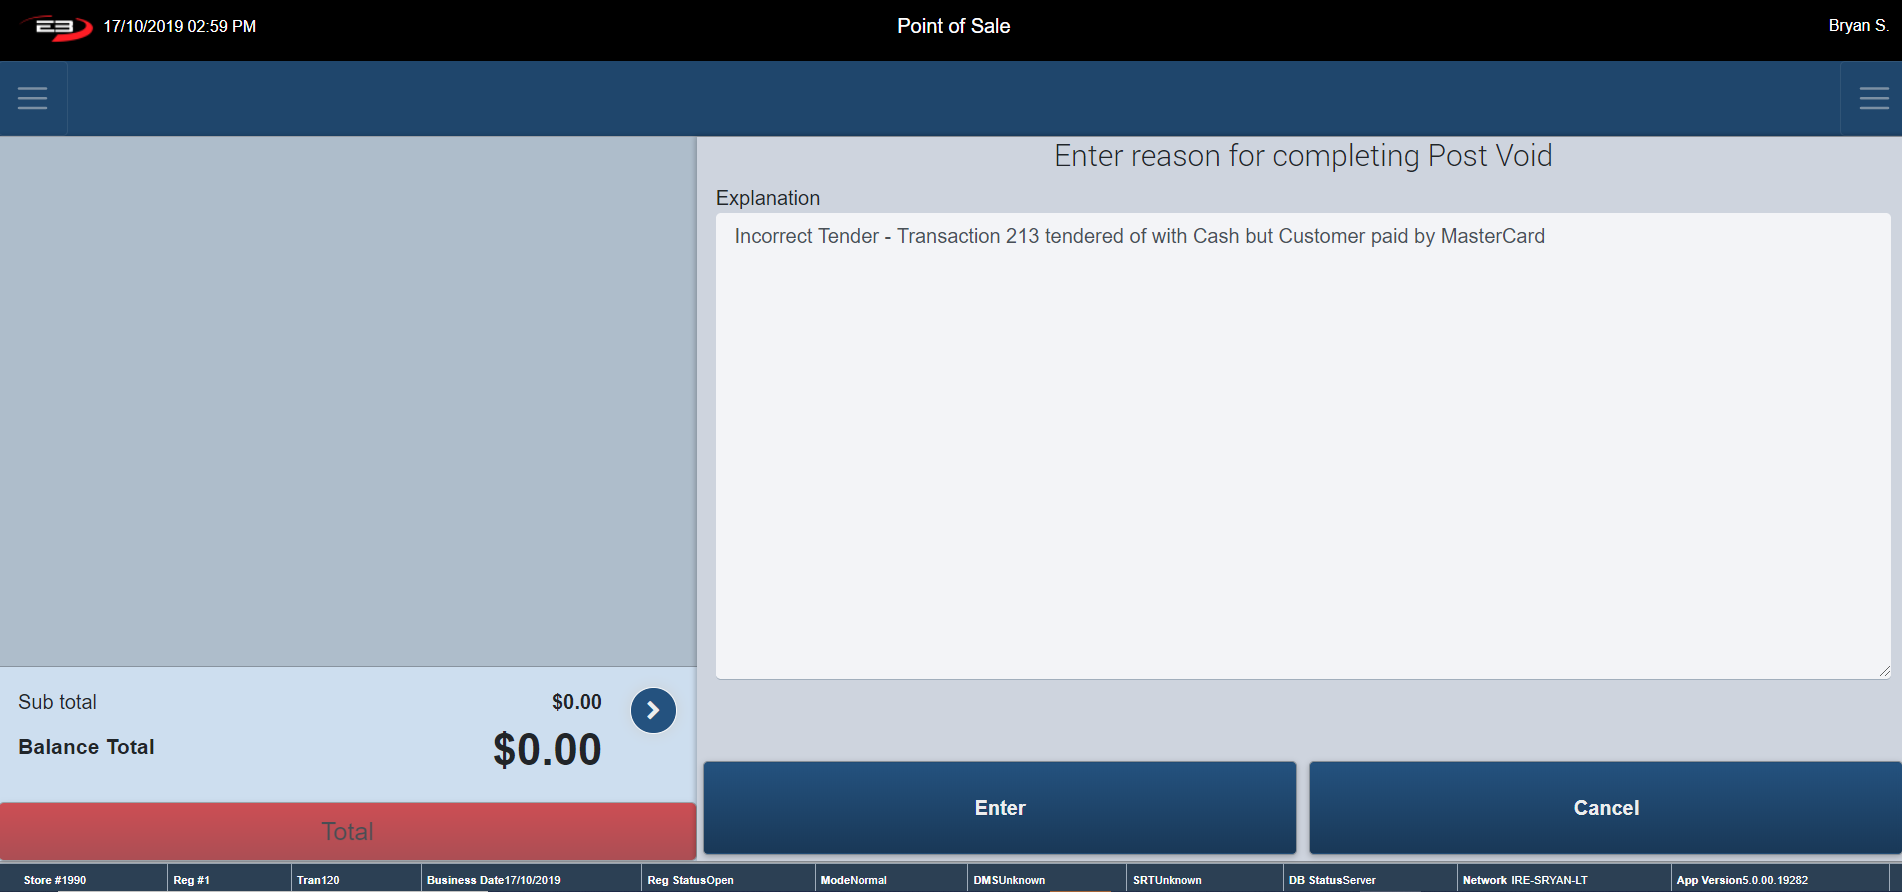
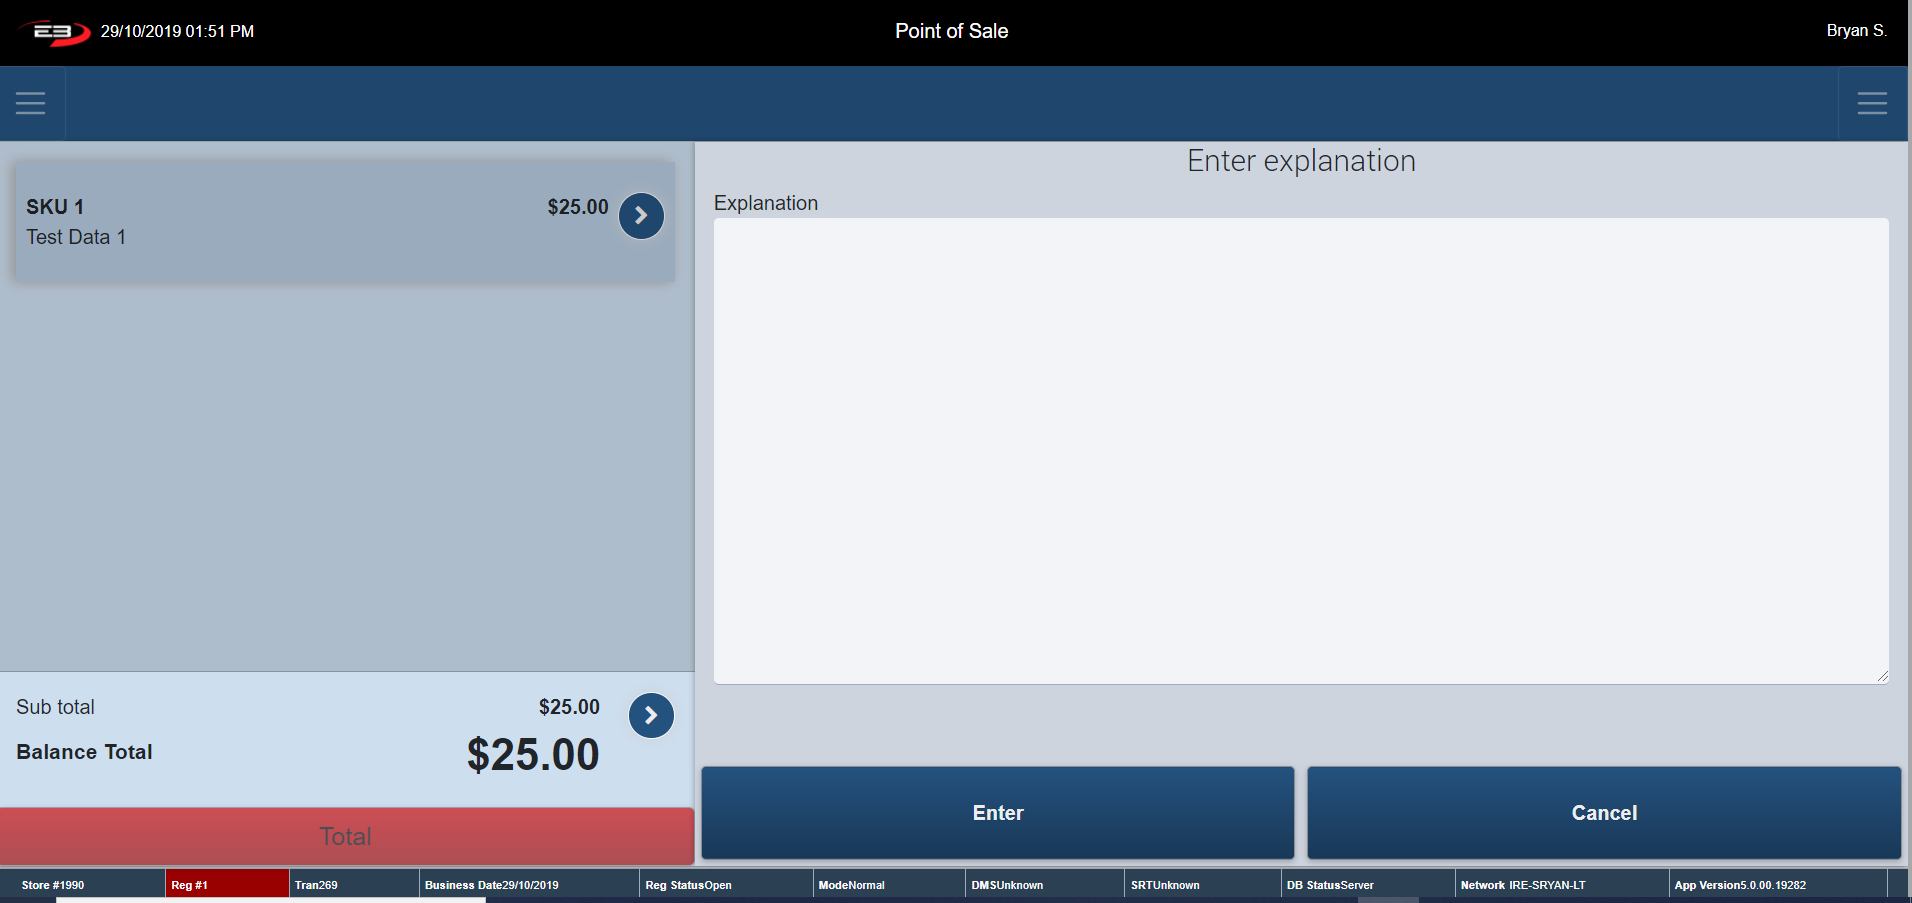
Once a reason for the Post Void is selected, the register ensures a written explanation for completing the void is recorded.
Screenshot of the Point of Sale application.
Select Enter after writing your explanation.
Screenshot of the Point of Sale application.
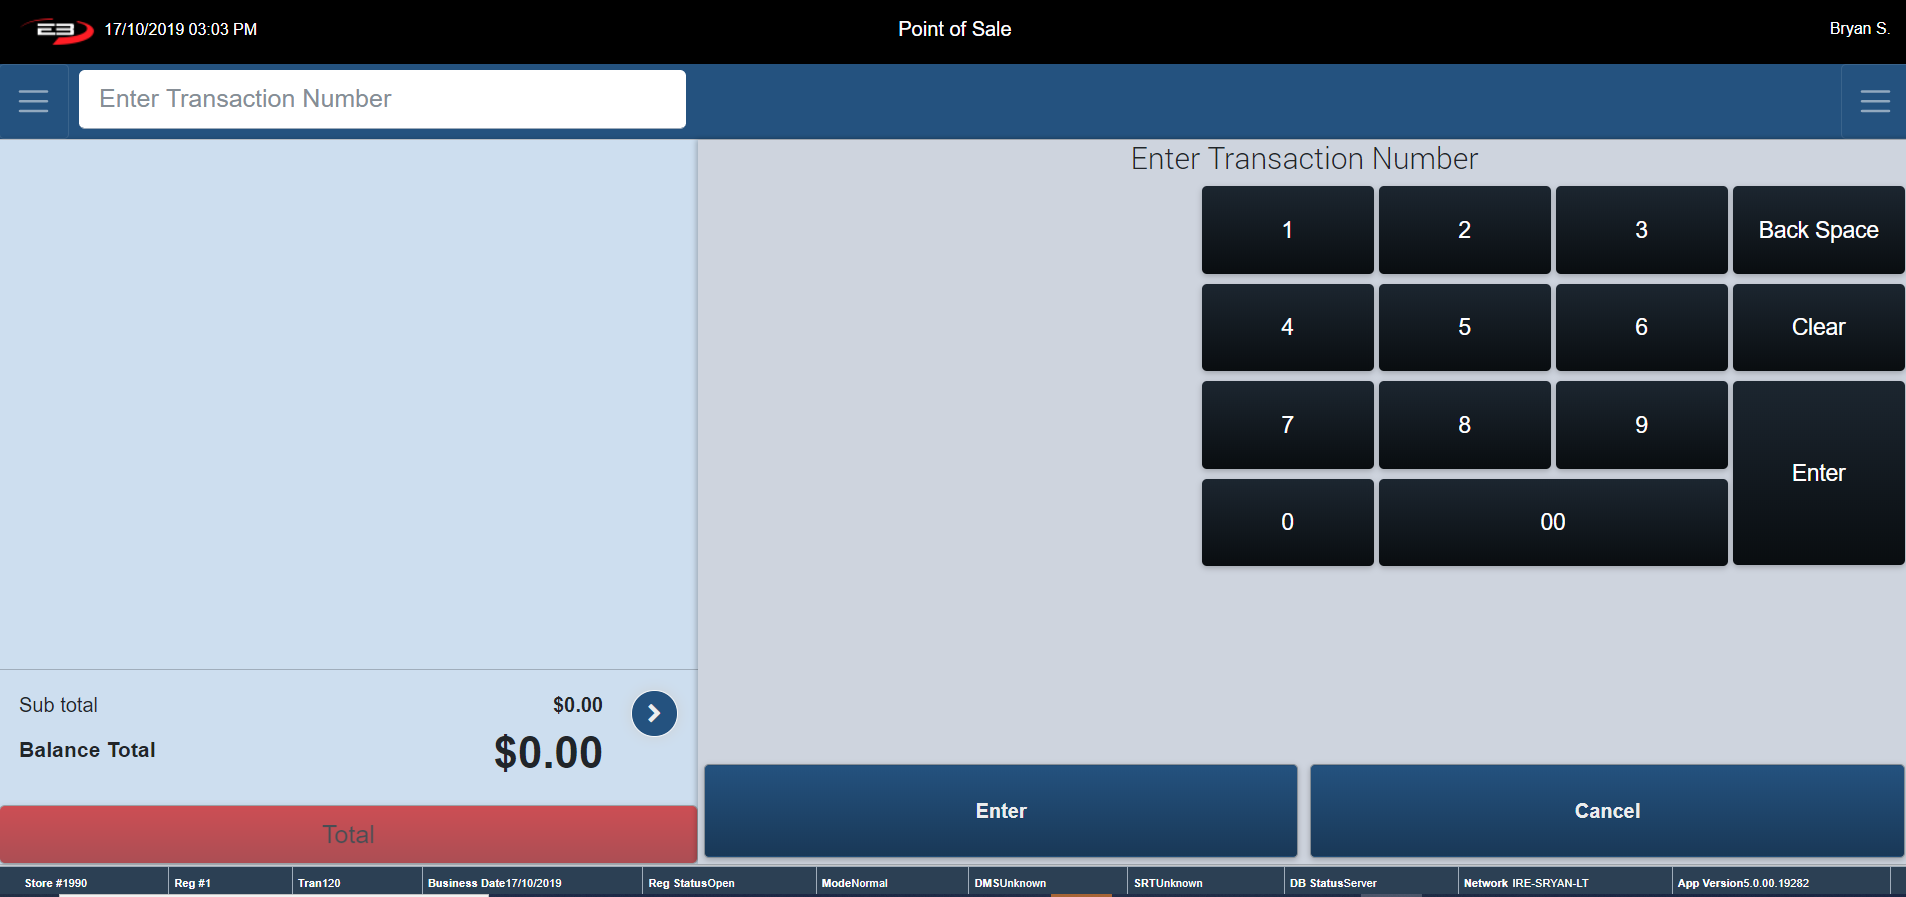
The register prompts the employee for the transaction number and transaction amount.
The transaction number and amount can be found on the receipt printed previously.
Click Enter -the transaction is now voided
The register returns to the Item Entry Screen.
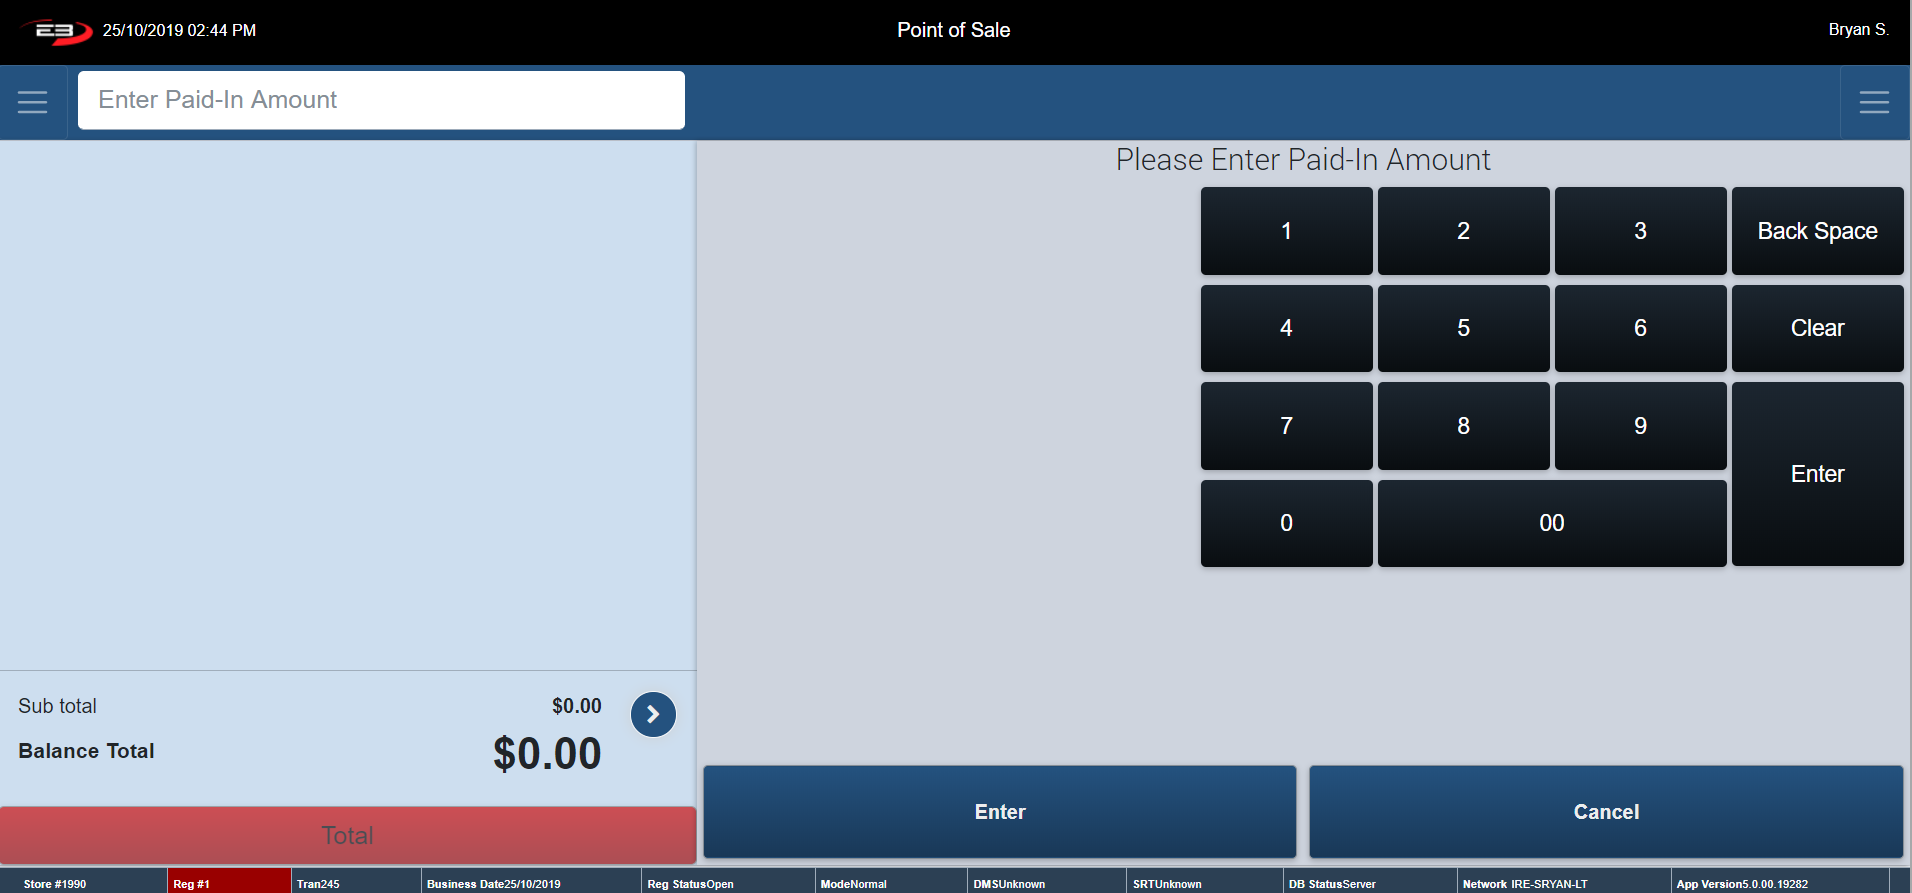
Paid In
The Paid In function allows you to record money being Paid In to the cash draw for different reasons other than a sale. This function is reported on the hard totals report, thus limiting discrepancies in your cash up.
From the Item Entry Screen go to Left Support Menu – Admin
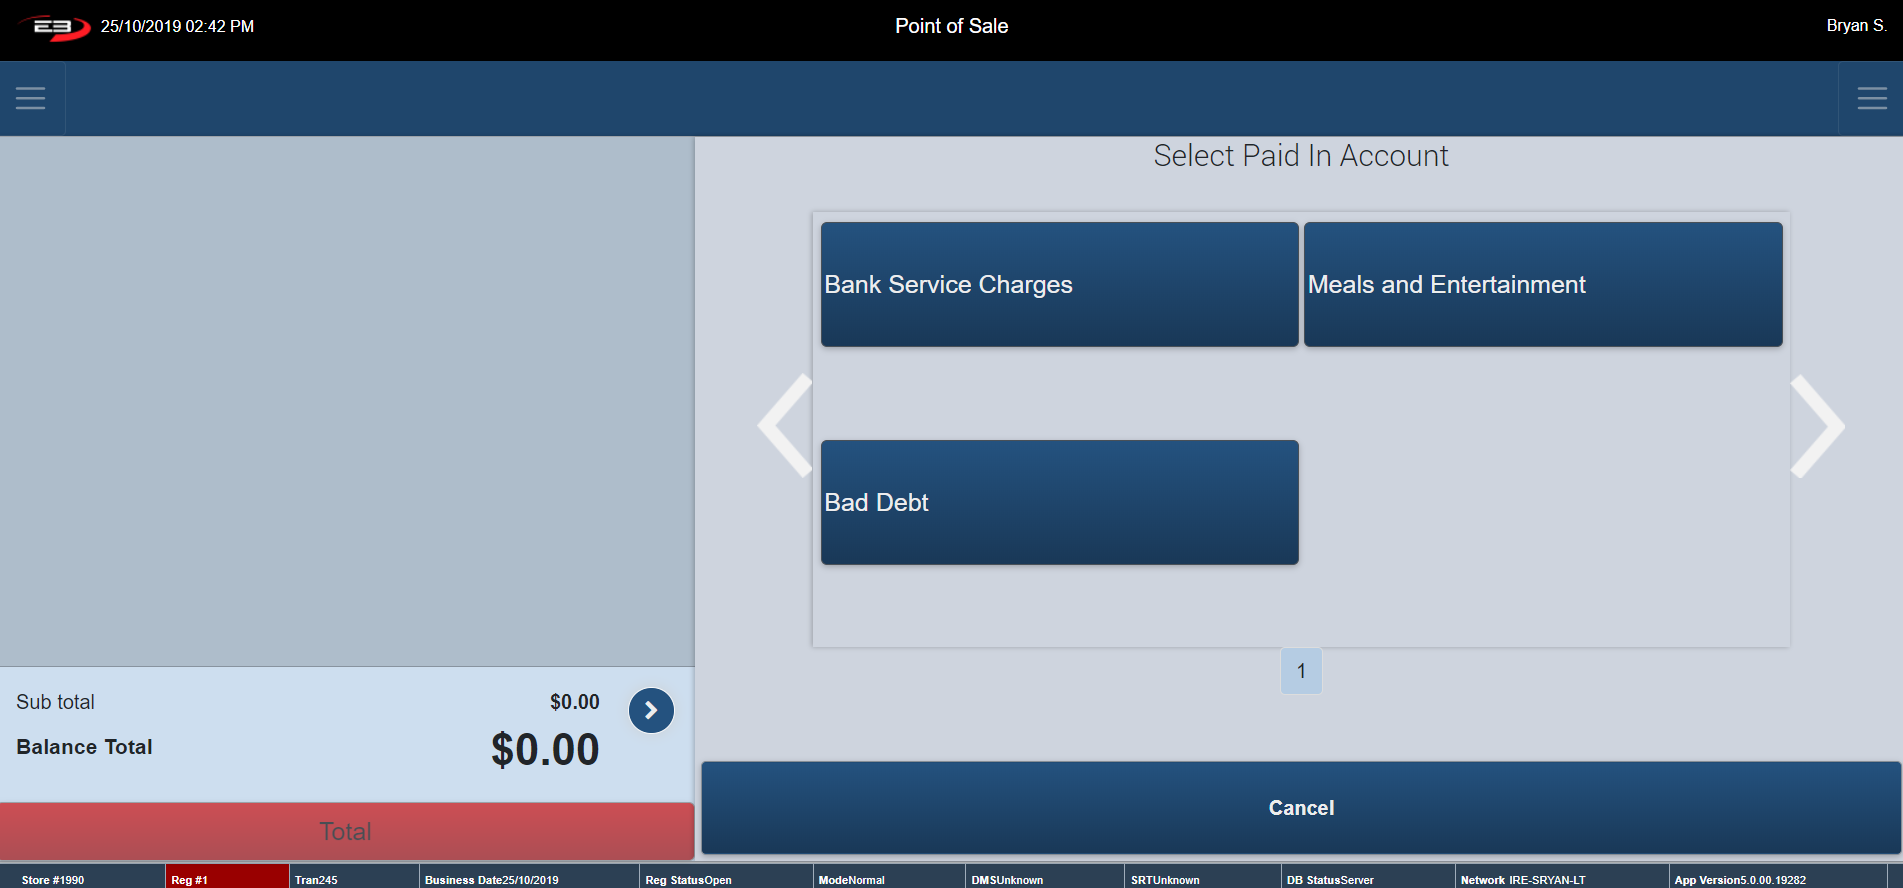
Click Paid In - the below screen appears.
Screenshot of the Point of Sale application.
The register prompts you to click on the relevant account in which the money is getting paid into – example accounts are shown above.
Screenshot of the Point of Sale application.
Type in the amount that was Paid In and click Enter.
Screenshot of the Point of Sale application.
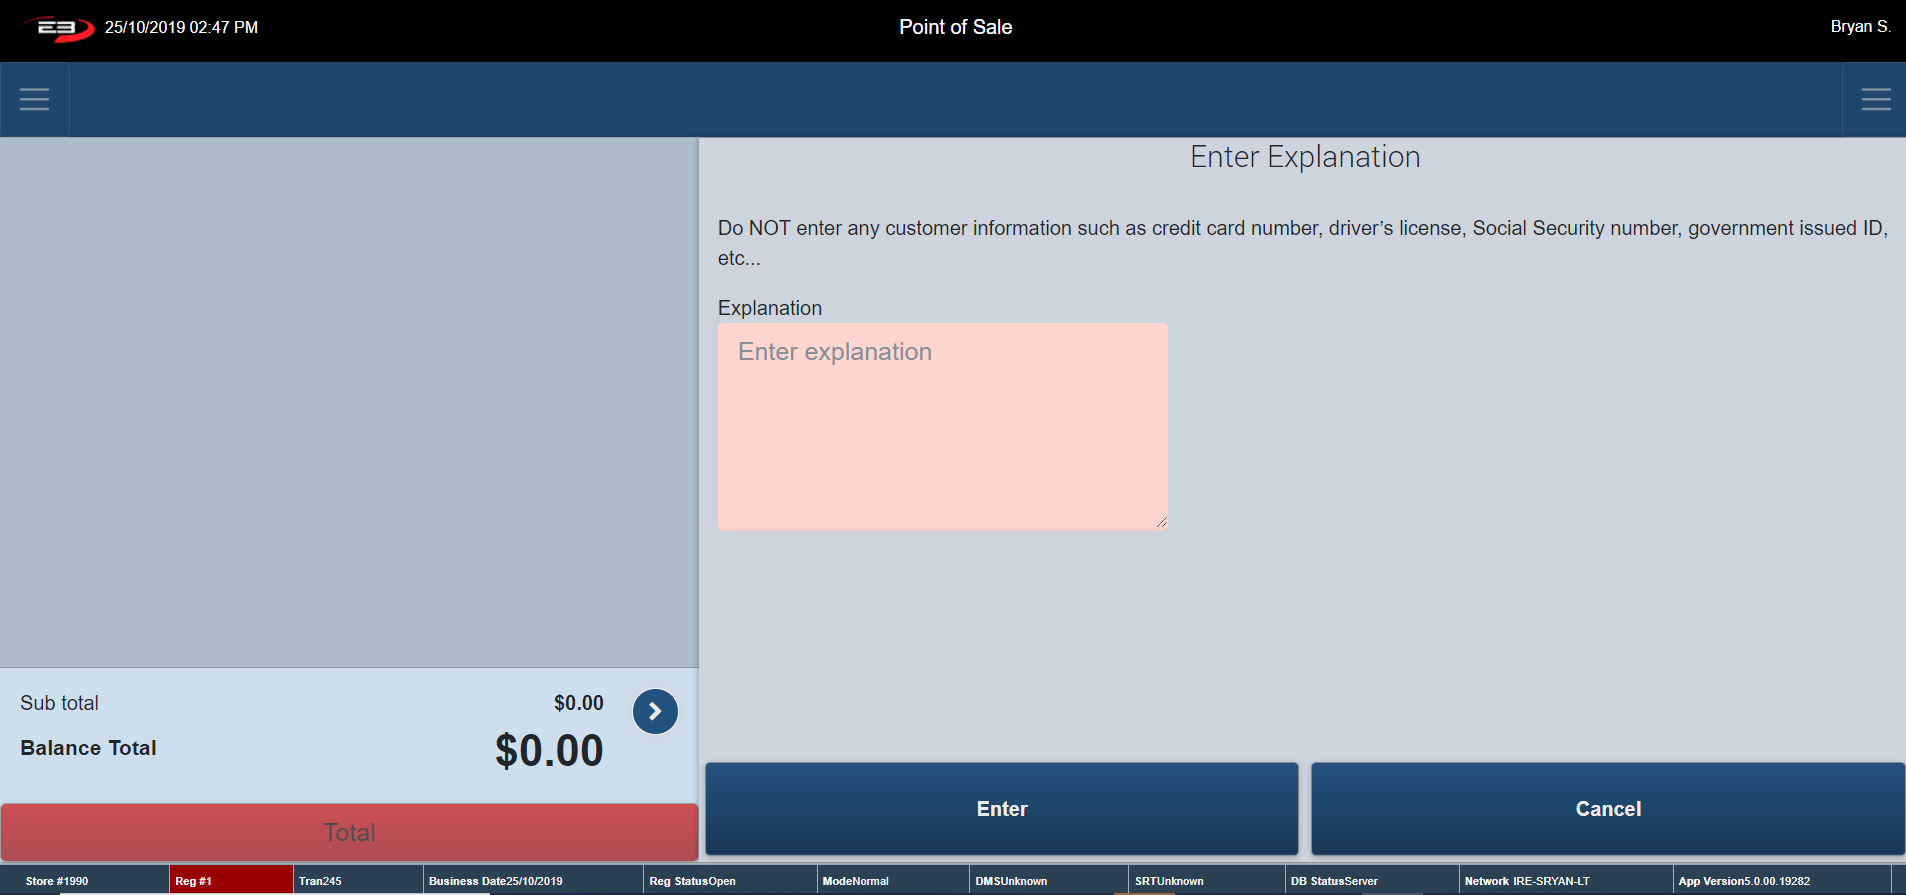
The register prompts you to enter in a typed explanation of the money being Paid In. You are not to enter in any of the customers details i.e. account number, for data protection reasons.
Provide an explanation and click Enter.
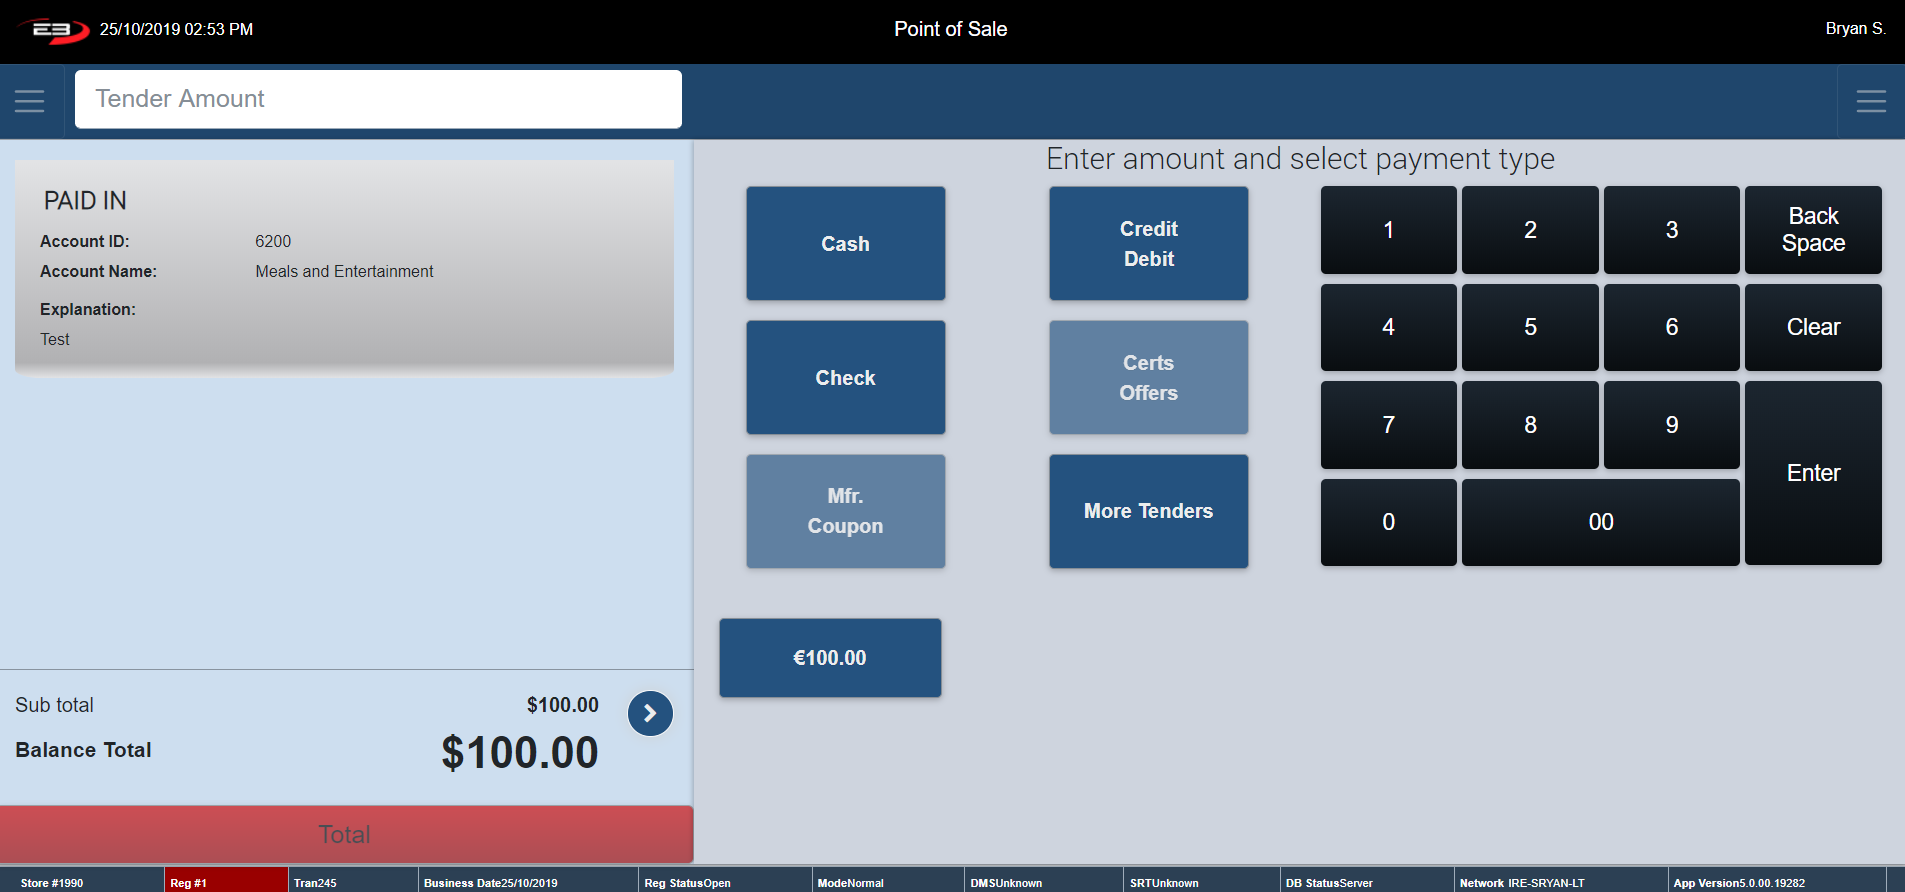
Screenshot of the Point of Sale application.
At this point the transaction has been processed. To cancel you most remote to the Transaction Context Menu and perform a Transaction Void.
To continue with the transactions, select a Tender Type to complete and the receipt prints.
The register returns to the Item Entry Screen.
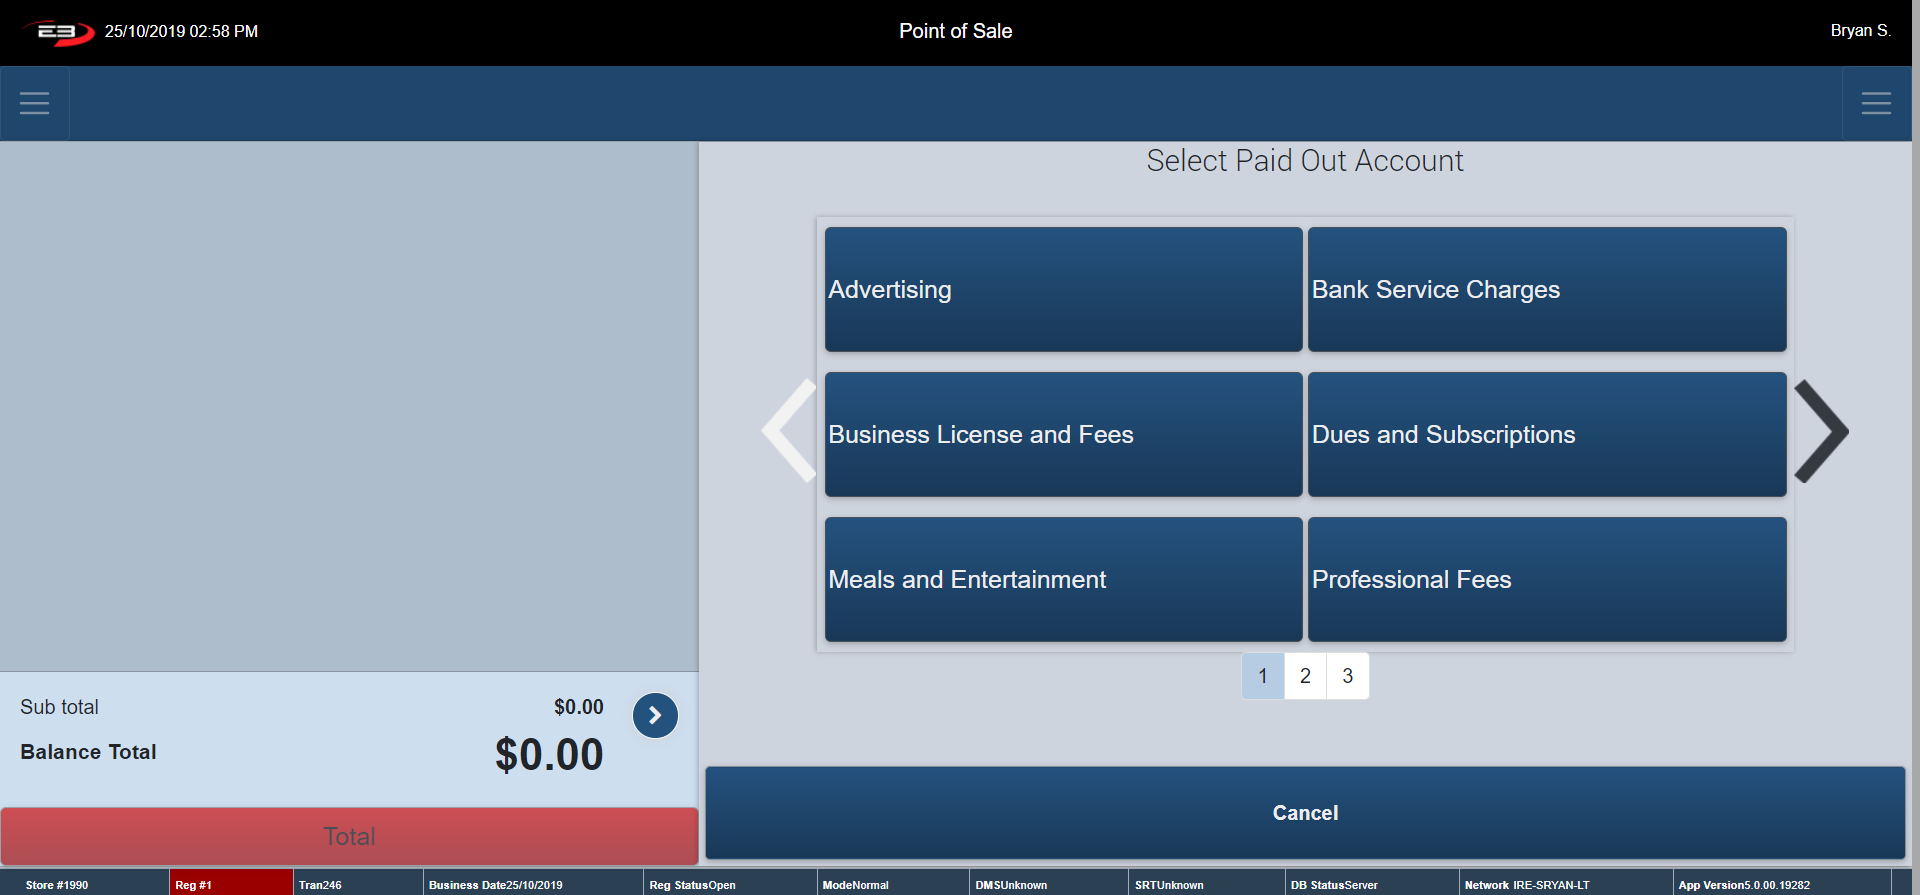
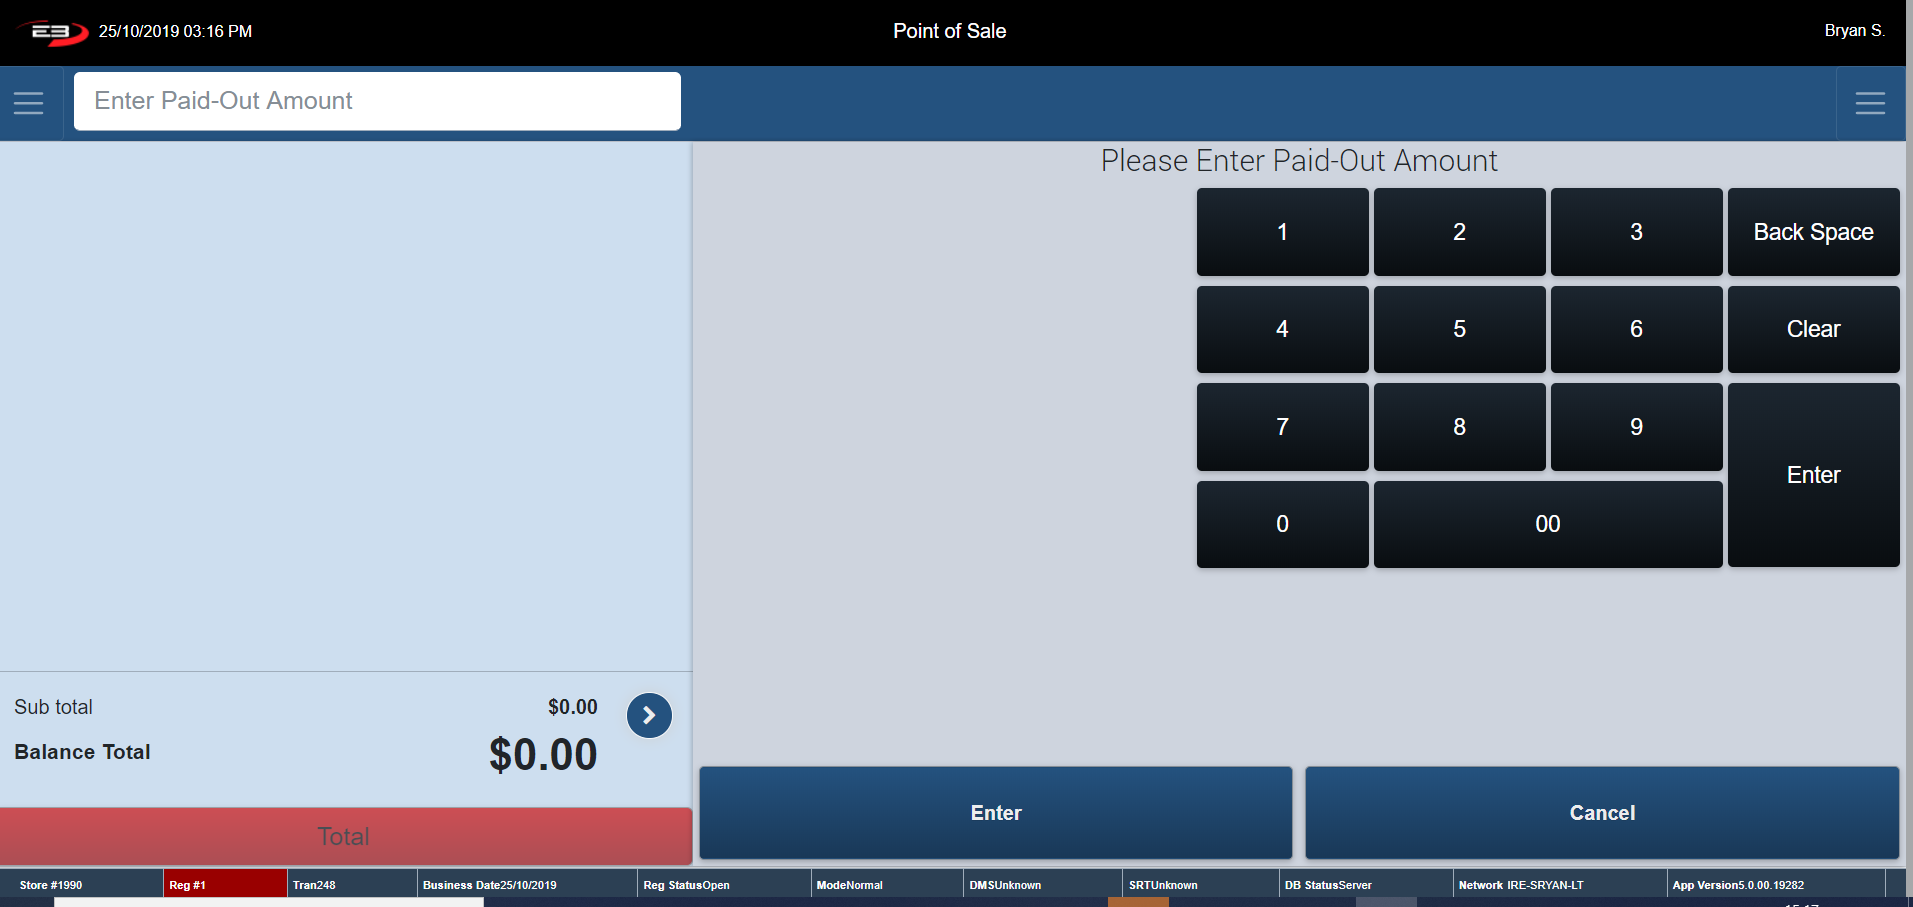
Paid Out
This function allows you to record money being Paid Out of your cash draw for different reasons. This function is reported on the hard totals report, thus limiting discrepancies in your till.
From the Item Entry Screen go to Left Support Menu – Admin.
Click Paid Out - the below screen appears. Use the arrows provide to view the different Paid Out account options.
Screenshot of the Point of Sale application.
The register prompts you to click on the relevant account in which the money is getting paid out off – example accounts are shown above.
Enter in the Paid-Out amount and click Enter.
Screenshot of the Point of Sale application.
The register prompts you to enter in a typed explanation of the money being Paid Out.
You are not to enter in any of the customers details i.e. Account Number for data protection reasons.
Screenshot of the Point of Sale application.
Click Enter. A receipt prints stating the Paid-Out details.
The register returns to the Item Entry Screen.
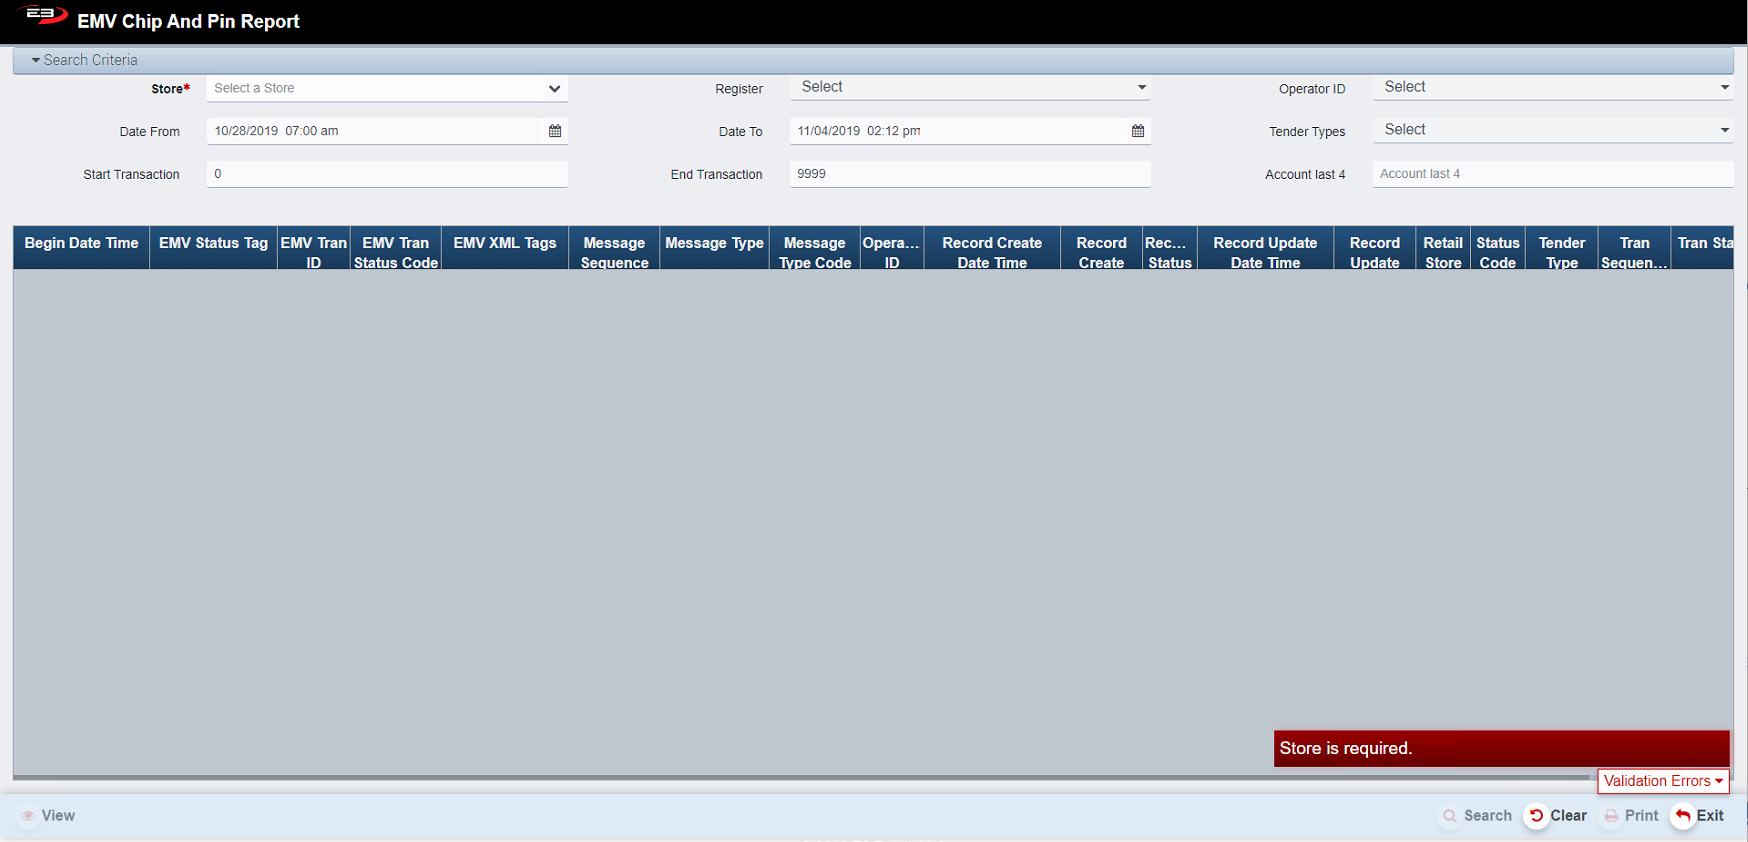
EMV Chip and Pin
The EMV Chip and Pin Report is a printed report with all tender types used to tender out a transaction stated on it.
From the Item Entry Screen go to Left Support Menu – Admin
Click EMV Chip and Pin - the below screen appears.
Screenshot of the Point of Sale application.
Manager Override is required to view the EMV Report.
This can only be confirmed by a manager or someone with a manager’s authority.
Once the manager confirms the override the screen below appears.
Screenshot of the Point of Sale application.
Results Table
Select a Store from the drop-list, the list contents are based on the store visibility.
This information must be entered otherwise a validation error message is displayed.
Register is used to select the individual workstation/register, default is all.
Operator ID allows you to choose an individual operator.
The Date from and Date To values filter the results to a particular date range.
The Tender Types field filters the type of tenders used.
The Start Transaction and End Transaction values filters the results to a particular transaction number range.
The Account last 4 field limits results to payments only made from that specific account.
The report should print. A sample of the report is shown below.
Once to above Search Criteria is filled in click Search.
Click Clear to clear any results and to reset the search criteria back to their default values.
Click Exit to go back to the Item Entry Screen.
The Print function allows the user to save the report as an Acrobat PDF file for viewing/printing in Adobe Acrobat Reader. Once you have a result set that’s filtered as desired, click the Print button. The file is saved as EMV Chip and Pin Report .pdf in the default location, typically the Downloads folder for the user.
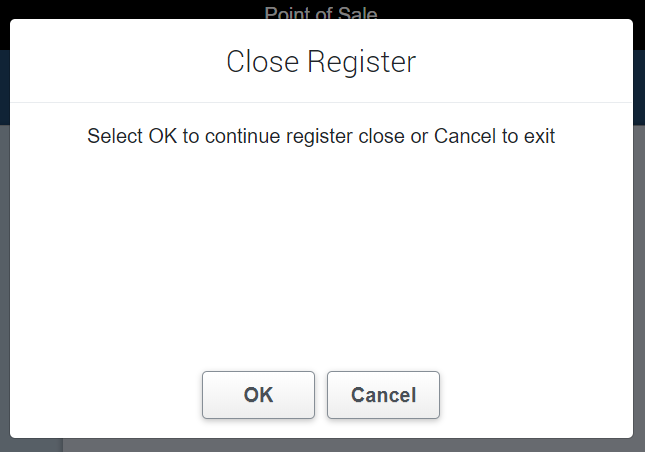
Close Register
At the end of each business day, you should close your register and count your cash draw, to determine if you have any discrepancies within it. Before closing your register, a Hard Totals report and EMV Chip and Pin Report should be printed off to show your registers daily activities.
From the Item Entry Screen go to Left Support Menu – Admin.
Click Close Register- the below screen appears.
Screenshot of the Point of Sale application.
The register prompts you to click OK or Cancel.
Click Ok to close the register. The register automatically Logs Off.
The cash draw opens allowing you to continue with your till balancing process.
Click Cancel. The register returns to Item Entry Screen (therefore the register is not closed).
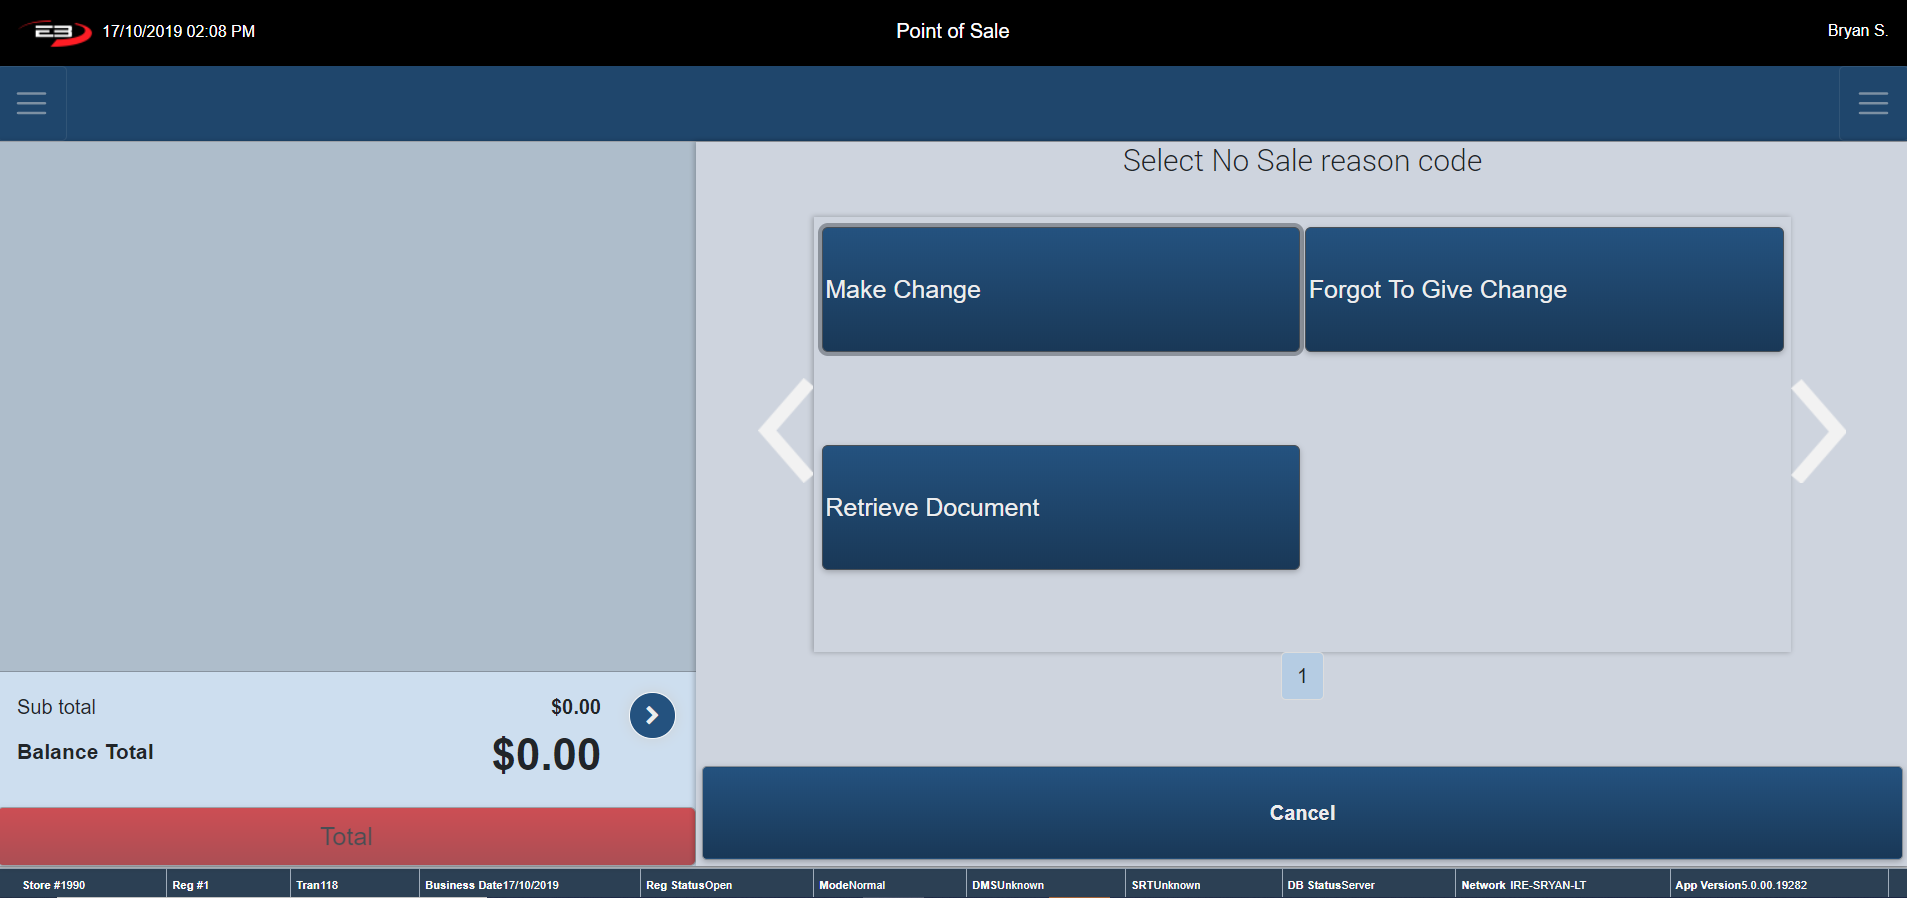
No Sale
The No Sale function allows you to open your cash drawer without creating a new transaction, which limits discrepancies in your end of day till balancing. This function can only be carried out by a manager or someone with a manager’s authority.
From the Item Entry Screen go to Left Support Menu – Admin.
Click No Sale - the below screen appears.
Screenshot of the Point of Sale application.
Once the manager confirms the override the screen below appears asking you to provide a reason for the No Sale.
Screenshot of the Point of Sale application.
Select your reason code for the no sale, the cash draw opens.
A no sale receipt prints off.
The register returns to the Item Entry Screen.
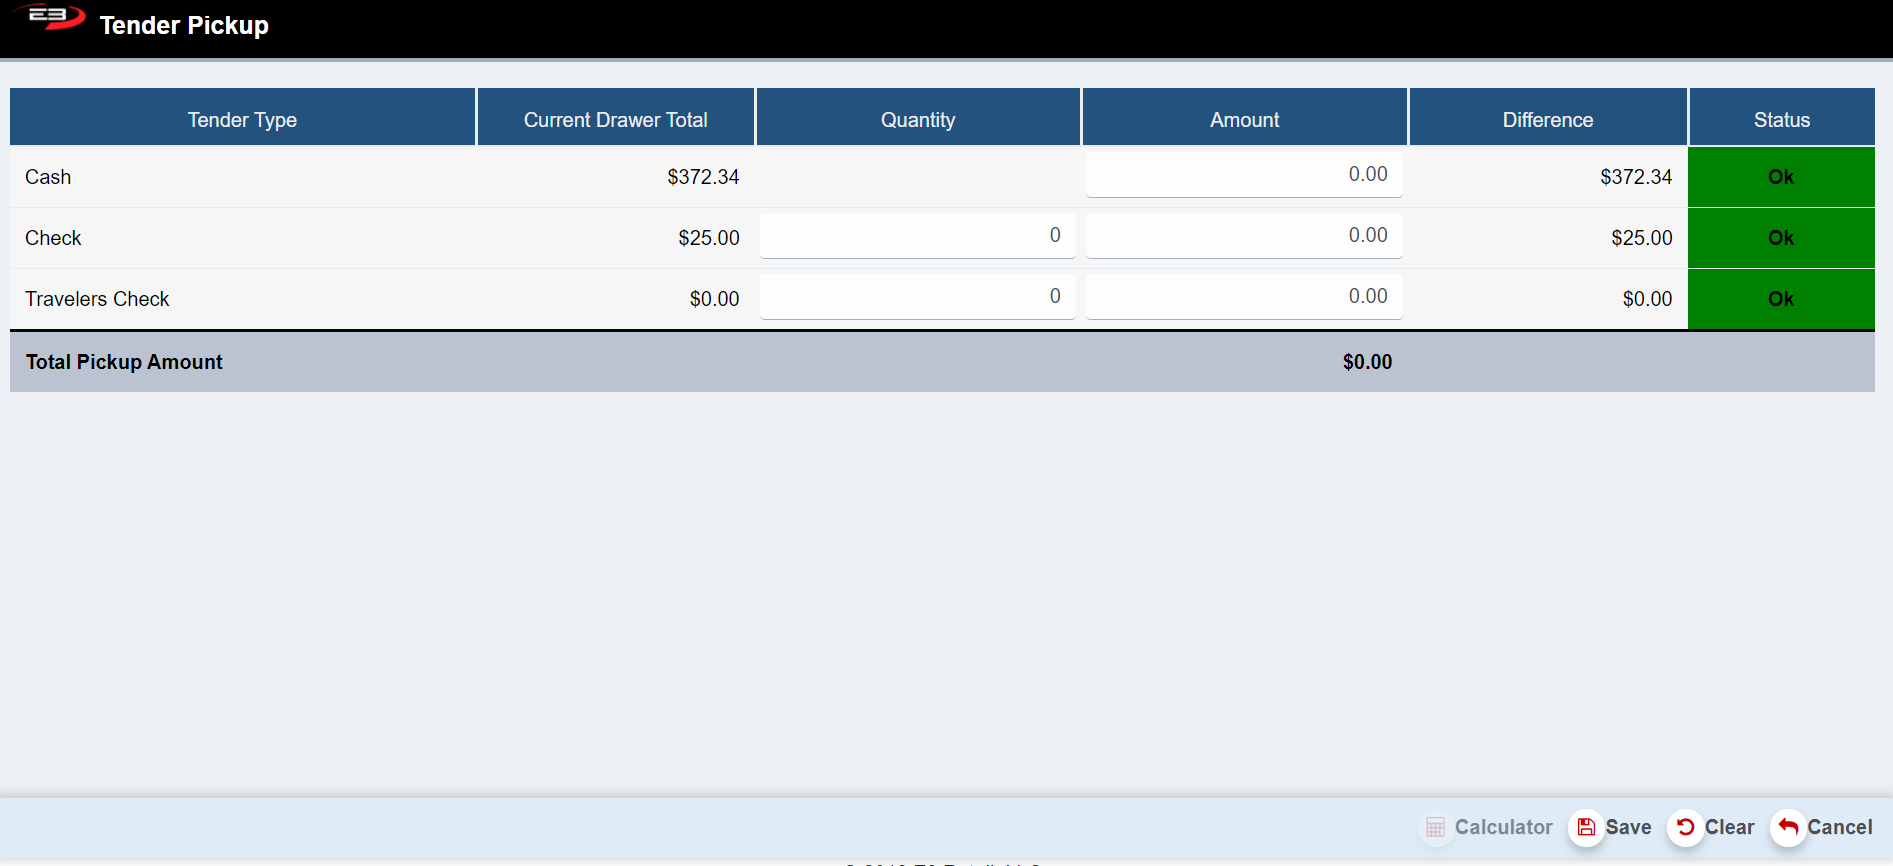
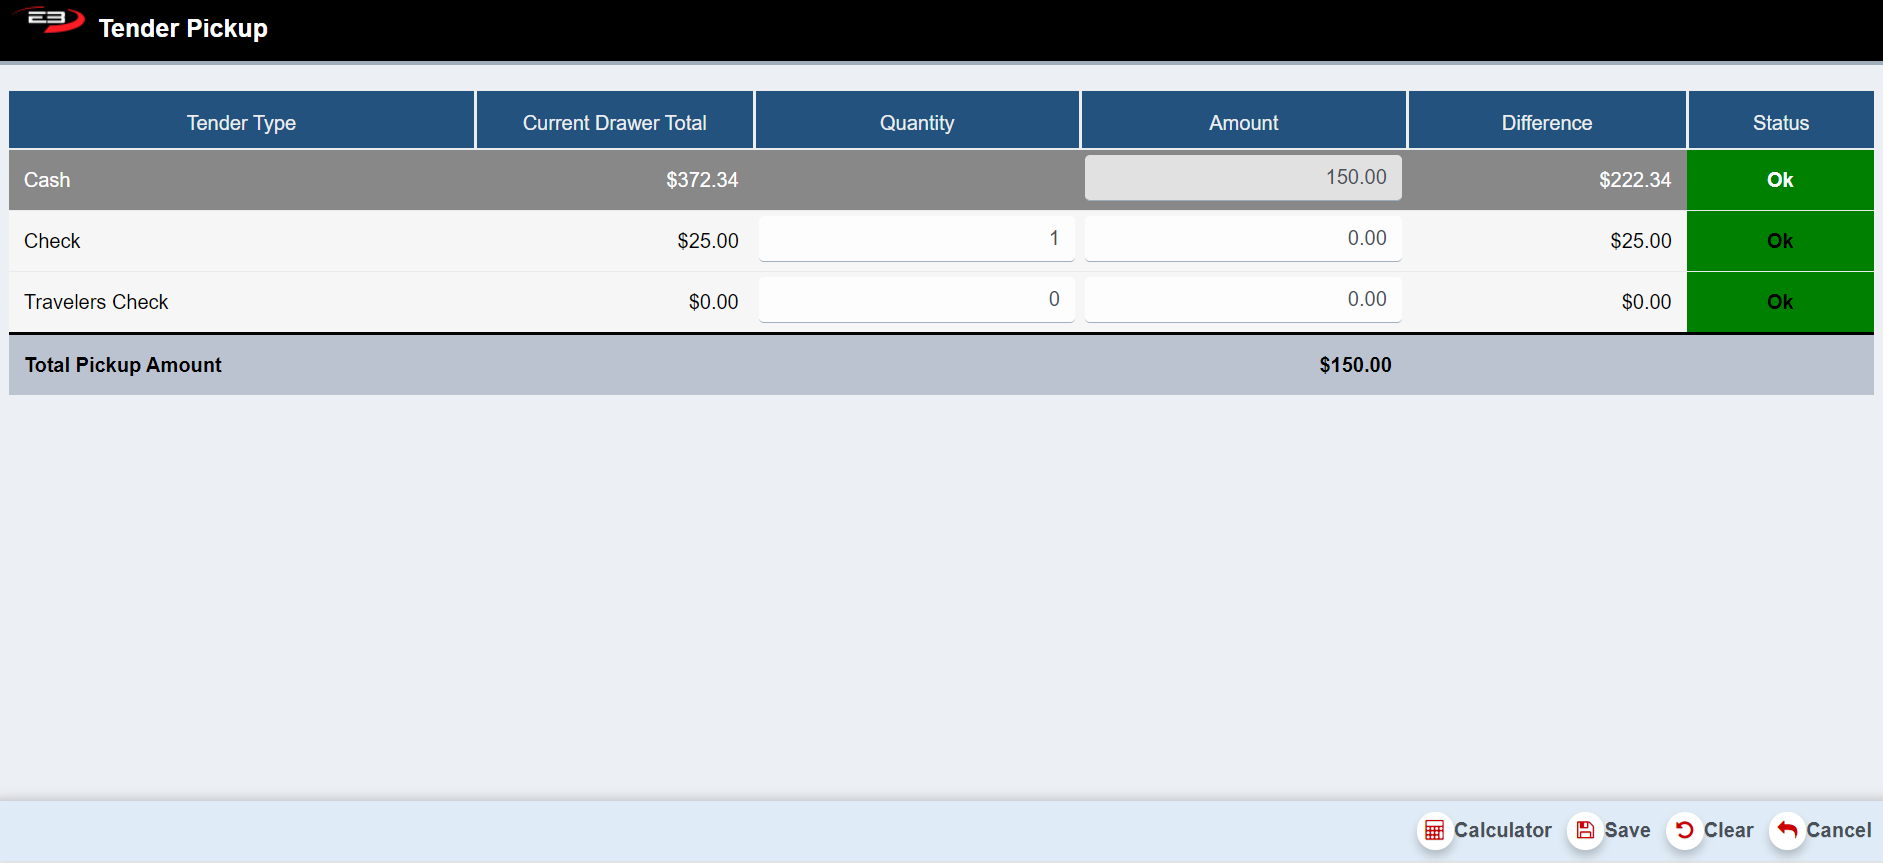
Pickup
The function Pickup is to be used when money is being dropped from your cash draw to the safe during shift. It records how much and of what tender type that has been dropped to limit discrepancies in your cash draw.
From the Item Entry Screen go to Left Support Menu – Admin.
Click Pick up - the below screen appears.
Screenshot of the Point of Sale application.
Enter in the amount and quantity of cash, check and/or travelers check that has been taken out and click Save.
Screenshot of the Point of Sale application.
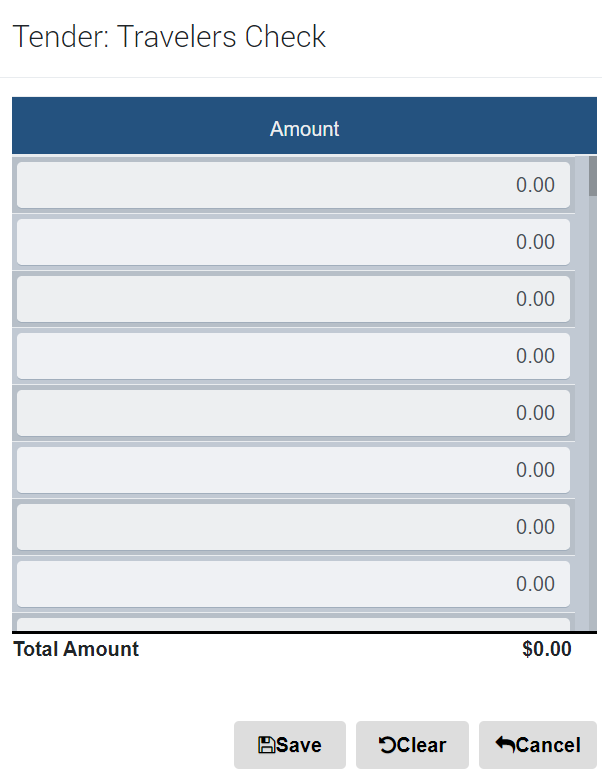
The Calculator button can be used to help calculate the money being taken from your cash draw.
Highlight the Tender Type you would like to Calculate and click Calculator.
Depending on which tender type you chose the following screens appears.
Cash Check
Screenshot of the Point of Sale application.
Enter in the tender type amounts and click Save. The register returns to the Item Entry Screen.
Click Clear to empty all fields back to the default values.
Click Cancel to go back to the Pickup Screen state.
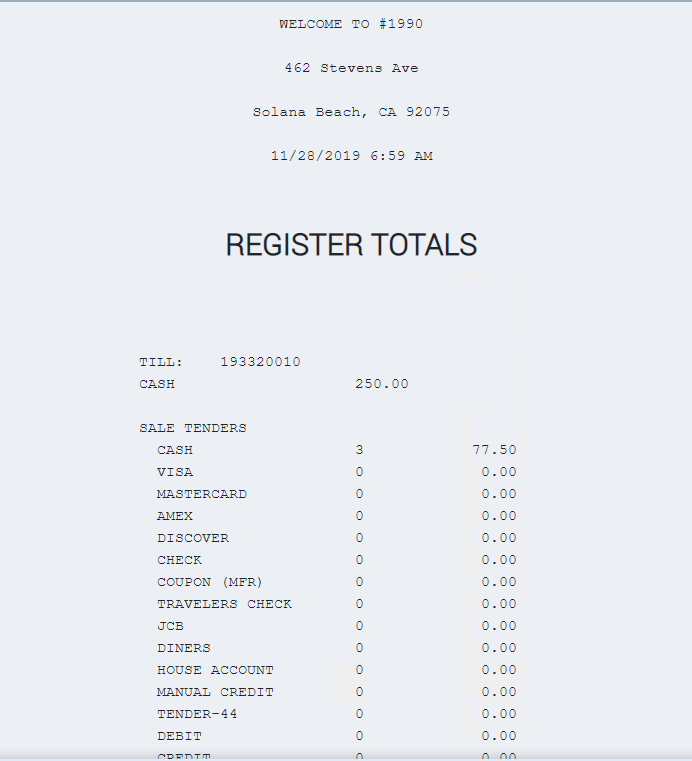
Hard Totals
Hard Totals is a report that has recorded all the transactions that has taken place on that register from when the employee opens the cash draw, until they close it for end of day.
This report helps to distinguish any discrepancies in the cash draw.
From the Item Entry Screen go to Left Support Menu – Admin.
Click Hard Totals – The hard totals report appears.
This report has the following register totals on it
Sale Tenders
Return Tenders
Cash Management
Payment Services
Paid on Account
Paid on Account Returns
Post Void Sales
Post Void Returns
Departmental Totals
Click Print – the report prints from the receipt printer.
Below is a small preview of the Hard Totals report.
Screenshot of the Point of Sale application.
Loan
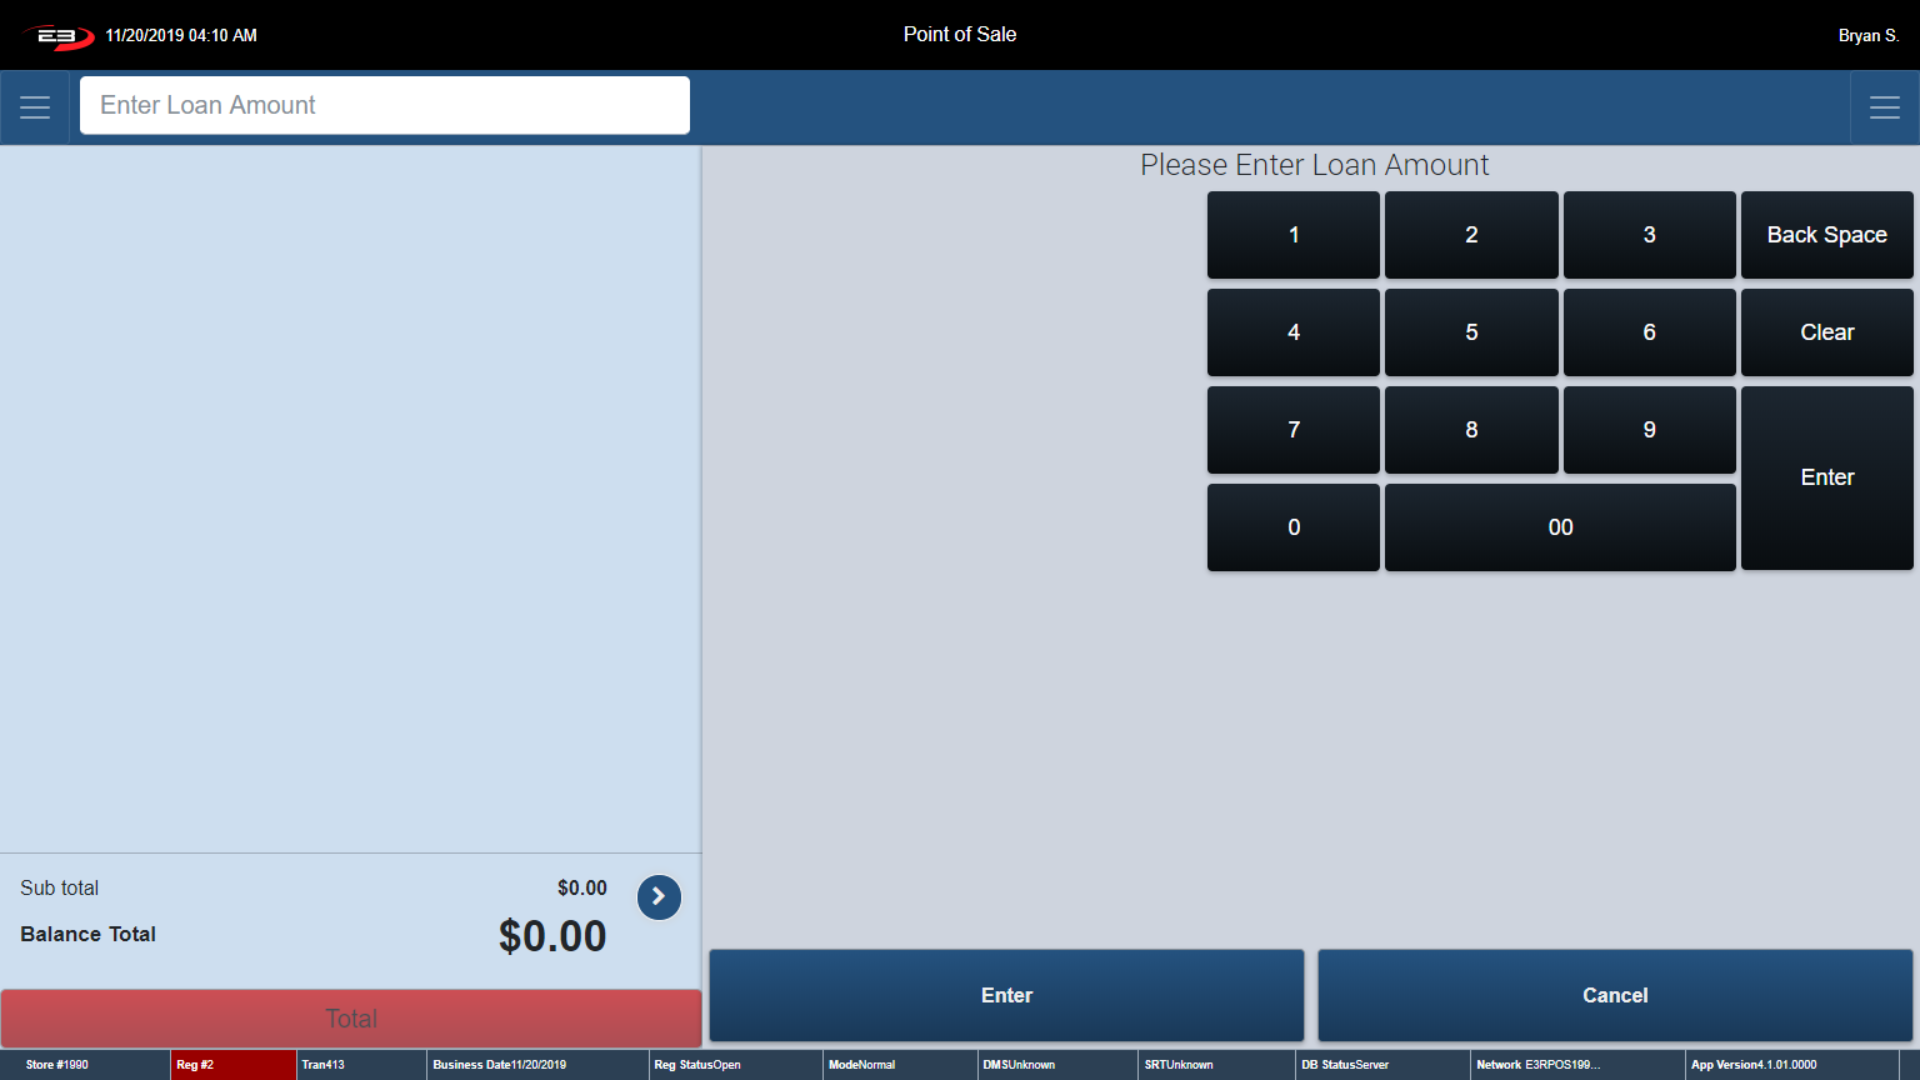
The Loan function is used to keep a record of money being included to the cash draw. An example of this would be getting bags of coins to make change for the cash draw.
From the Item Entry Screen go to Left Support Menu – Admin.
Click Loan - the below screen appears.
Screenshot of the Point of Sale application.
Enter in the Loan Amount and select Enter.
The register prompts you to provide an explanation of the reason for the loan.
Close the cash draw and a receipt stating the Loan information prints.
The register returns to the Item Entry Screen.
Reprint Receipt
This function allows you to reprint a previously printed receipt. For various reasons an employee may need to reprint a receipt for a previous purchase.
From the Item Entry Screen go to Left Support Menu – Admin.
Click Reprint Receipt, the below screen appears.
Screenshot of the Point of Sale application.
The register prompts you to select what type of receipt you want to print
Transaction Receipt
Gift Receipt
Selecting Transaction receipt prints the previous transactions receipt.
Selecting Gift Receipt prints a Gift receipt for the previous transaction.
Once the receipt is printed, the register returns to the Item Entry Screen.
Reload Workstation
This function reloads the workstation allowing for any updates/changes to emerge on the workstation.
From the Item Entry Screen go to Left Support Menu – Admin
Click Reload Workstation to reload the workstation’s options (parameters).
Any updates or changes are now incorporated on the register.
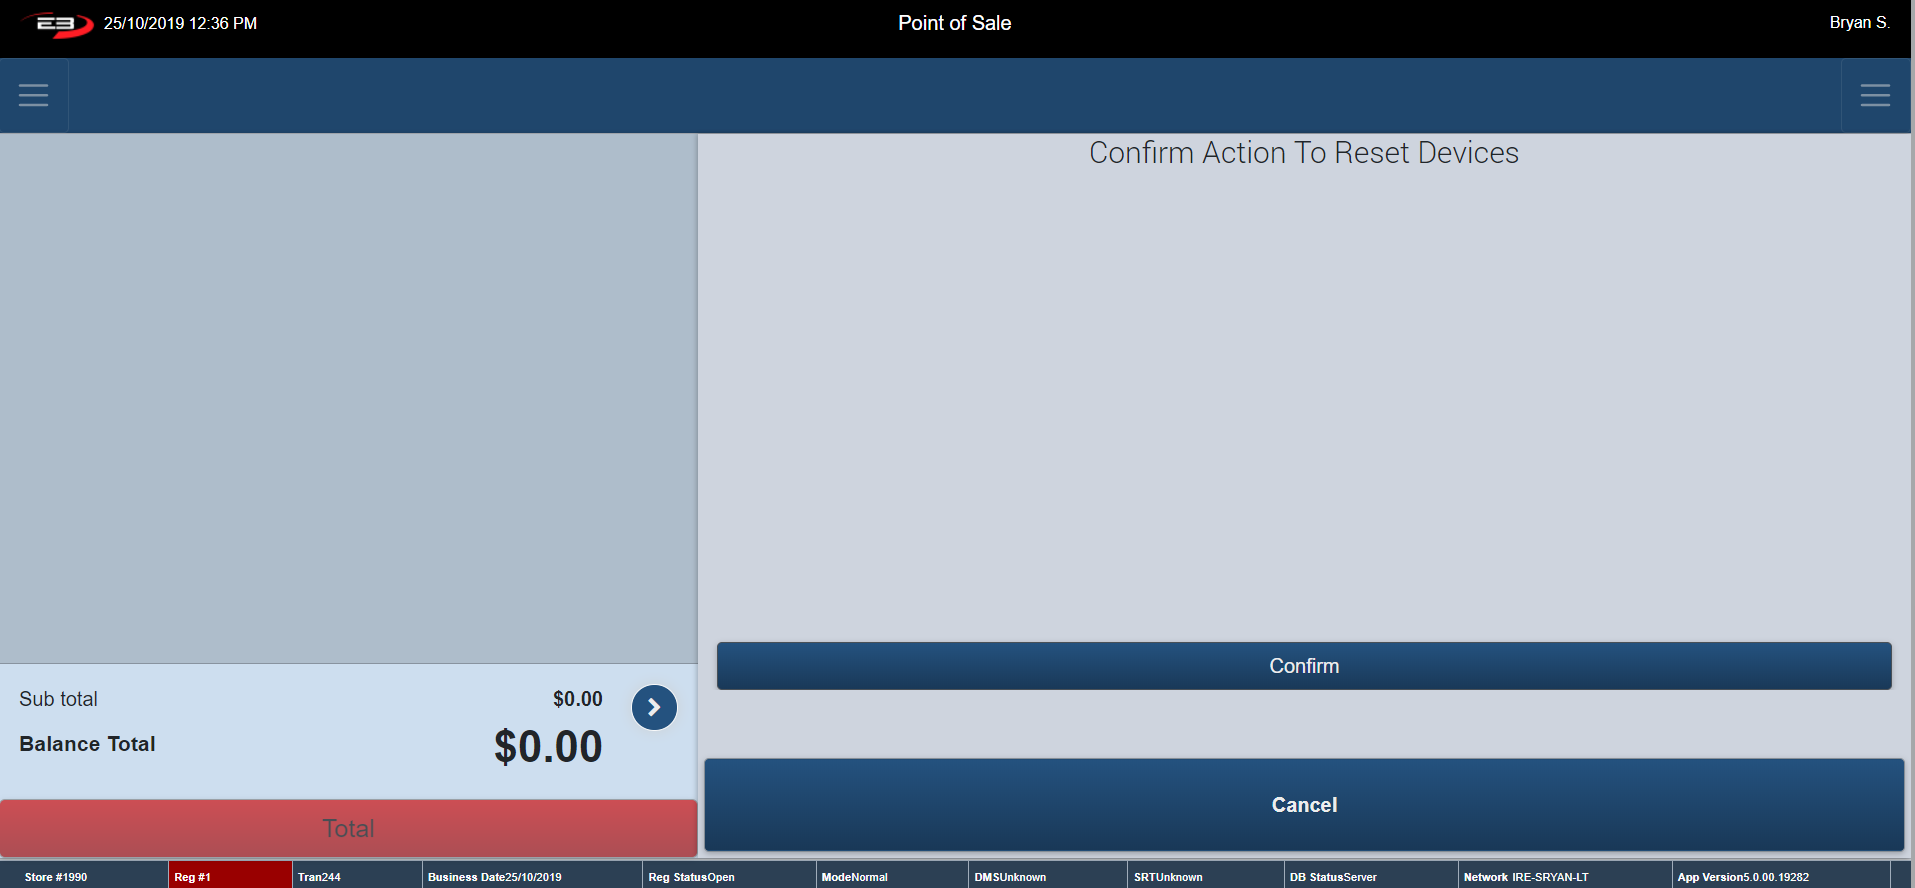
Reset Devices
Devices should be reset to optimize performance.
From the Item Entry Screen go to Left Support Menu – Admin.
Click Reset Devices.
A confirmation dialog comes up to confirm that you do want to reset all devices on the register.
Click Confirm to continue or Cancel to go back.
If confirm is selected, the register returns to Item Entry Screen and the devices restart.
Screenshot of the Point of Sale application.
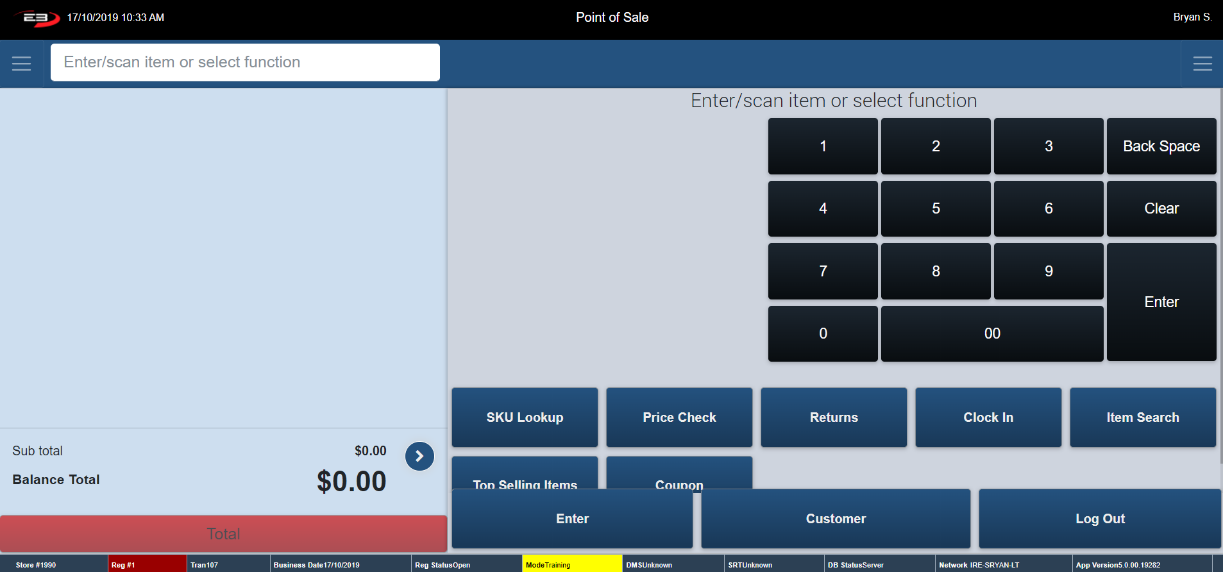
Training Mode on
Using the Training Mode function gives you the opportunity to train on a live register without affecting any business information. Note: while in training mode none of the data is stored in the database. For training mode to commence, the register must be open and not in the middle of a transaction.
From the Item Entry Screen go to Left Support Menu – click Training Mode On
Screenshot of the Point of Sale application.
Most features work as normal in training mode except the transactions rung through are deleted straight away and therefore will not show up on your Hard Totals Report/EMV Chip and Pin Report.
You will know the register is in training mode when the Mode Training Icon is highlighted (see below).
Screenshot of the Point of Sale application.
To exit out of Training Mode, return to the Left Support Menu and click Training Mode Off. Note: Just logging out of the register will not turn training mode off.
The previously highlighted Mode Training icon goes back to normal.
The register returns to the Item Entry Screen where transactions can continue to take place.
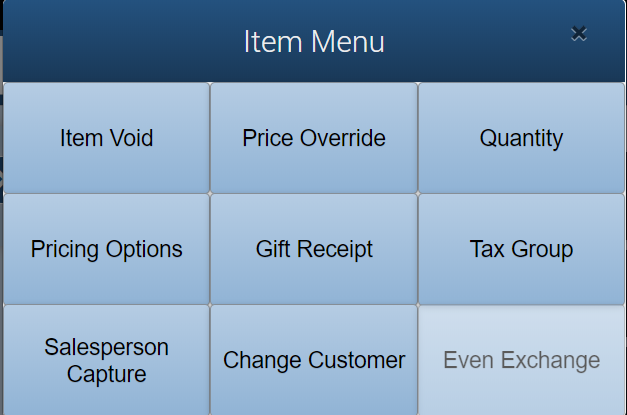
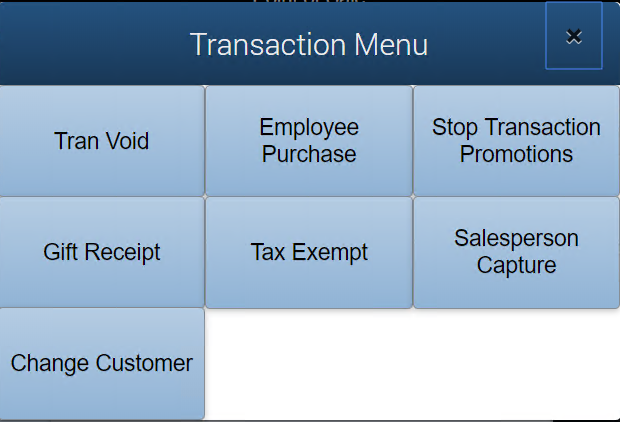
Item Context Menu
The Item Context Menu contains different functions that can be used on an individual item in a transaction that is still in progress. This menu is only accessible once a transaction is in place.
Item Void
Price Override
Quantity
Pricing Options
Gift Receipt
Tax Group
SalesPerson Capture
Change Customer
Even Exchange
Once an item has been rung thorugh the register, a screen like the one below appears.
Screenshot of the Point of Sale application.
Screenshot of the Point of Sale application.
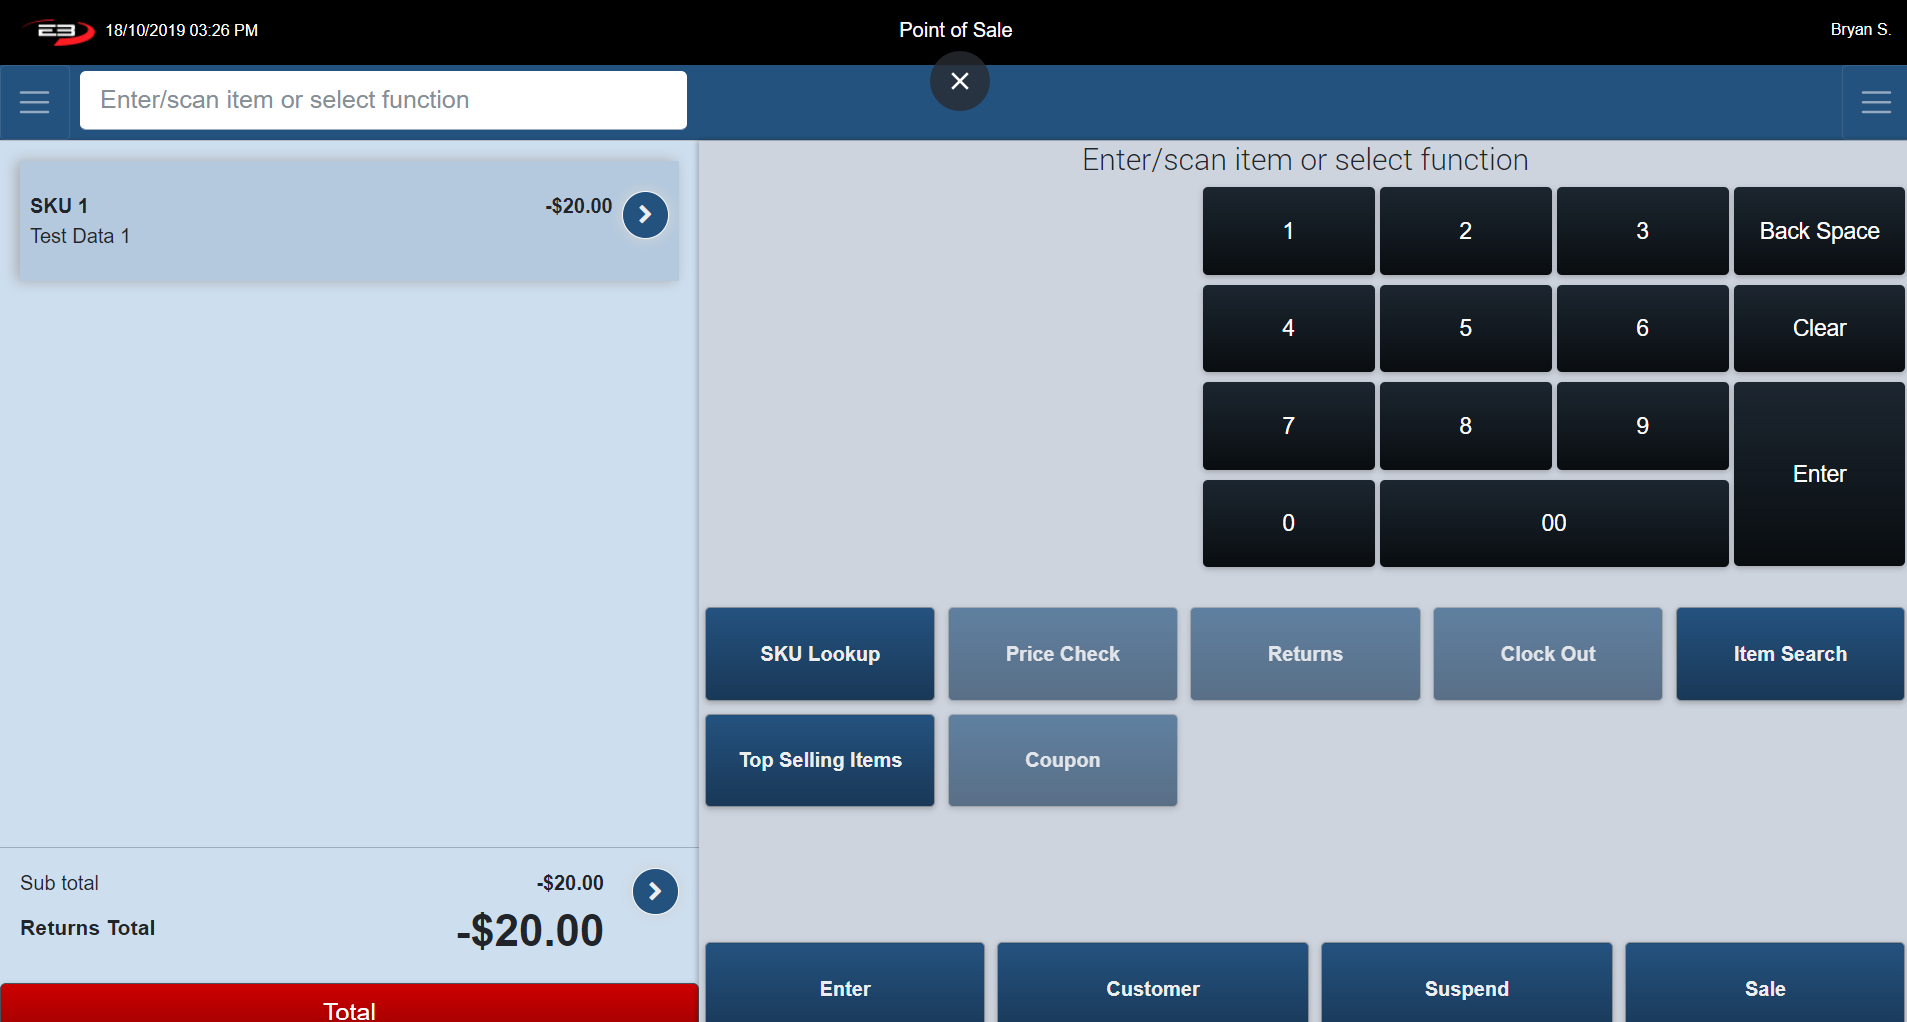
To Locate to the Item Context Menu, click the button beside SKU 1 – Test Data 1.
Screenshot of the Point of Sale application.
The Item Context Menu will pop up:
Item Void
Item Void allows you to delete or cancel an item in a transaction that is still in the process of being completed.
The distinction between Item Void, Trans Void and Post Void is that Item Void is the process of voiding one singular item that is in the process of being completed versus voiding a whole transaction that is still in the process of being completed (Trans Void) or a void on a transaction that was already completed (Post Void).
From Item Entry Screen, go to Item Context Menu (Explained Previous) assuming there is a transaction in the process of being completed.
The Item Menu appears:
Screenshot of the Point of Sale application.
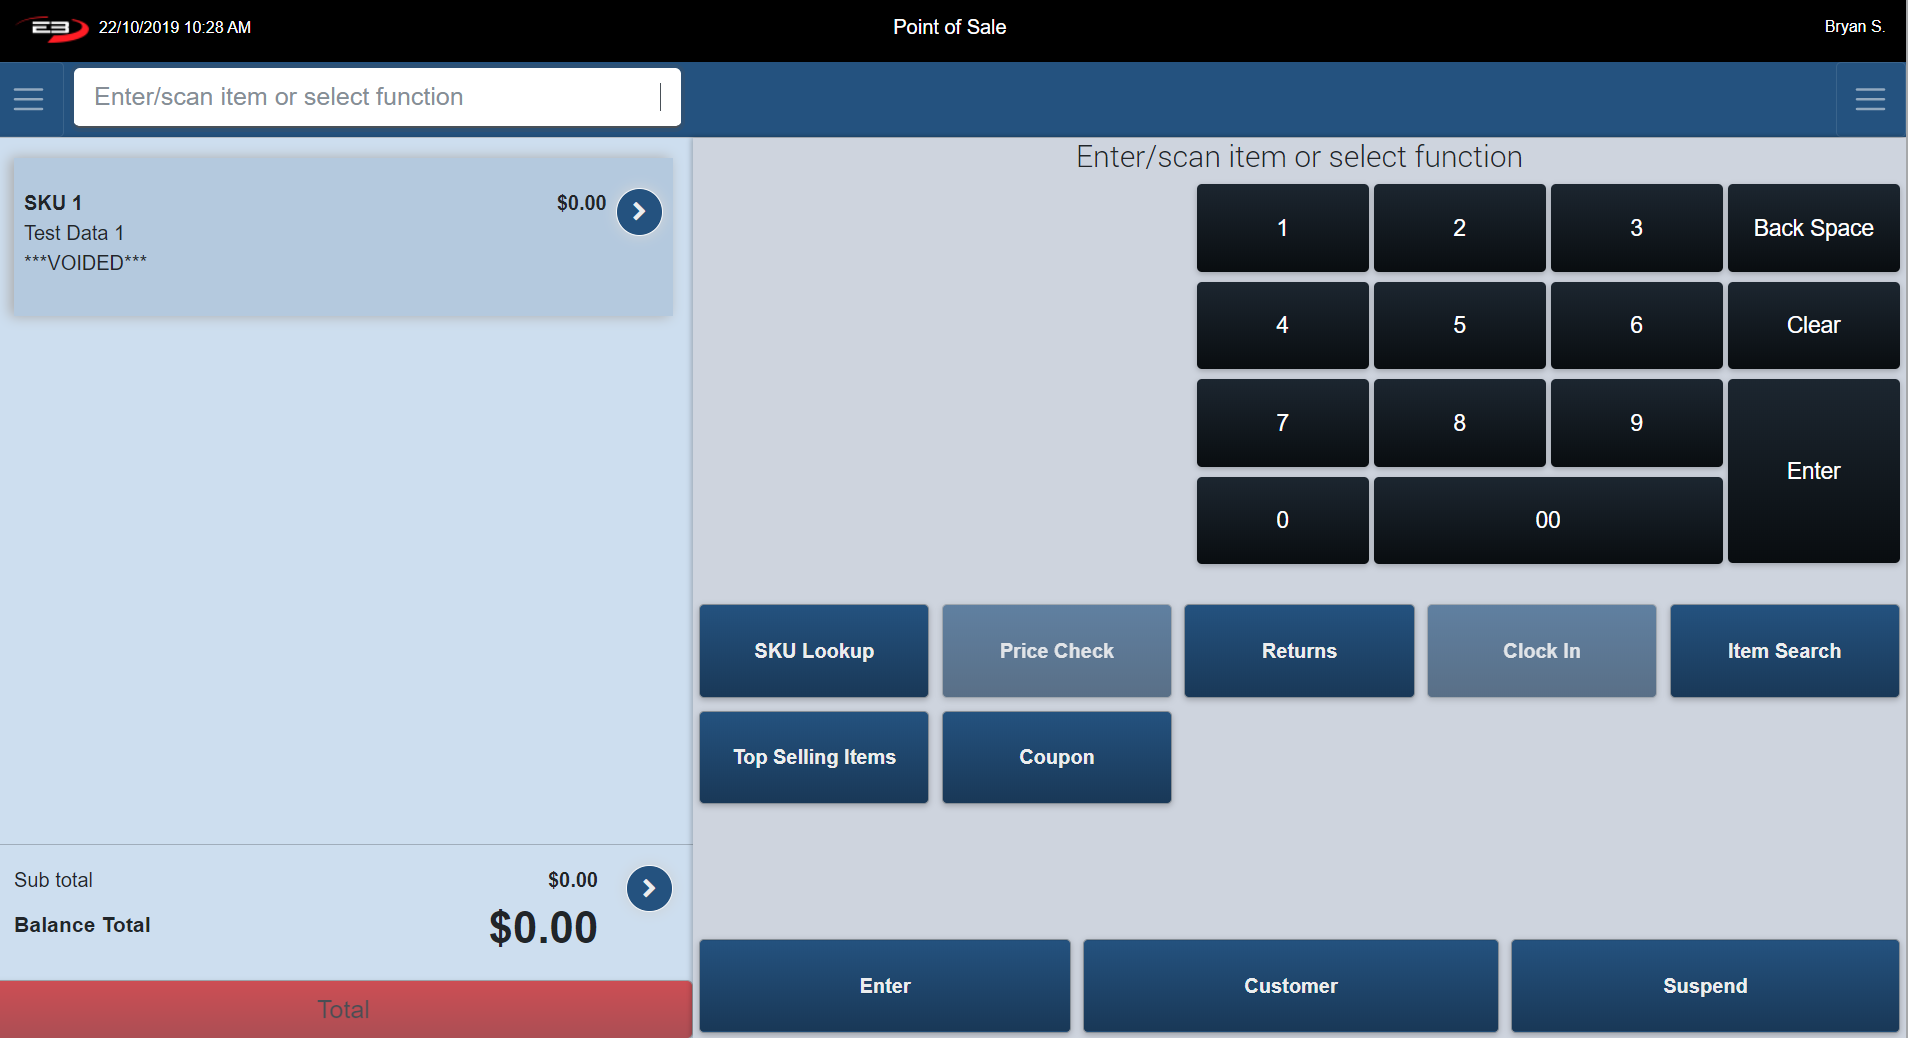
Select Item Void.
The item is now voided.
When an item is voided, "VOIDED" shows up under the description of the item in the Transaction Tab (see below).
Screenshot of the Point of Sale application.
Price Override
Price Override allows an authorized employee to alter the price of a product or service to allow for a once off discount.
From Item Entry Screen, go to Item Context Menu (Explained Previous), assuming there is a transaction in the process of being completed.
The Item Menu appears:
Screenshot of the Point of Sale application.
Click Price Override.
The register prompts you to click on an Item Price Change Reason.
Use the arrows provide to view additional price change reasons.
Click Cancel the register returns to Item Entry Screen.
Screenshot of the Point of Sale application.
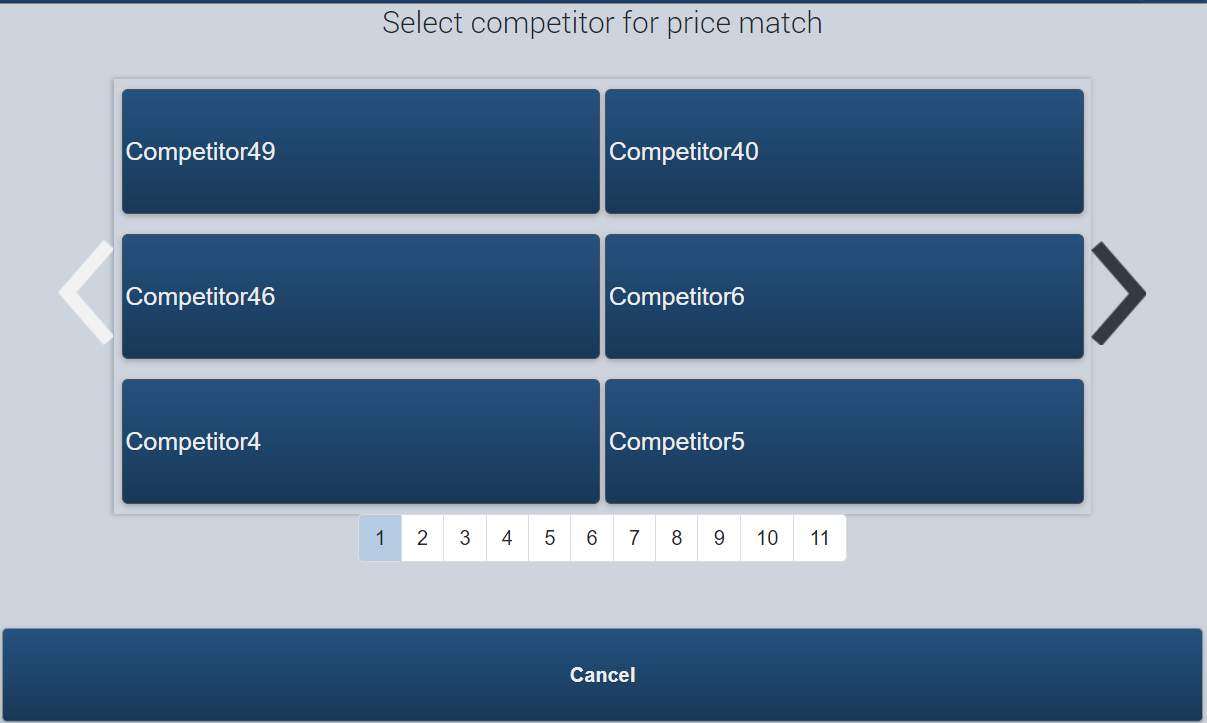
Choosing Price Match prompts, you to Choose the Store that you are price matching (All of the other option skip this step. Use the arrows provide to view different criteria).
Screenshot of the Point of Sale application.
Once the item price change reason is selected, the register goes to an Explanation Screen.
Provide a written explanation of the Price Override and click Enter.
Click Cancel, the register returns to Item Price Change Reason.
Screenshot of the Point of Sale application.
Type in the new price for the item and click Enter.
Screenshot of the Point of Sale application.
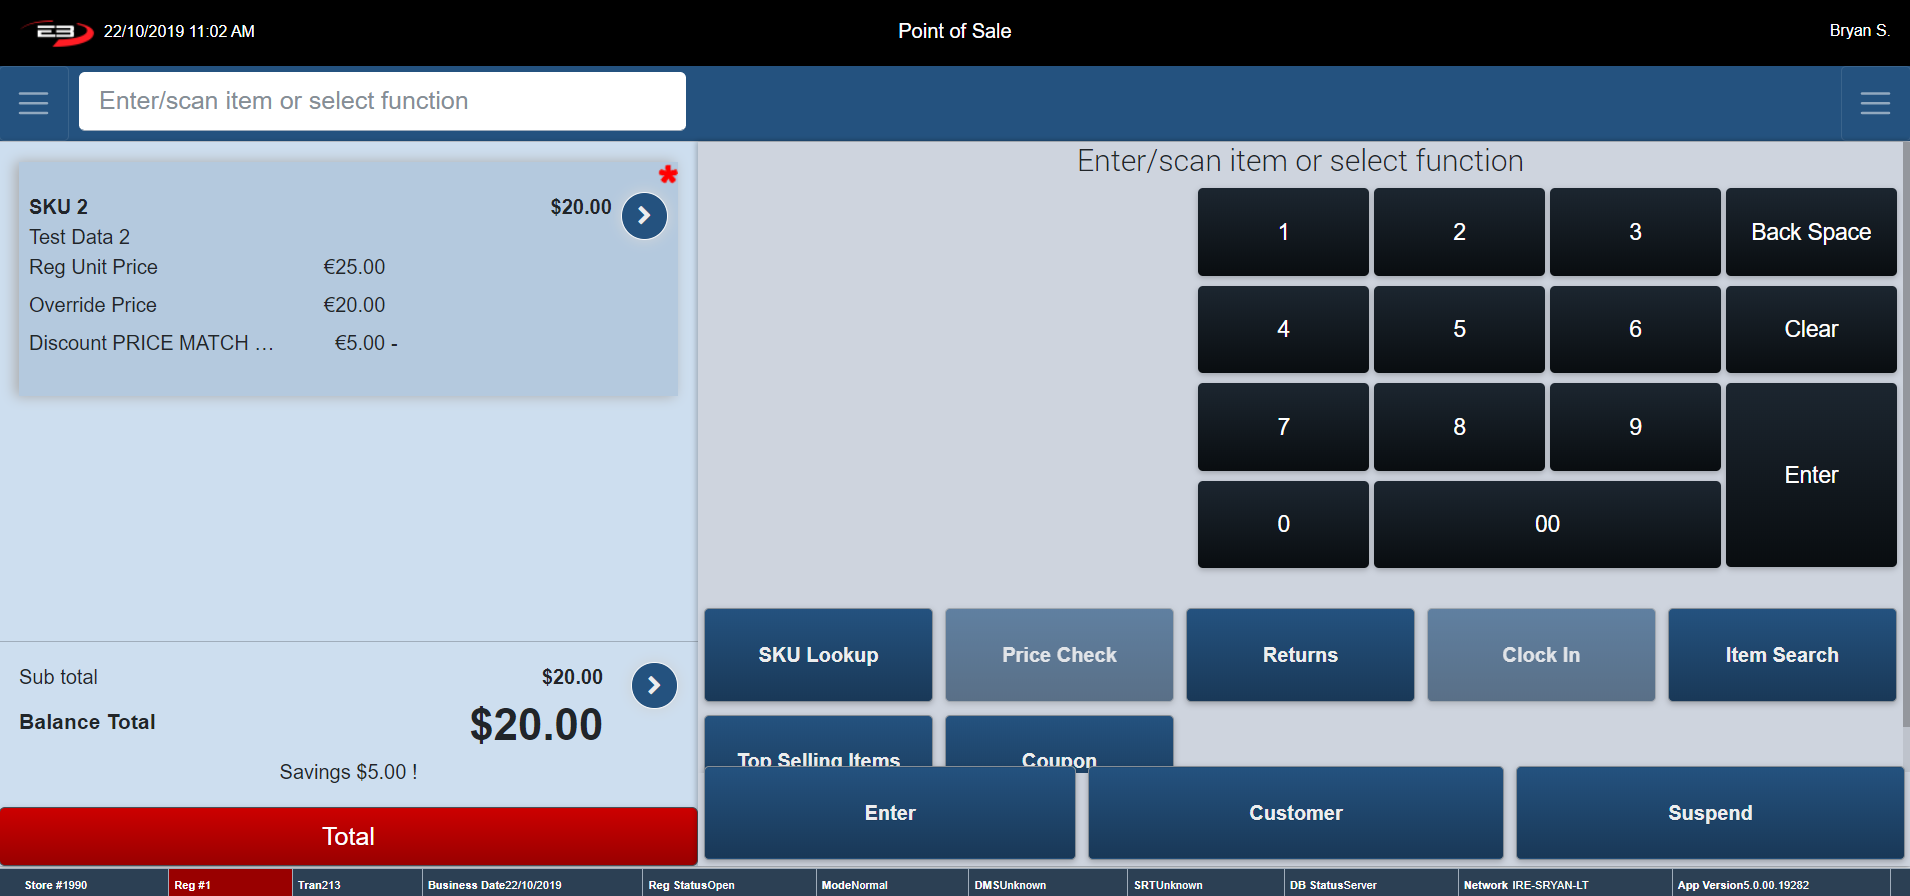
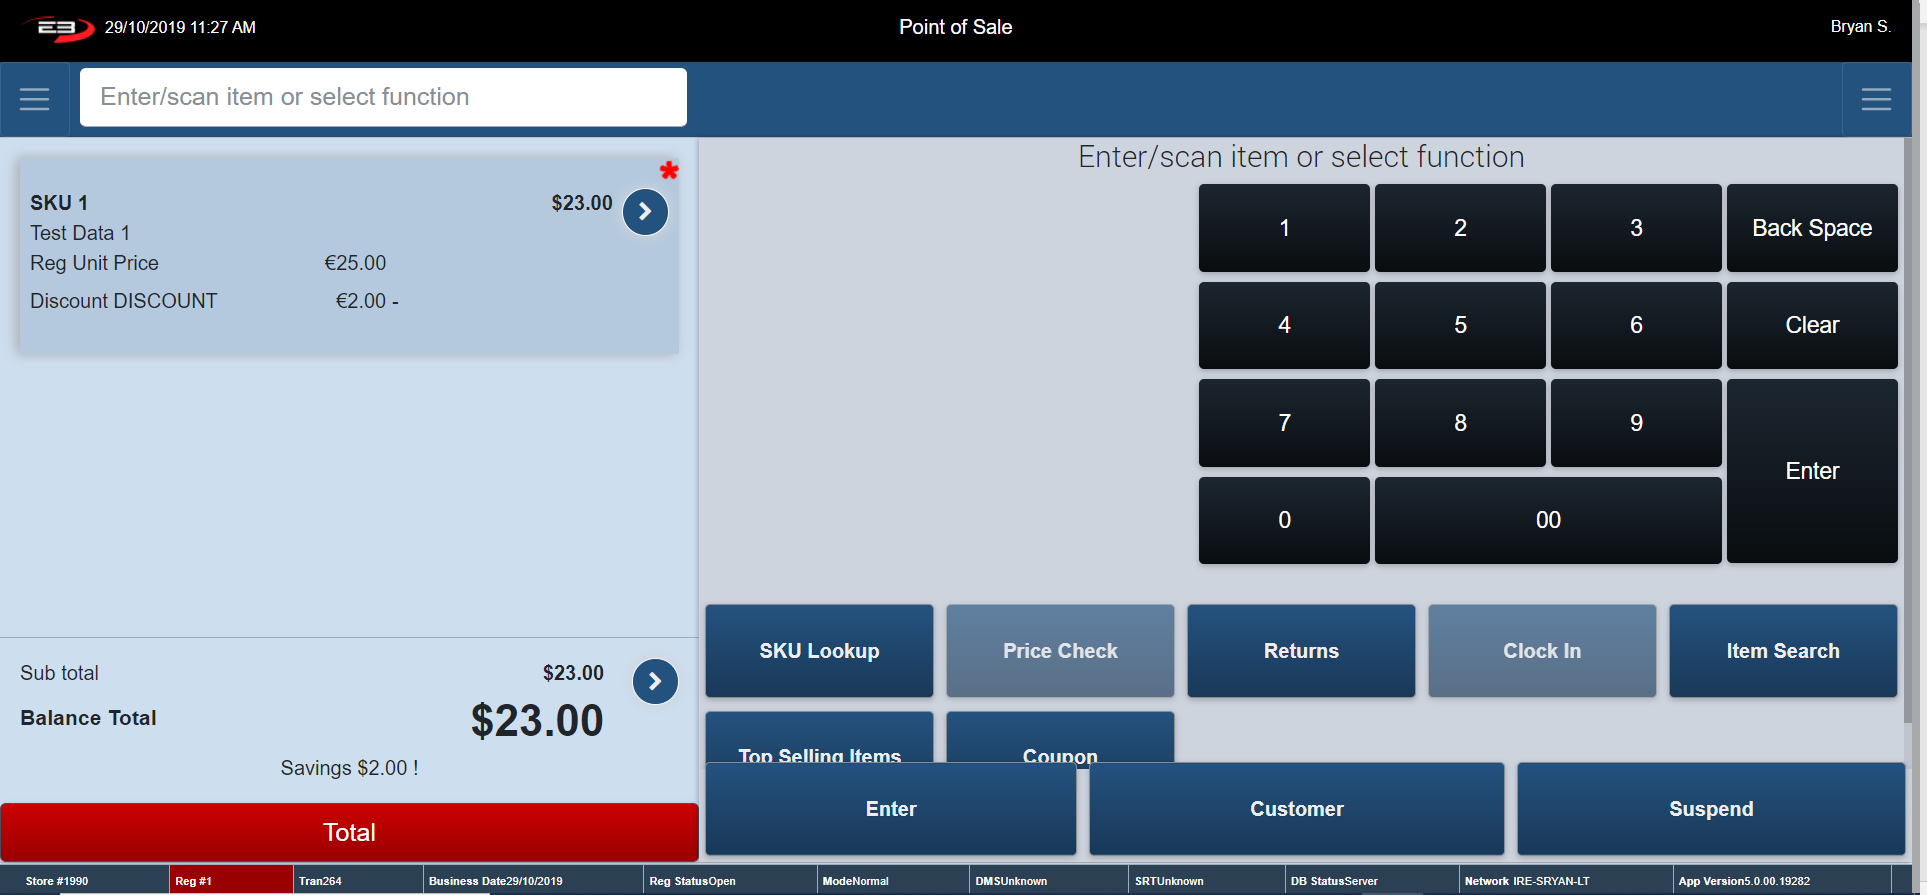
When a discount is applied to an item it is stated in the Transaction Tab (see below).
A red asterisk shows up beside the Price Override. (Note: $5 has been taken off SKU 2 – Reg Unit Price was $25 – after discount is applied Discount Price is $20).
Price Override Change Reason shows up in Transaction Tab (See below).
Screenshot of the Point of Sale application.
Quantity
This function allows you to enter in the amount ornumber of a certain product being added to a transaction after one of these items has already been added.
From Item Entry Screen, go to Item Context Menu (Explained Previous) assuming there is a transaction in the process of being completed.
The Item Menu appears - click Quantity. The screen below appears.
Screenshot of the Point of Sale application.
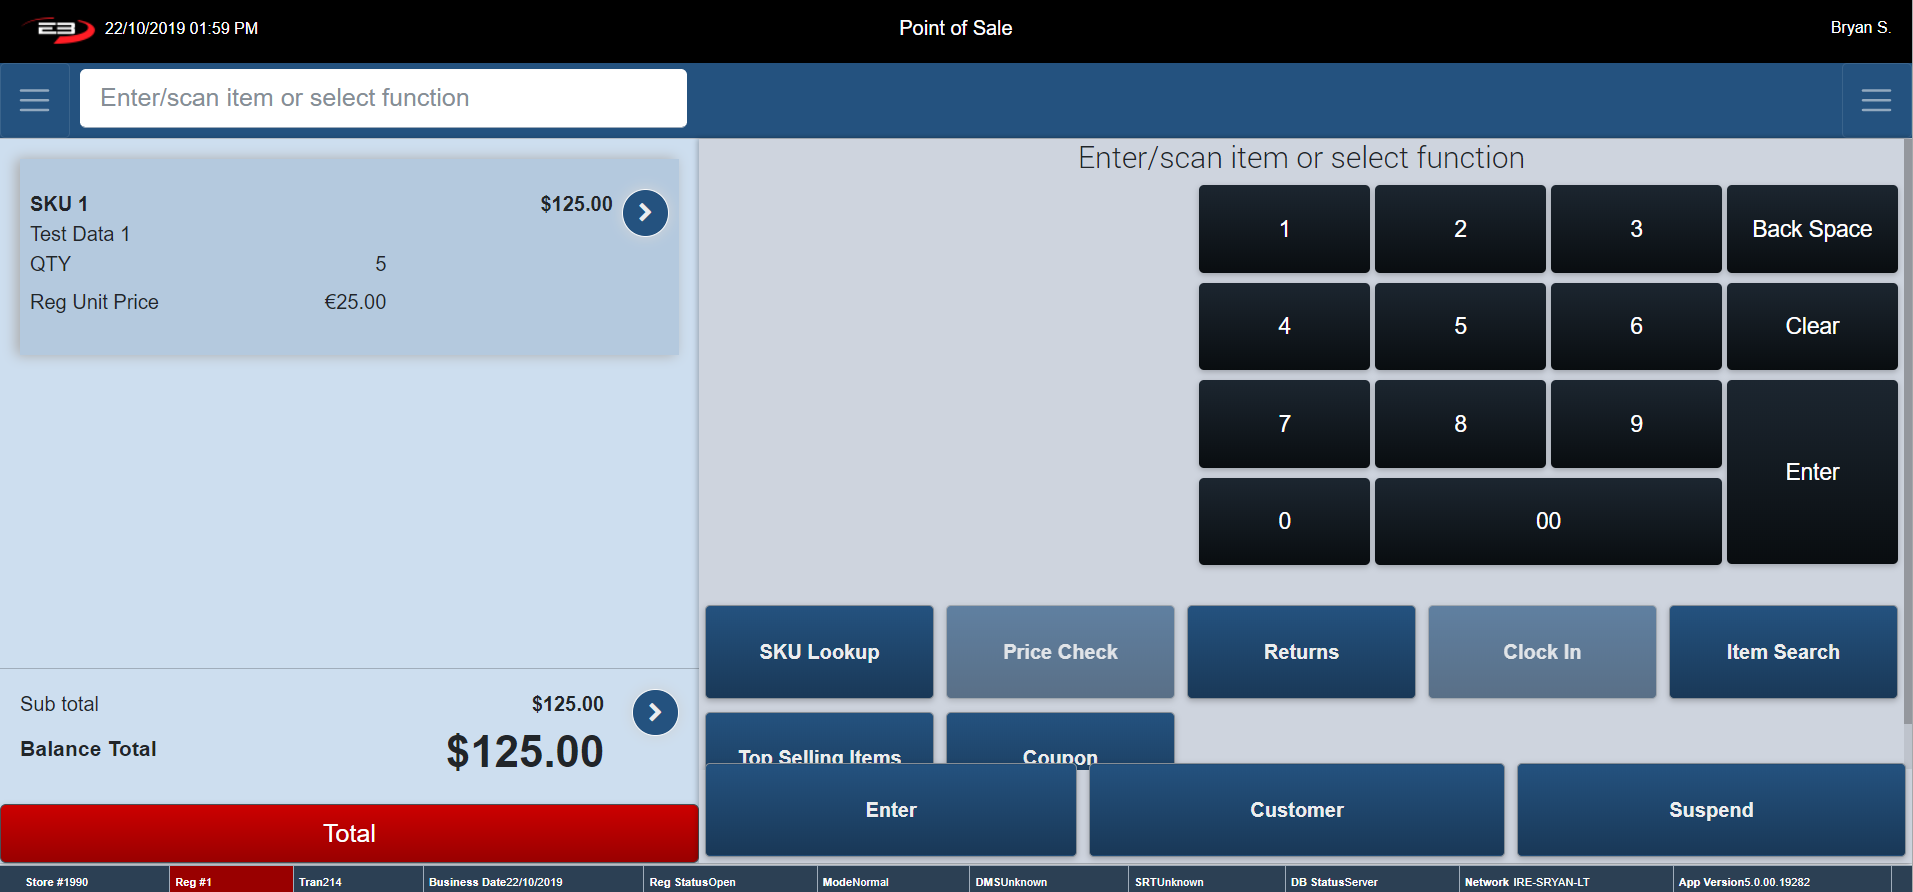
Enter in the amount of the product/service that the customer is buying and click Enter.
The register returns to the Item Entry Screen.
The updated quantity for the product/service is stated in the Transaction Tab (see below).
Screenshot of the Point of Sale application.
Pricing Options
This function allows you to manually adjust the price of an item using the below options:
Adjusting the amount of the item/service
Adjusting a percent off an item/service
Stopping a promotion on an item/service
From Item Entry Screen, go to Item Context Menu (Explained Previous) assuming there is a transaction in the process of being completed.
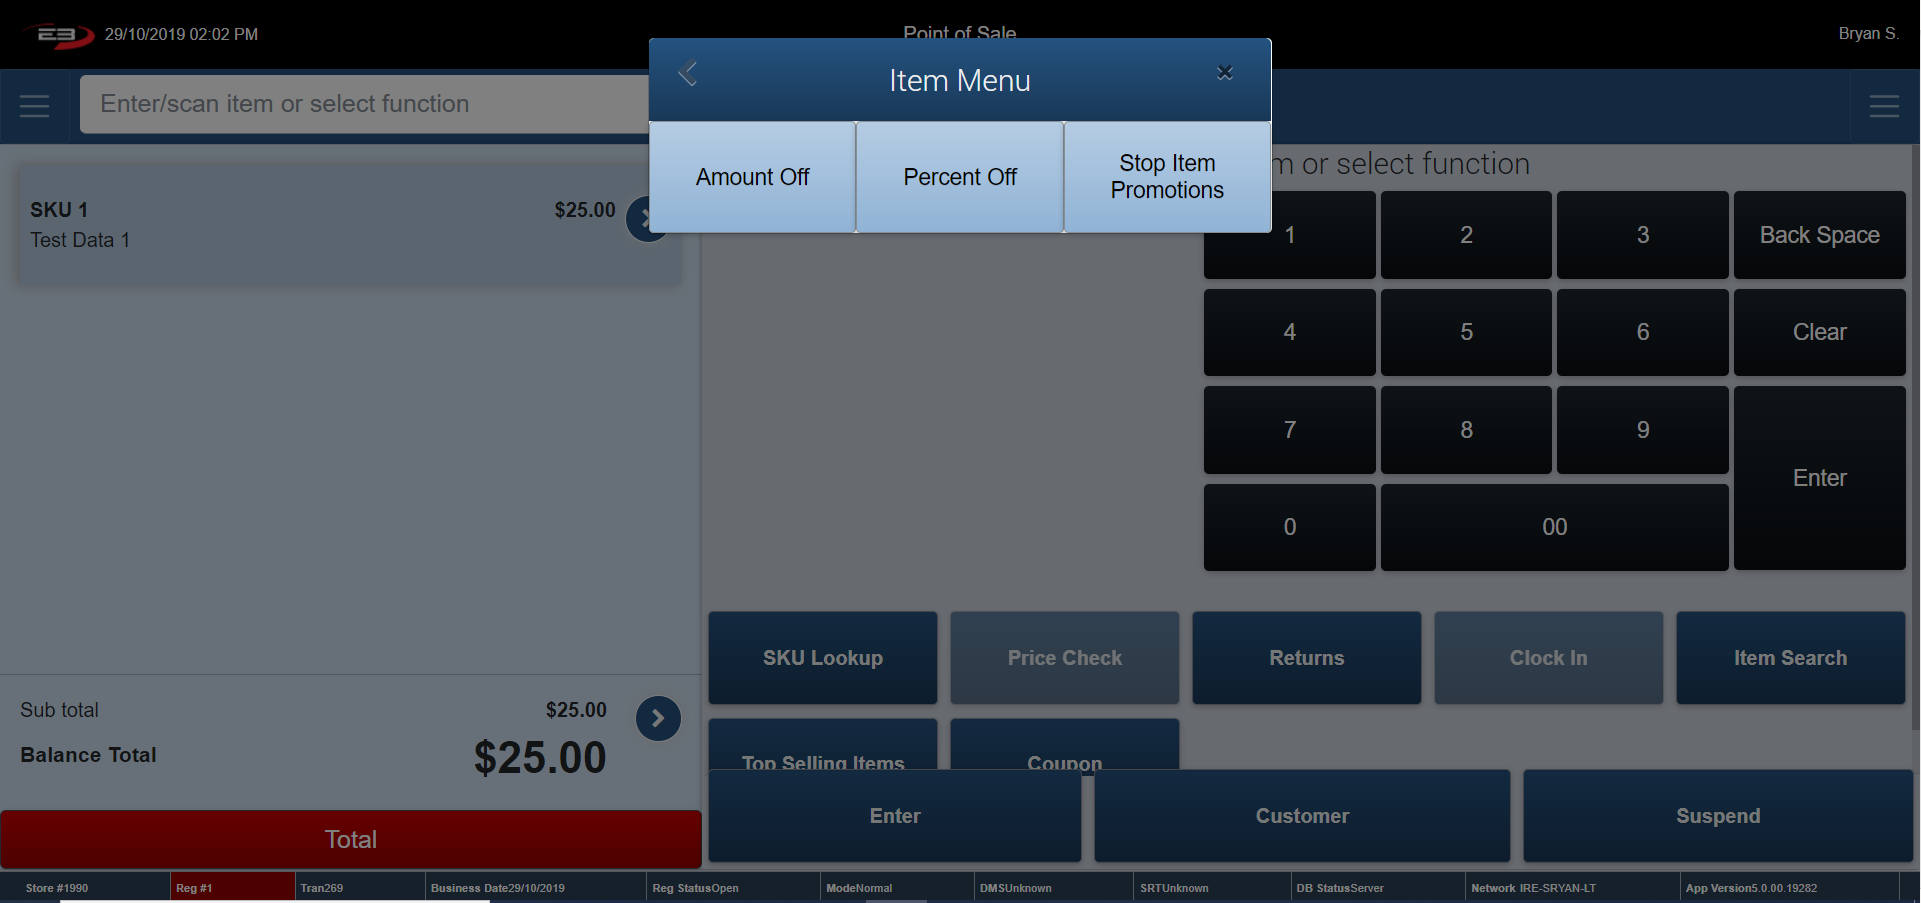
The Item Menu appears - click Pricing Options. The screen below appears.
Click on one of the Pricing Options:
Amount Off
Percent Off
Stop Item Promotions
Screenshot of the Point of Sale application.
Amount off
Click Amount Off - The screen below appears.
Screenshot of the Point of Sale application.
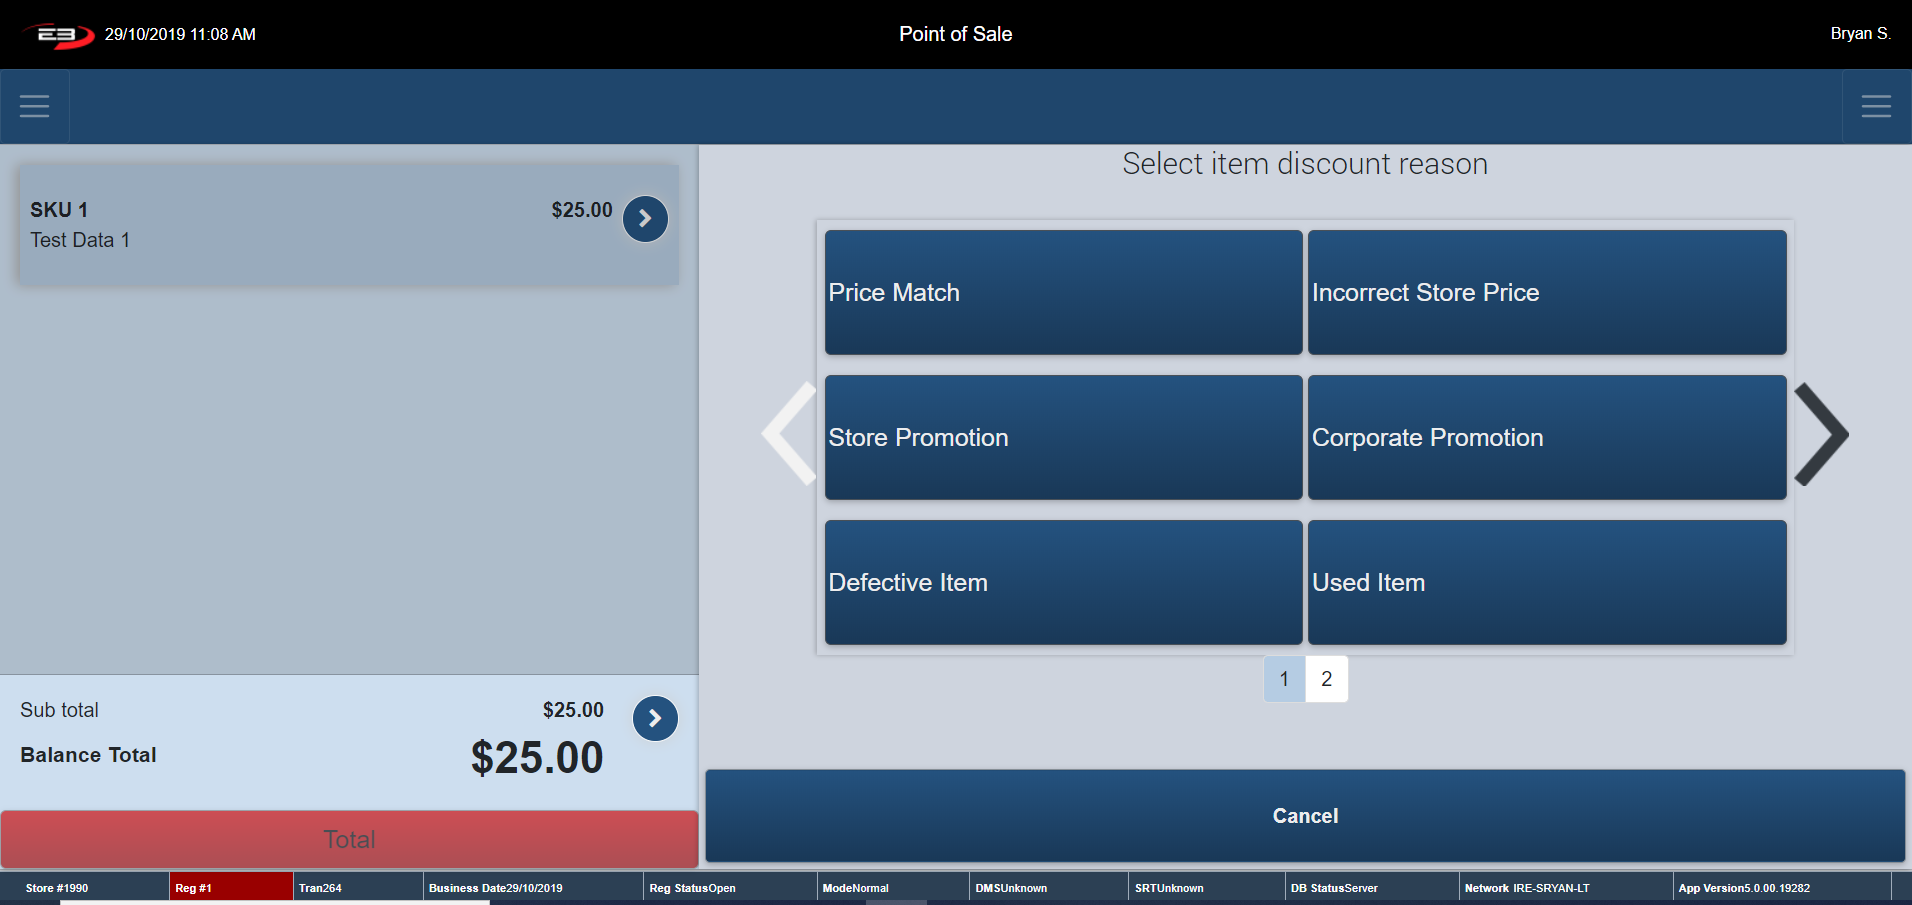
Choose one of the listed Item Discount Reason. Use the arrows provide to view different criteria**.**
Applying a Pricing Option discount to a SKU that has already had a Pricing Option Discount take place, overrides the previous discount.
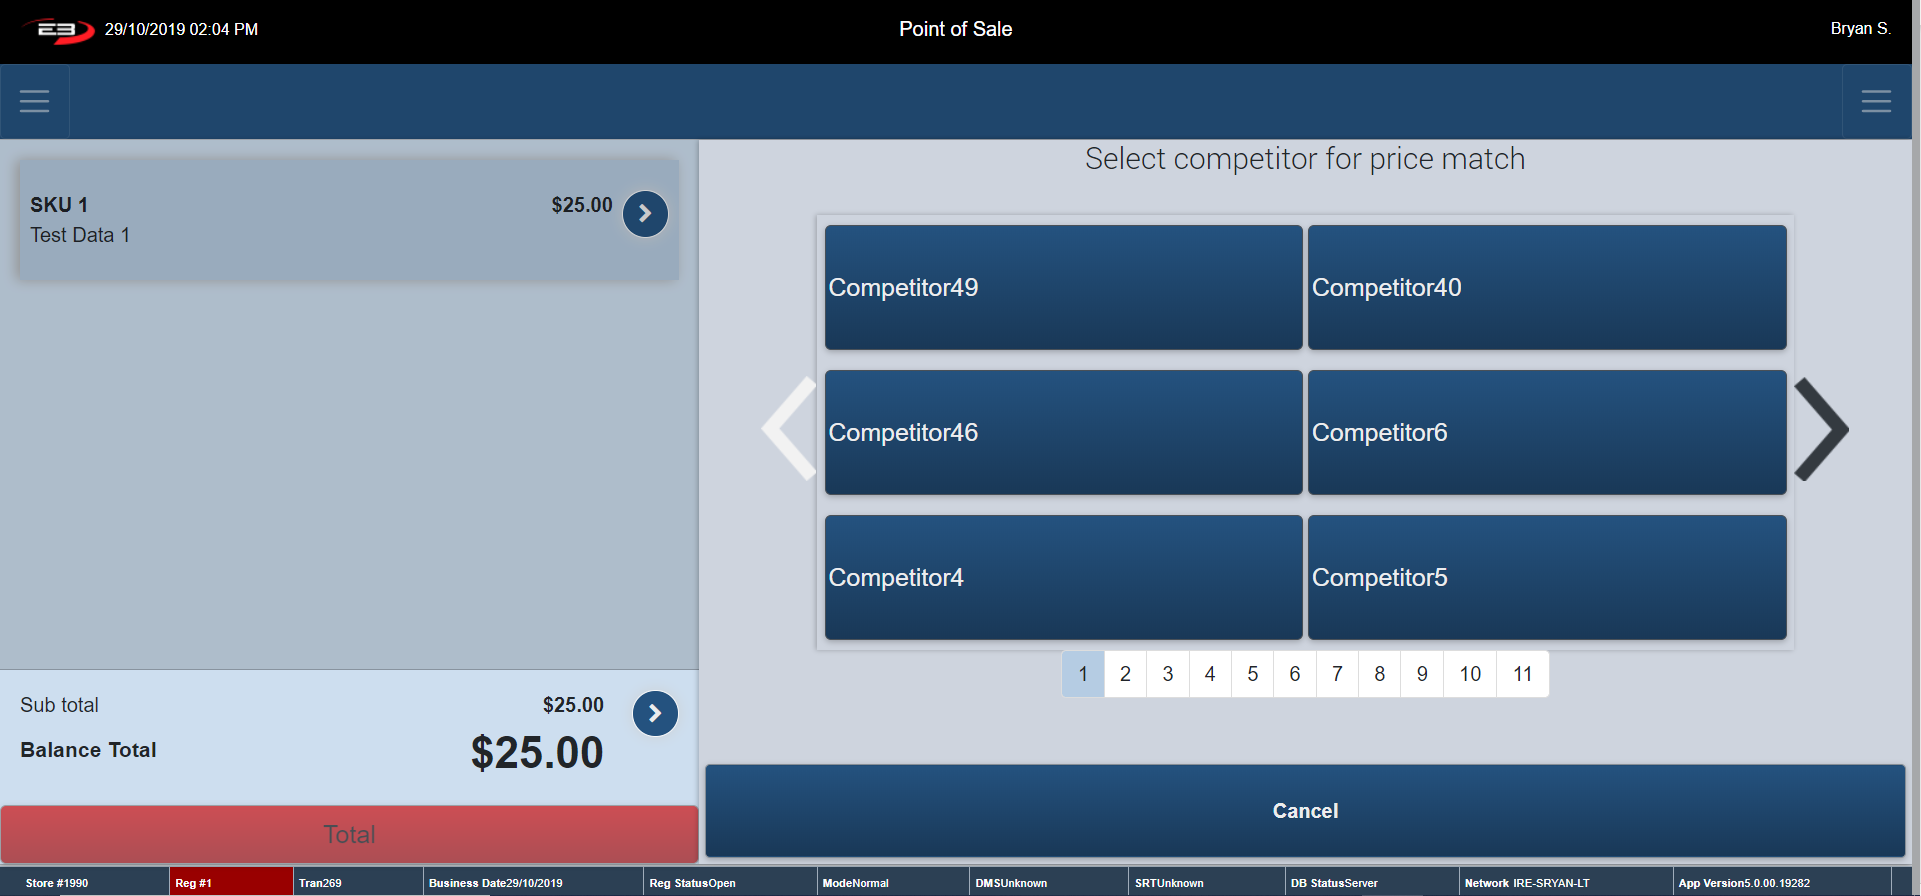
Choosing Price Match asks you to select the Store which your Price Matching (All of the other options skip this step).
Screenshot of the Point of Sale application.
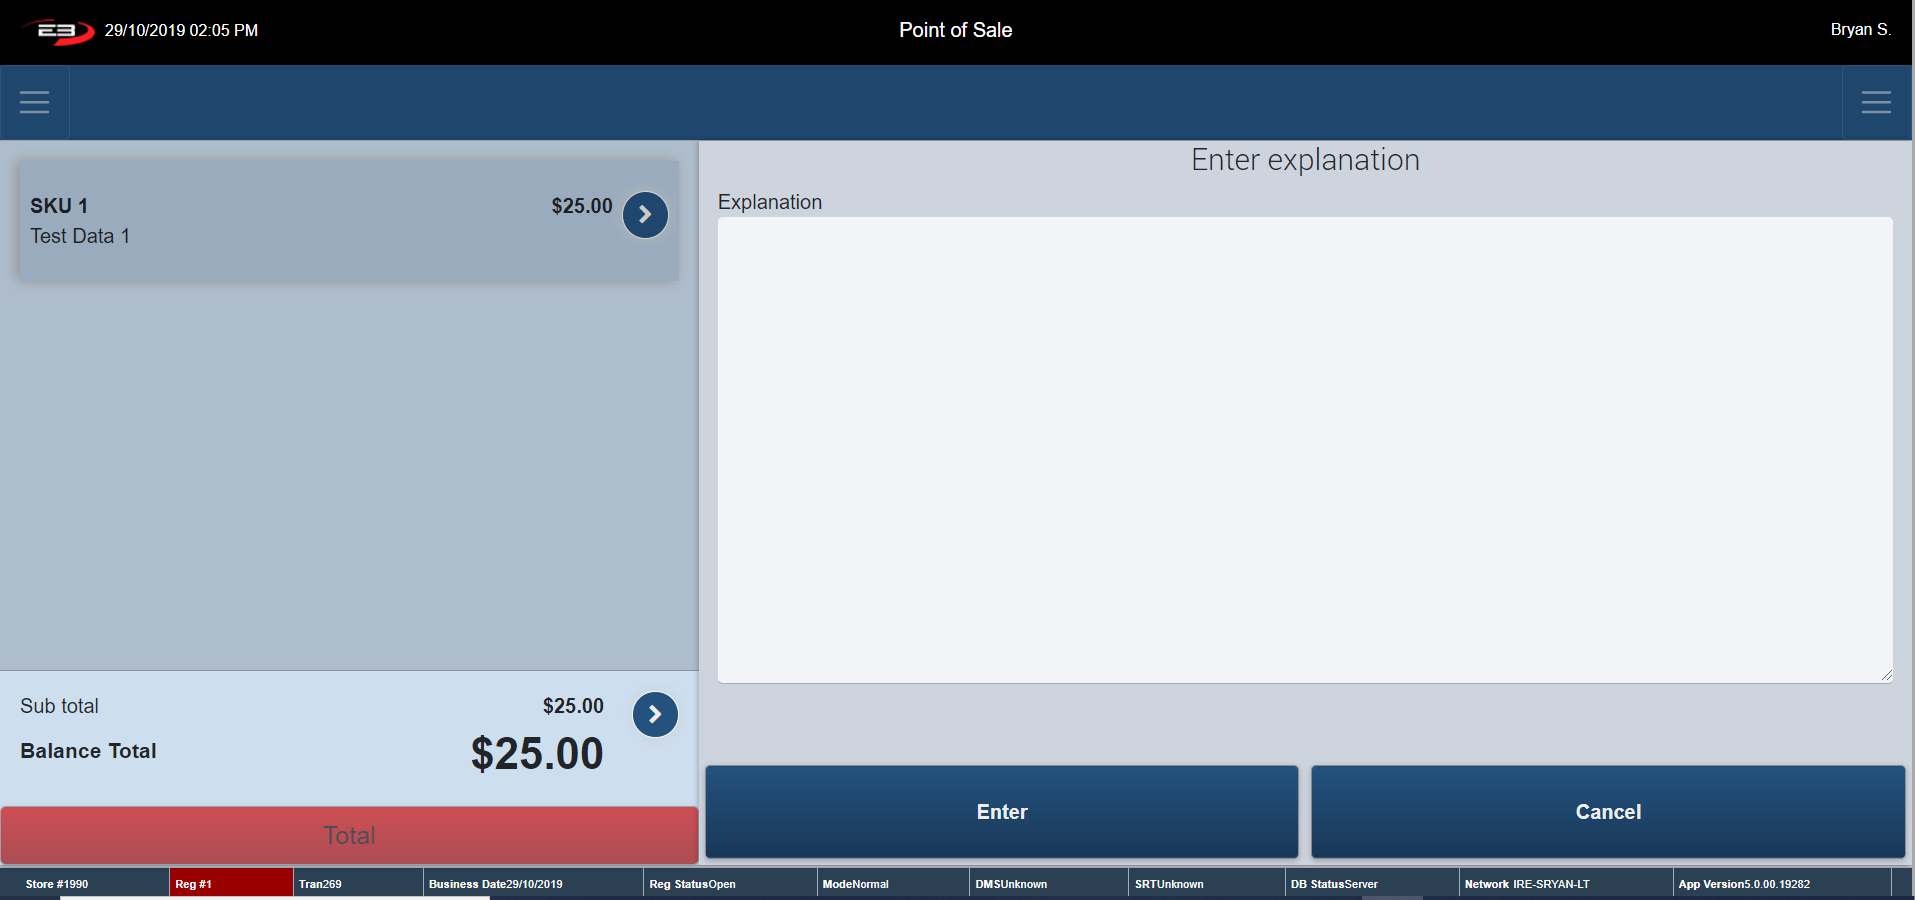
Once the Item Discount Reason is selected, the register goes to an Explanation Screen.
Provide a written explanation of the amount off and click Enter.
Click Cancel to go back to Item Discount Reason Screen.
Screenshot of the Point of Sale application.
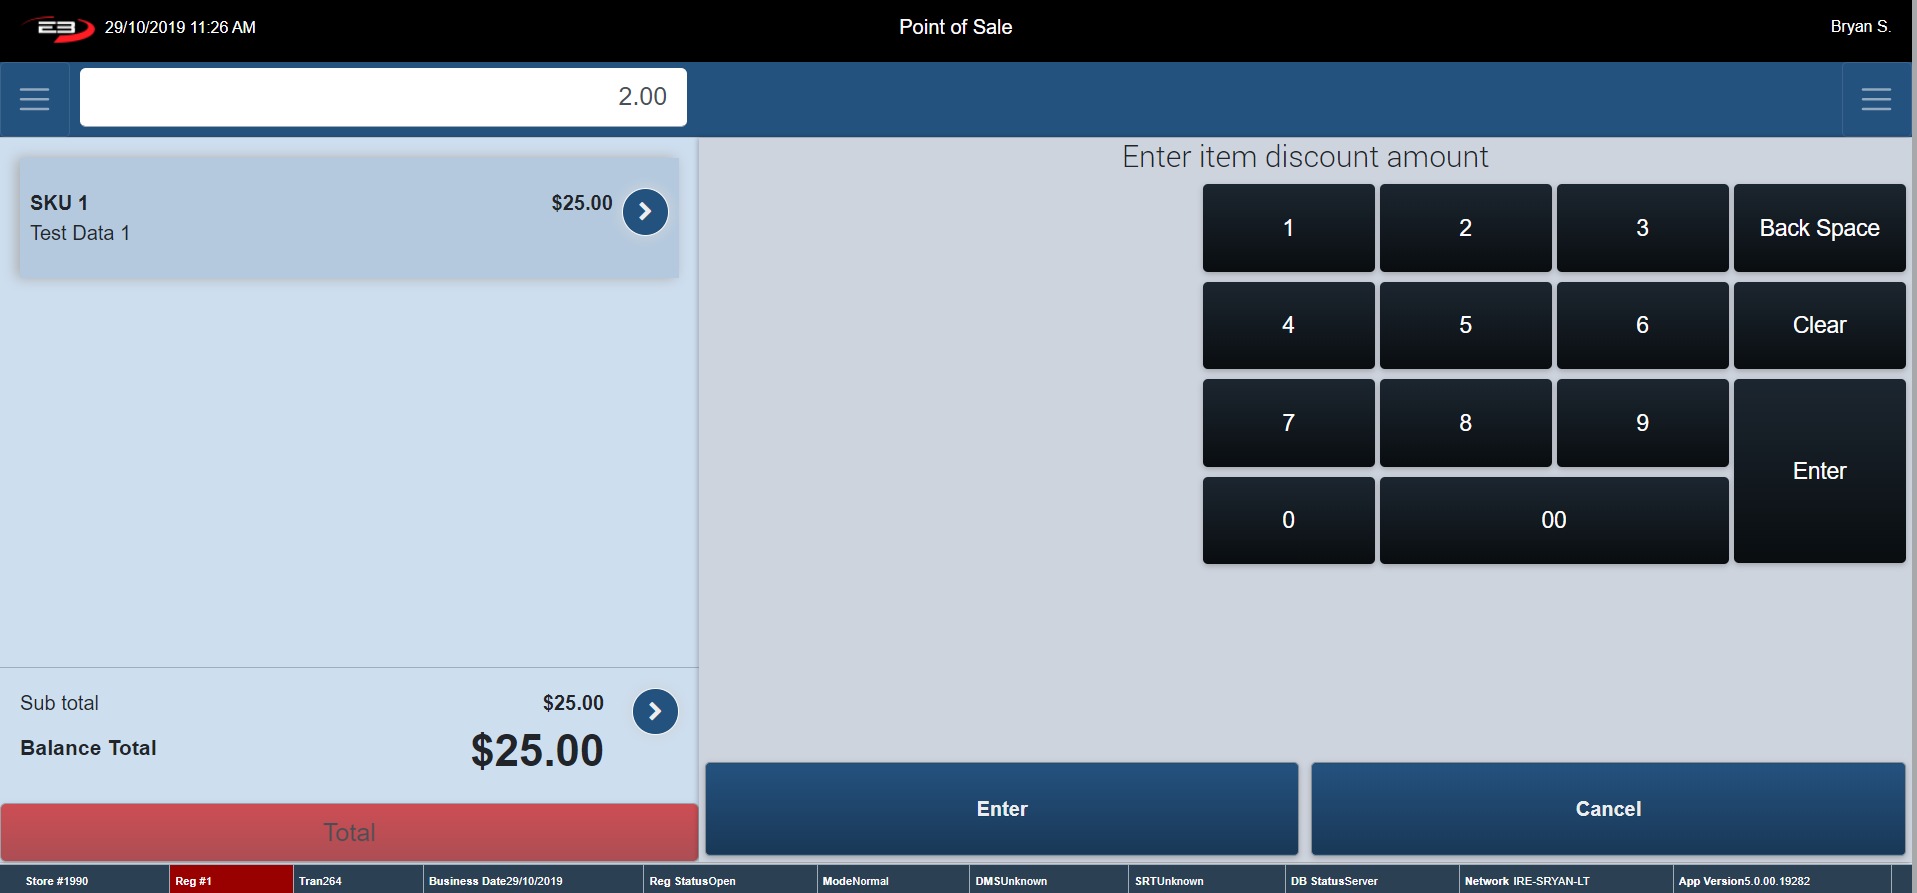
Enter in the amount that is getting discount off the item and press Enter.
Screenshot of the Point of Sale application.
When a discount is applied to an item it is stated in the Transaction Tab (see below).
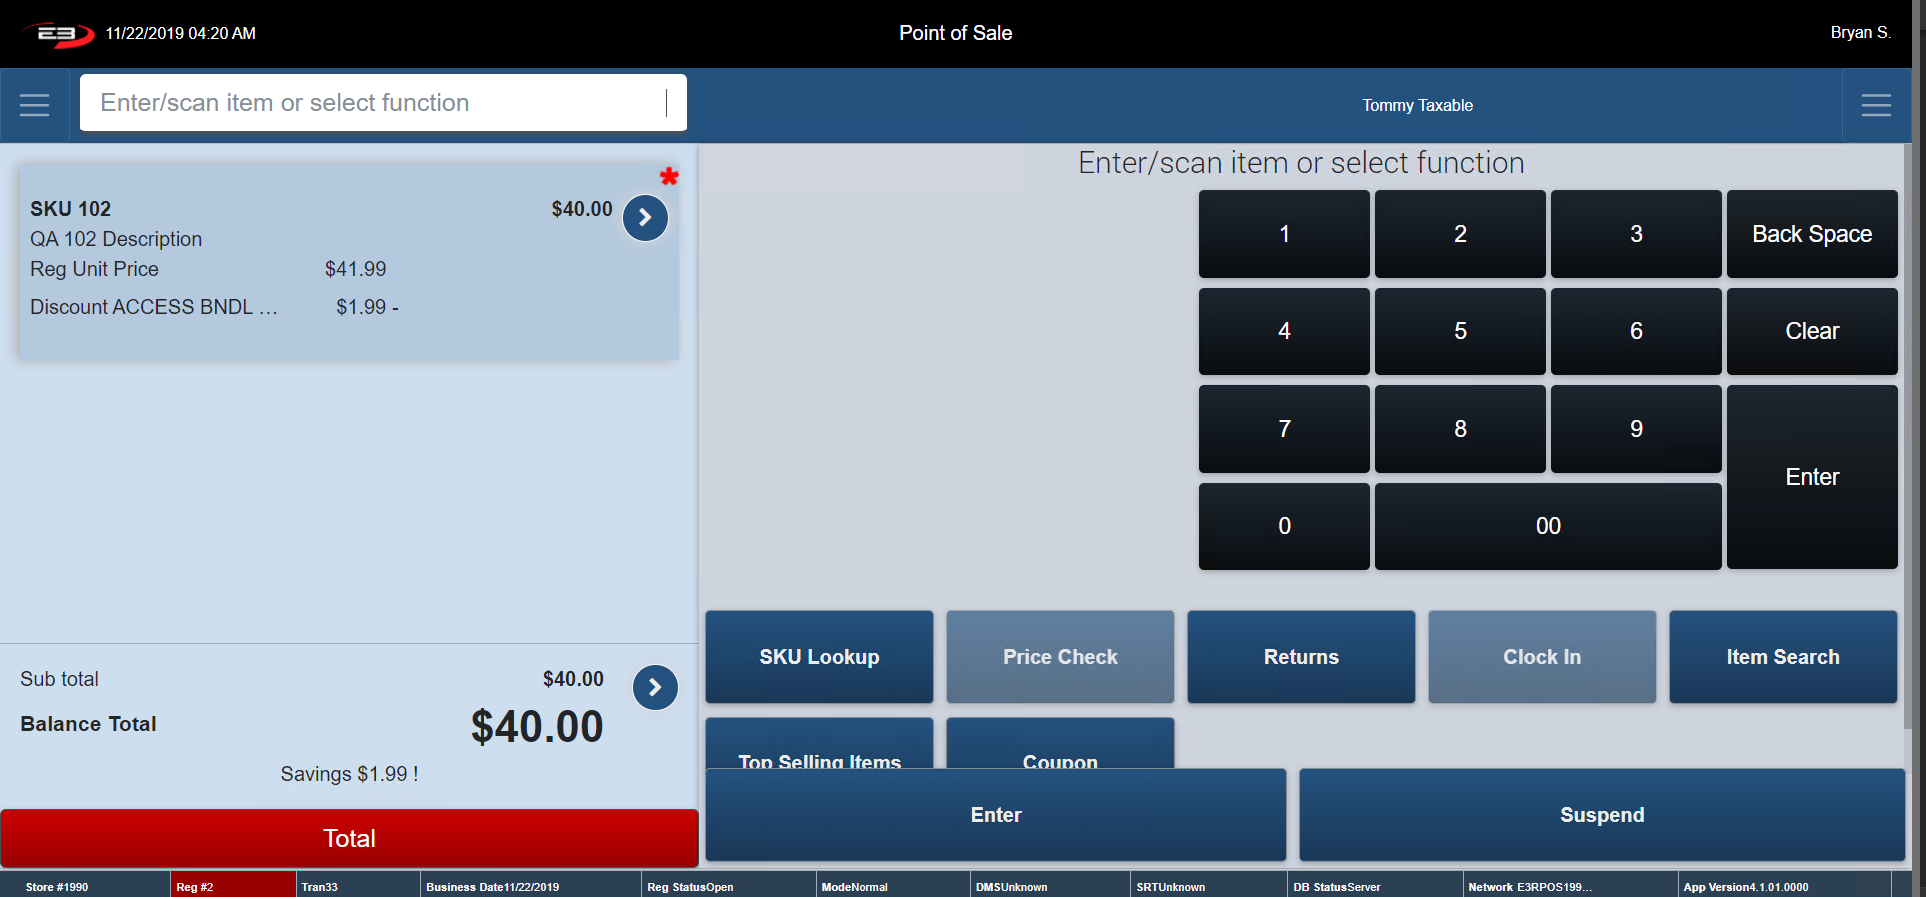
A red asterisk shows up beside the discount. (Note: $2 has been taken off SKU 1 – Reg Unit Price was $25 – after discount is applied Discount Price is $23).
Screenshot of the Point of Sale application.
Percent Off
From Item Entry Screen, go to Item Context Menu (Explained Previous) assuming there is a transaction in the process of being completed.
The Item Menu appears - click Pricing Options.
Click Percent Off - The screen below appears
Screenshot of the Point of Sale application.
Choose one of the listed Item Discount Reason. Use the arrows to view other discount reasons.
Choosing Price Match, the register asks you to Choose the Store which your Price Matching (All of the other options skip this step).
Screenshot of the Point of Sale application.
Once the Item Discount Reason is selected, the register goes to an Explanation Screen.
Provide a written explanation of the Percent Off and click Enter.
Click Cancel, the register returns to Item Discount Reason Screen.
Screenshot of the Point of Sale application.
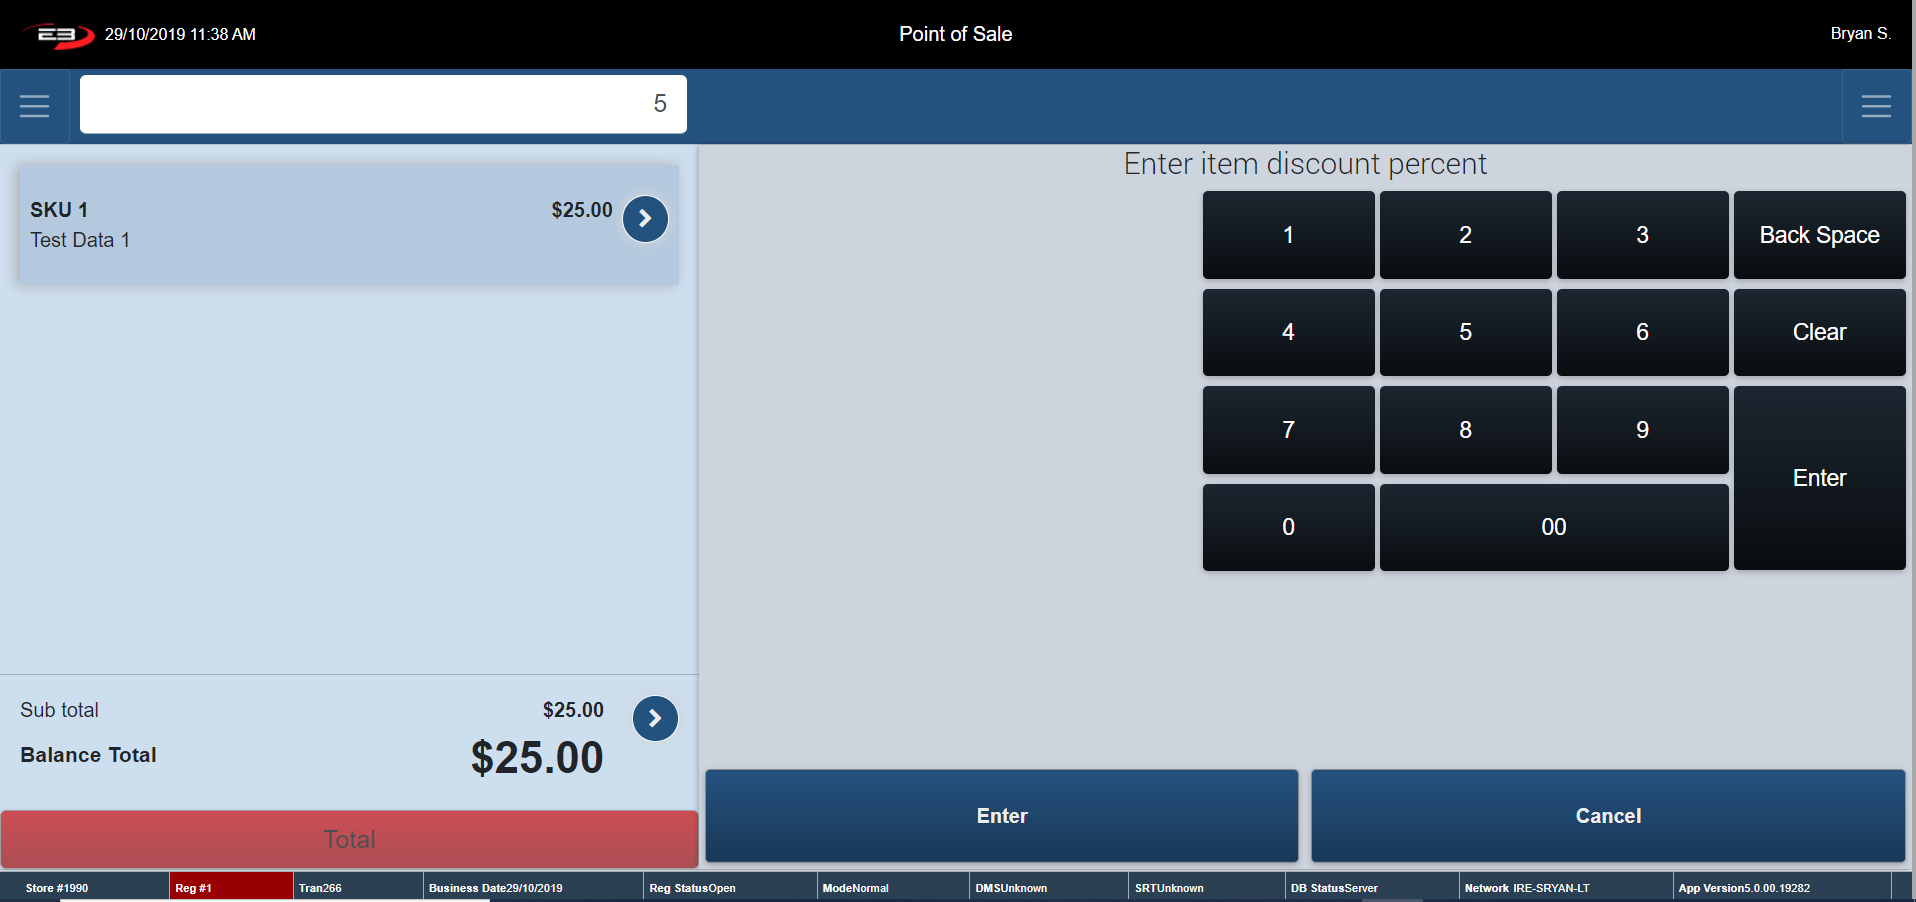
Enter in the percent you are discounting off the Item and click Enter.
Applying a Pricing Option Discount to a SKU that has already had a Pricing Option Discount take place, overrides the previous discount.
Screenshot of the Point of Sale application.
When a discount is applied to an item it is stated in the Transaction Tab (see below).
A red asterisk shows up beside the discount. (Note: 5% has been taken off SKU 1 – Reg Unit Price was $25 – after discount is applied Discount Price is $23).
Screenshot of the Point of Sale application.
Stop Item Promotions
The Stop Transaction Promotions function stops all promotions taking place in that transaction (Does not include Instant Saving, they are not considered a promotion).
From Item Entry Screen, go to Item Context Menu (Explained Previous) assuming there is a transaction in the process of being completed.
The Item Menu appears - click Pricing Options.
Click Stop Transaction Promotion – any promotion that has been already applied are now disregarded.
Screenshot of the Point of Sale application.
Clicking Stop Transaction Promotion on the example above adjusts the SKU back to the Regular Unit Price (see below).
Screenshot of the Point of Sale application.
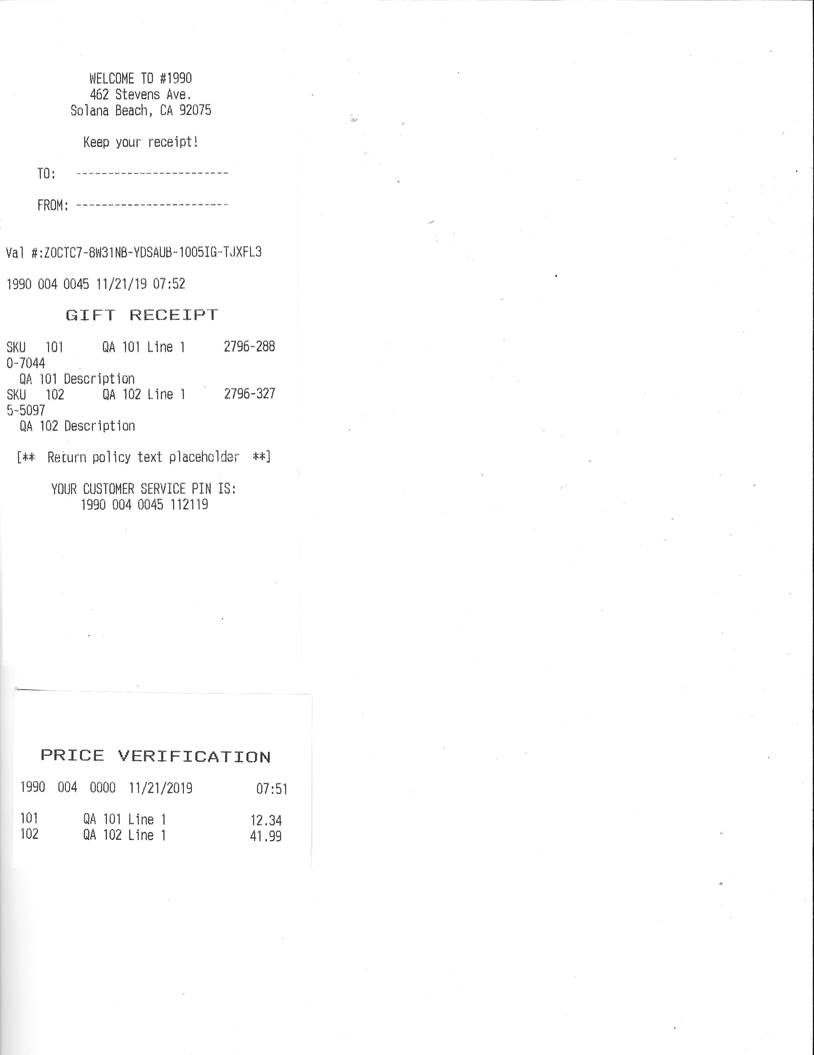
Gift Receipt
A customer may request a gift receipt to be printed with the purchase of an item.
This function is normally used when the customer is purchasing a gift for someone and wants to give them receipt, so they have the option of bringing the item back.
From Item Entry Screen, go to Item Context Menu (Explained Previous) assuming there is a transaction in the process of being completed.
The Item Menu appears - click Gift Receipt.
This ensures a gift receipt is printed for the individual product/service.
To get a Gift Receipt for every item in the transaction – go to Transaction Context Menu and click Gift Receipt.
Below is a sample Gift Receipt – Note: no prices are displayed on the receipt.
Screenshot of the Point of Sale application.
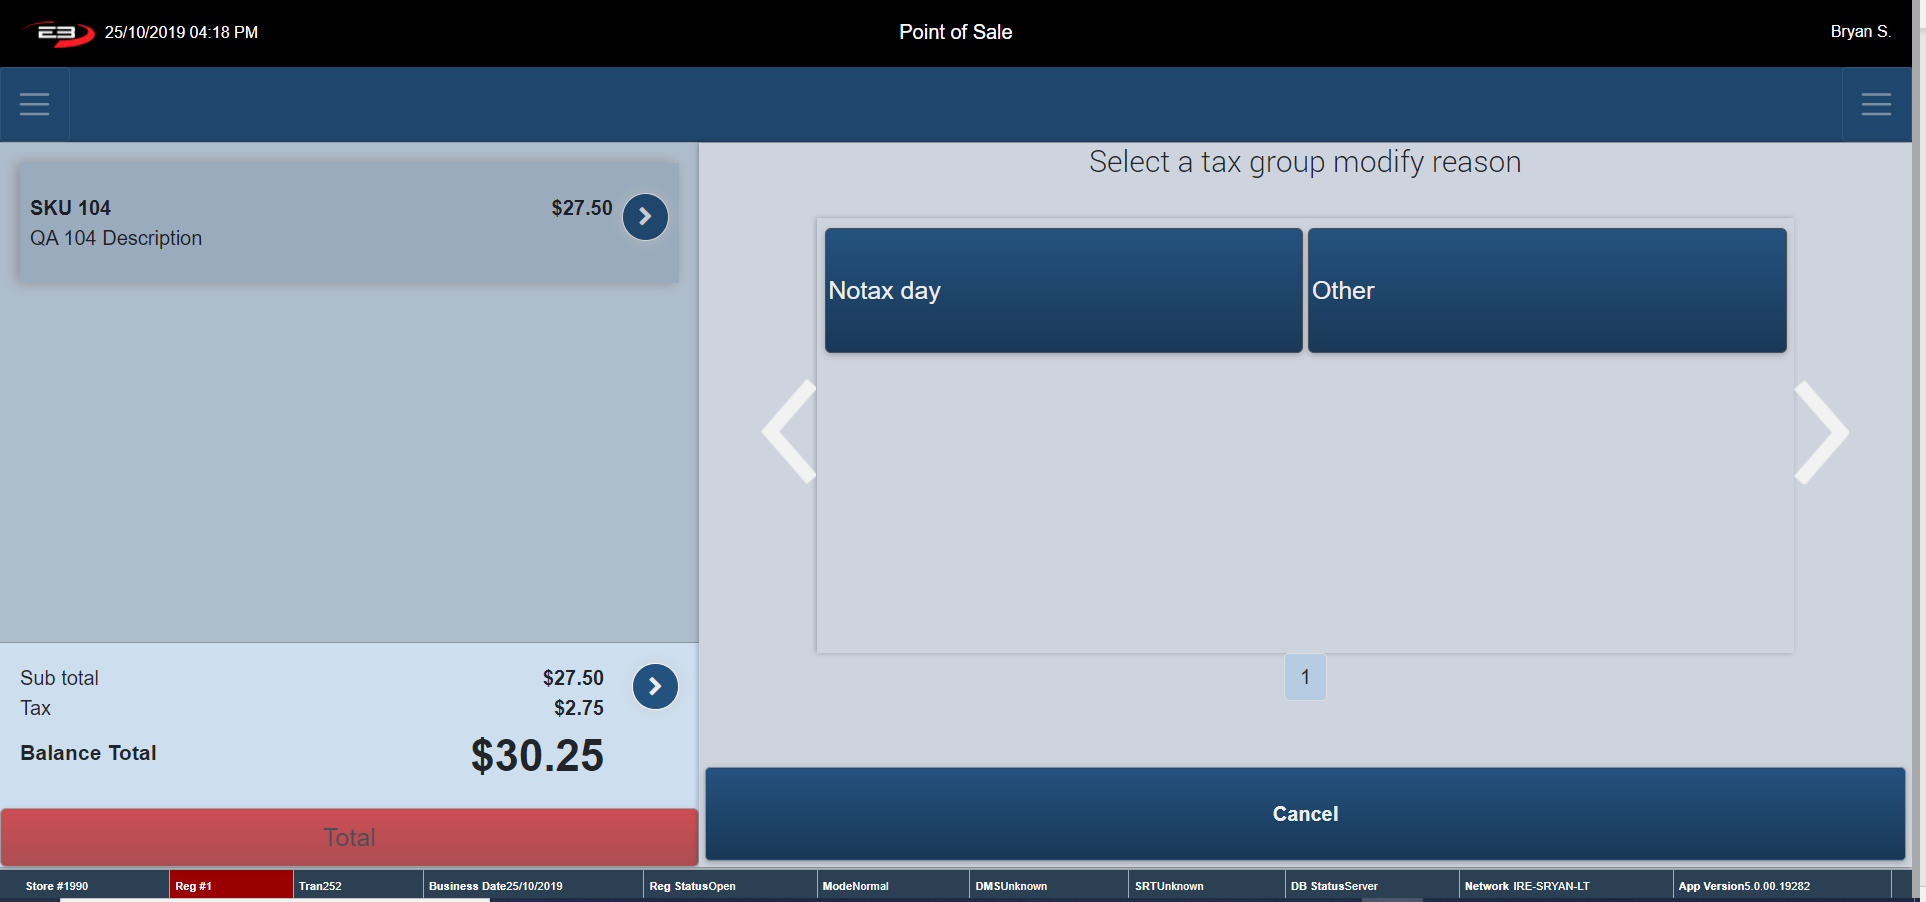
Tax Group
This function allows you to modify the tax group on the chosen item
From Item Entry Screen, go to Item Context Menu (Explained Previous) assuming there is a transaction in the process of being completed.
The Item Menu appears - click Tax Group. The screen below appears.
Screenshot of the Point of Sale application.
Select a reason for modifying the tax group and the register prompts you to select a Tax Group for the items selected.
Once the Tax Group has been selected, the tax has been removed off the item and register returns to the Item Entry Screen.
Screenshot of the Point of Sale application.
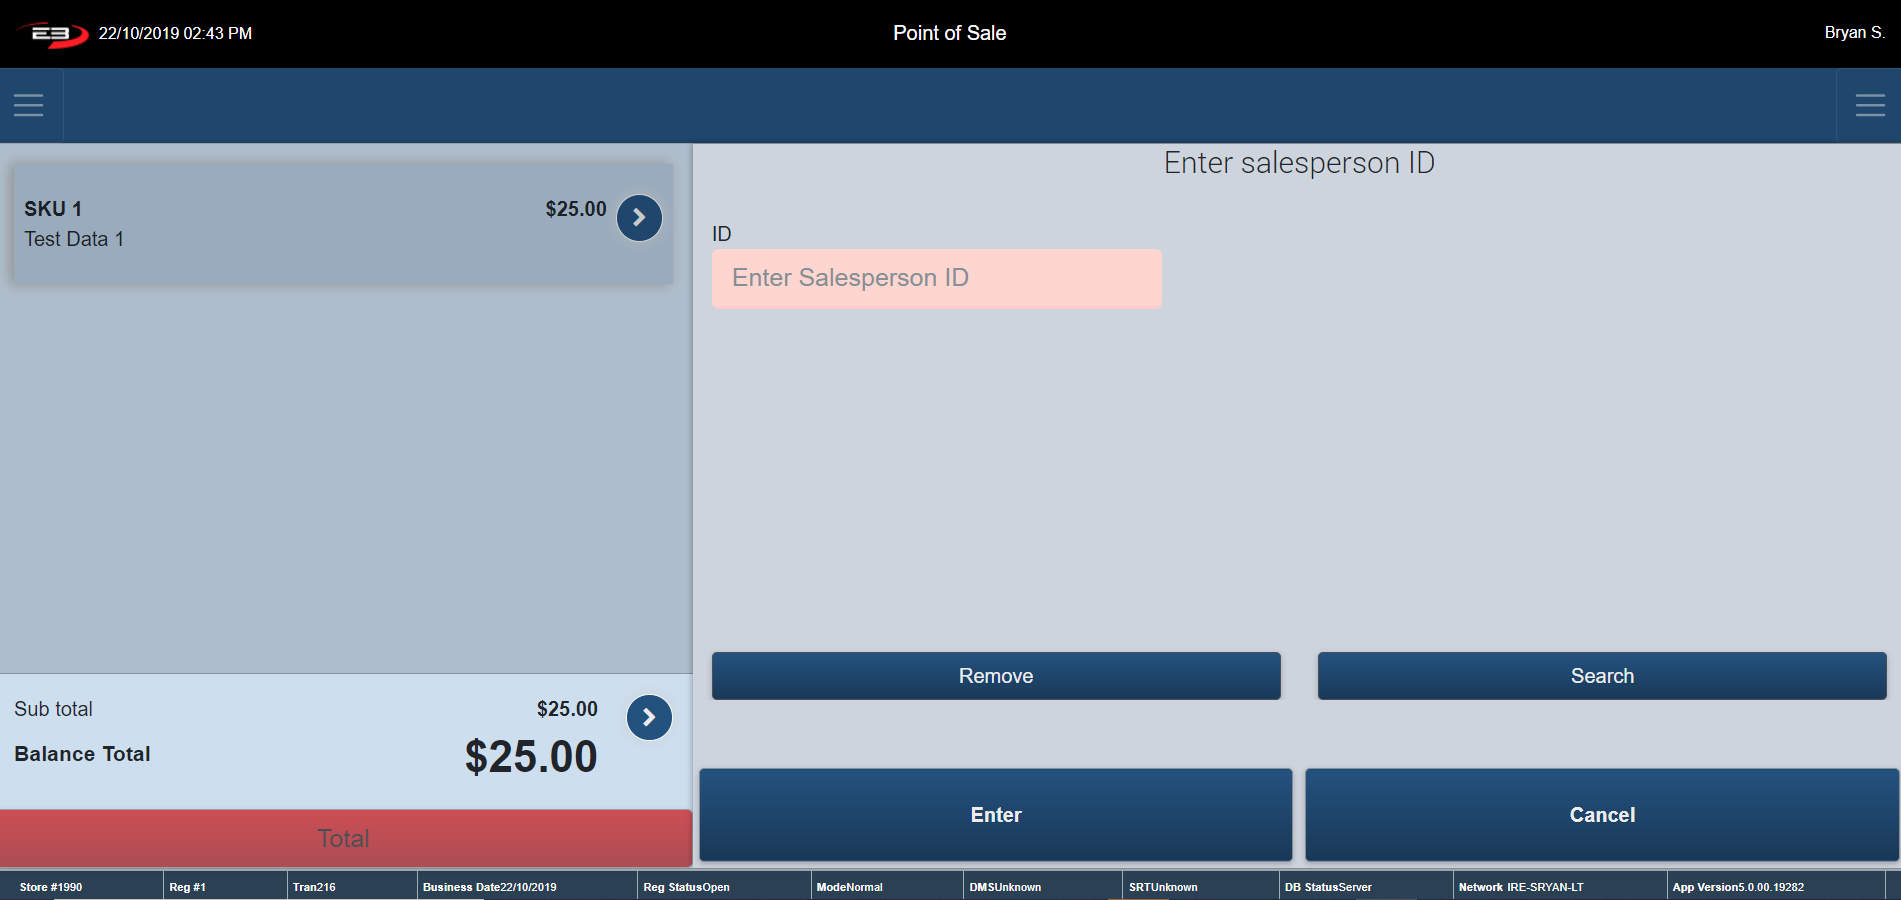
Salesperson Capture
This function allows an operator to add a salesperson ID to an item in a transaction. This is normally done for reasons such as the sales associate helped the customer find what they needed/ ensured a smooth sales process.
From Item Entry Screen, go to Item Context Menu (Explained Previous) assuming there is a transaction in the process of being completed.
The Item Menu appears - click Salesperson Capture – The below screen appears.
Screenshot of the Point of Sale application.
Enter in the Salespersons ID of the employee that assisted the customer, into the “ID” box.
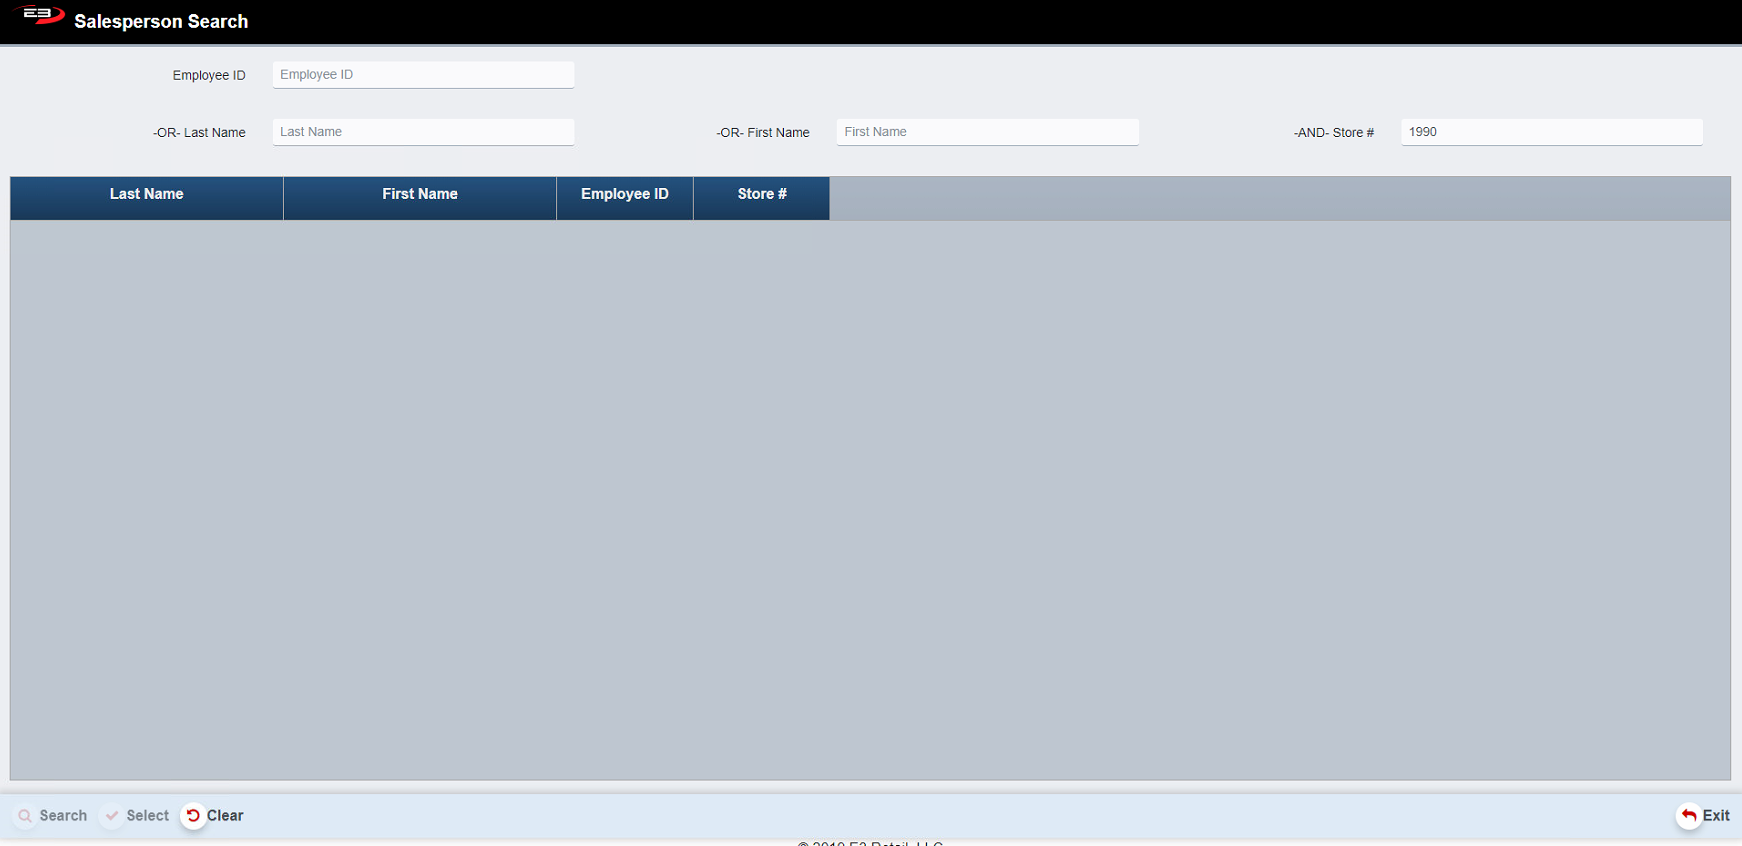
If you do not have the Salespersons ID, click Search to search for the Employee. A screen like the one shown below appears.
Screenshot of the Point of Sale application.
Enter in the Employees First Name or Last Name and click Search to search for their ID number.
The store number should default to the store the register is in.
Highlight the employee and click Select.
Click Remove to delete any ID associated with the transaction and to return to the Item Entry Screen.
Go to the Item Context Menu and Select Salesperson Capture – The employee ID you previously added appears in the ID box – see below.
Screenshot of the Point of Sale application.
Change Customer
The Change Customer function is used to modify the Customer attached to the item.
From Item Entry Screen, go to Item Context Menu (Explained Previous) assuming there is a transaction in the process of being completed.
The Item Menu appears - click Change Customer – The below screen appears.
Screenshot of the Point of Sale application.
Phone Number or First Name and Last Name are required information to search.
Enter in the Customers Information and select Search.
Screenshot of the Point of Sale application.
Highlight Customer and click Select.
An Individual and/ or a Business can be added at this stage (explained previously).
The below screen appears.
Screenshot of the Point of Sale application.
The register remotes to the Editing a Customer Screen (explained Previously).
Select Confirm Selection to proceed with adding a customer to an item.
Any Comments that have be attached to the Customers Profile appears as seen below.
Screenshot of the Point of Sale application.
Click OK. The selected customer is now added to the item.
The register returns to the Item Entry Screen.
Note: Changing a Customer at Item Level does not apply or remove tax exempt status, nor does it impact customer loyalty promotions.
Even Exchange
Not Working
Transaction Context Menu
Screenshot of the Point of Sale application.
To Locate to the Transaction Context Menu, use the button beside the Sub Total of the transaction.
Once a product/service is rung through the register all the features in the transaction context menu are enabled.
Screenshot of the Point of Sale application.
Transaction Context Menu contains the features:
Trans Void
Employee Purchase
Stop Transaction Promotion
Gift Receipt
Tax Exempt
Salesperson Capture
Change Customer
Trans Void
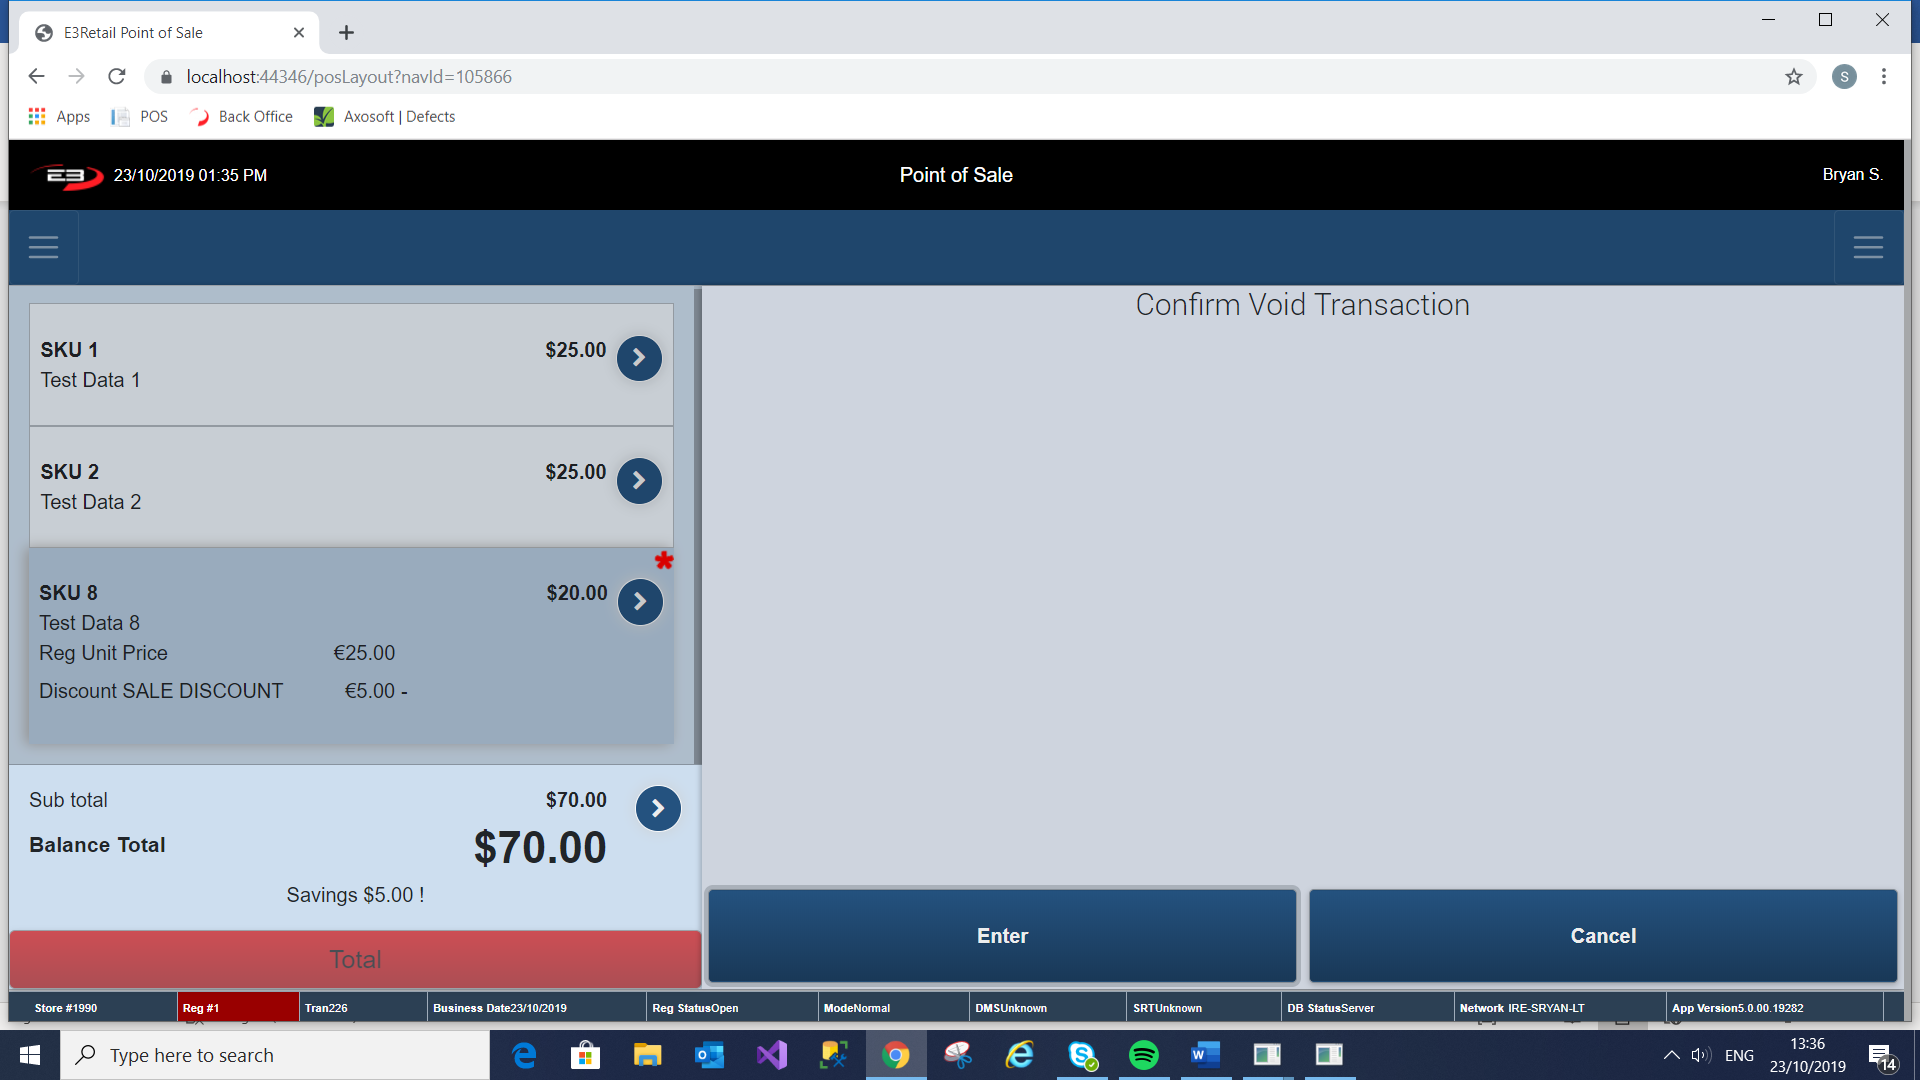
This section allows you to void a transaction therefore it cancels, or deletes entirely, a transaction that is still in progress.
The distinction between this Trans Void, Post Void and Item Void is that Transaction Void is used on a transaction that is still in the process of being completed, versus one that is already completed (Post Void) or just a void on a singular item in a transaction (Item Void).
From Item Entry Screen, go to Transaction Context Menu (Explained Previous) assuming there is a transaction in process.
The Transaction Context Menu appears - click Trans Void – The below screen appears.
Screenshot of the Point of Sale application.
Click Cancel to cancel the transaction void and to continue with transaction.
To Confirm the void on the transaction, click Enter.
The transaction has now been voided and the register returns to the Item Entry Screen.
Employee Purchase
The Employee Purchase function is a function that allows employees to purchase selected items at a discounted price.
From Item Entry Screen, go to Transaction Context Menu (Explained Previous) assuming there is a transaction in the process of being completed.
The Transaction Menu appears – click Employee Purchase - The below screen appears.
Screenshot of the Point of Sale application.
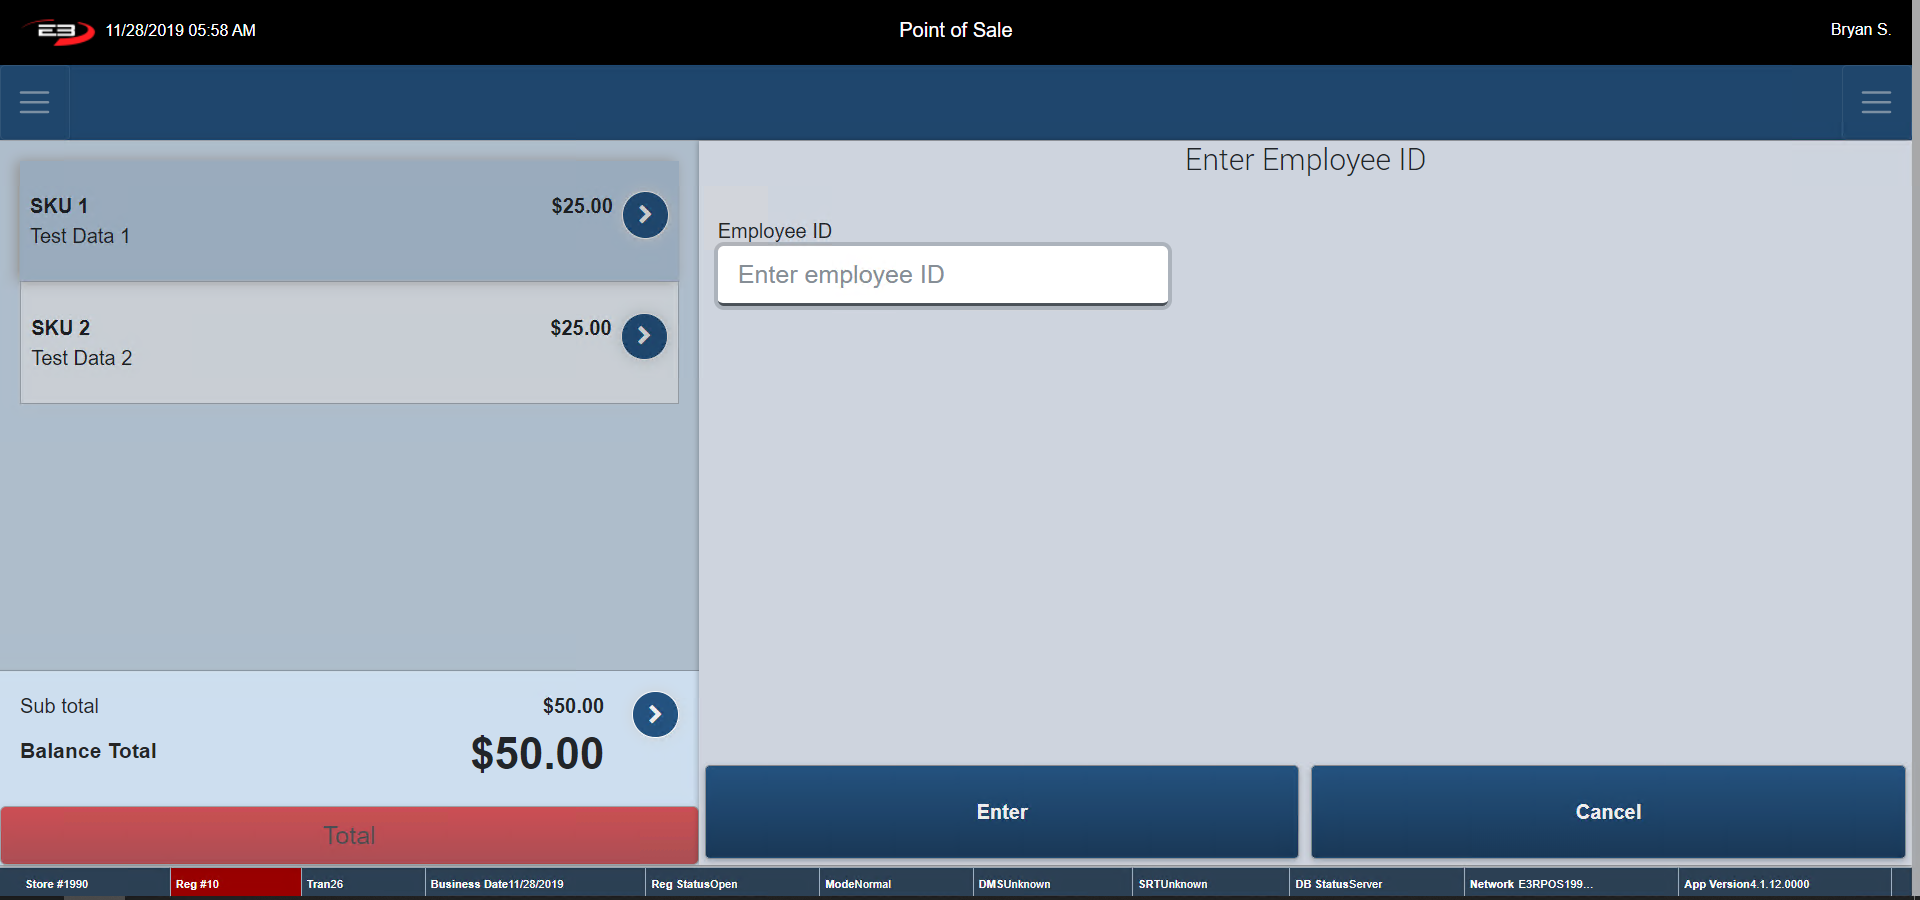
Enter in the ID of the employee who wishes to purchase the item and click Enter. To Cancel, click Cancel. The register returns to the Item Entry Screen.
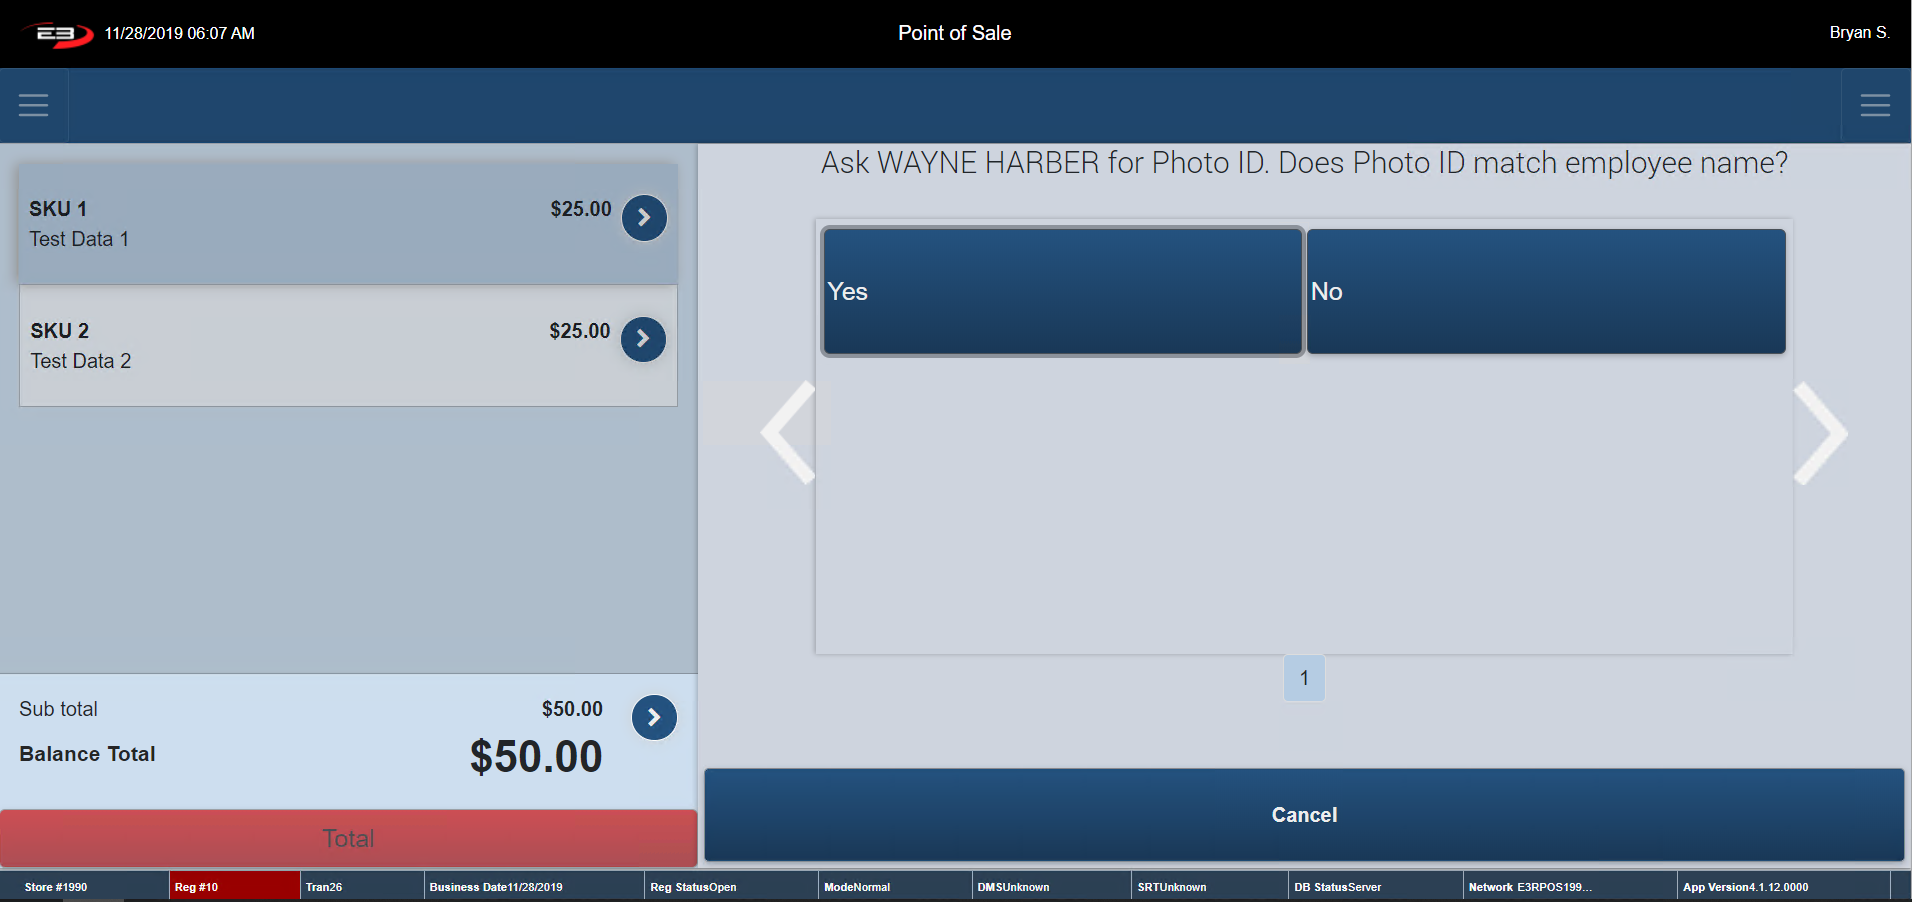
A confirmation dialog box appears asking you check Photo ID.
Screenshot of the Point of Sale application.
If the Photo ID matches the employees name, click Yes.
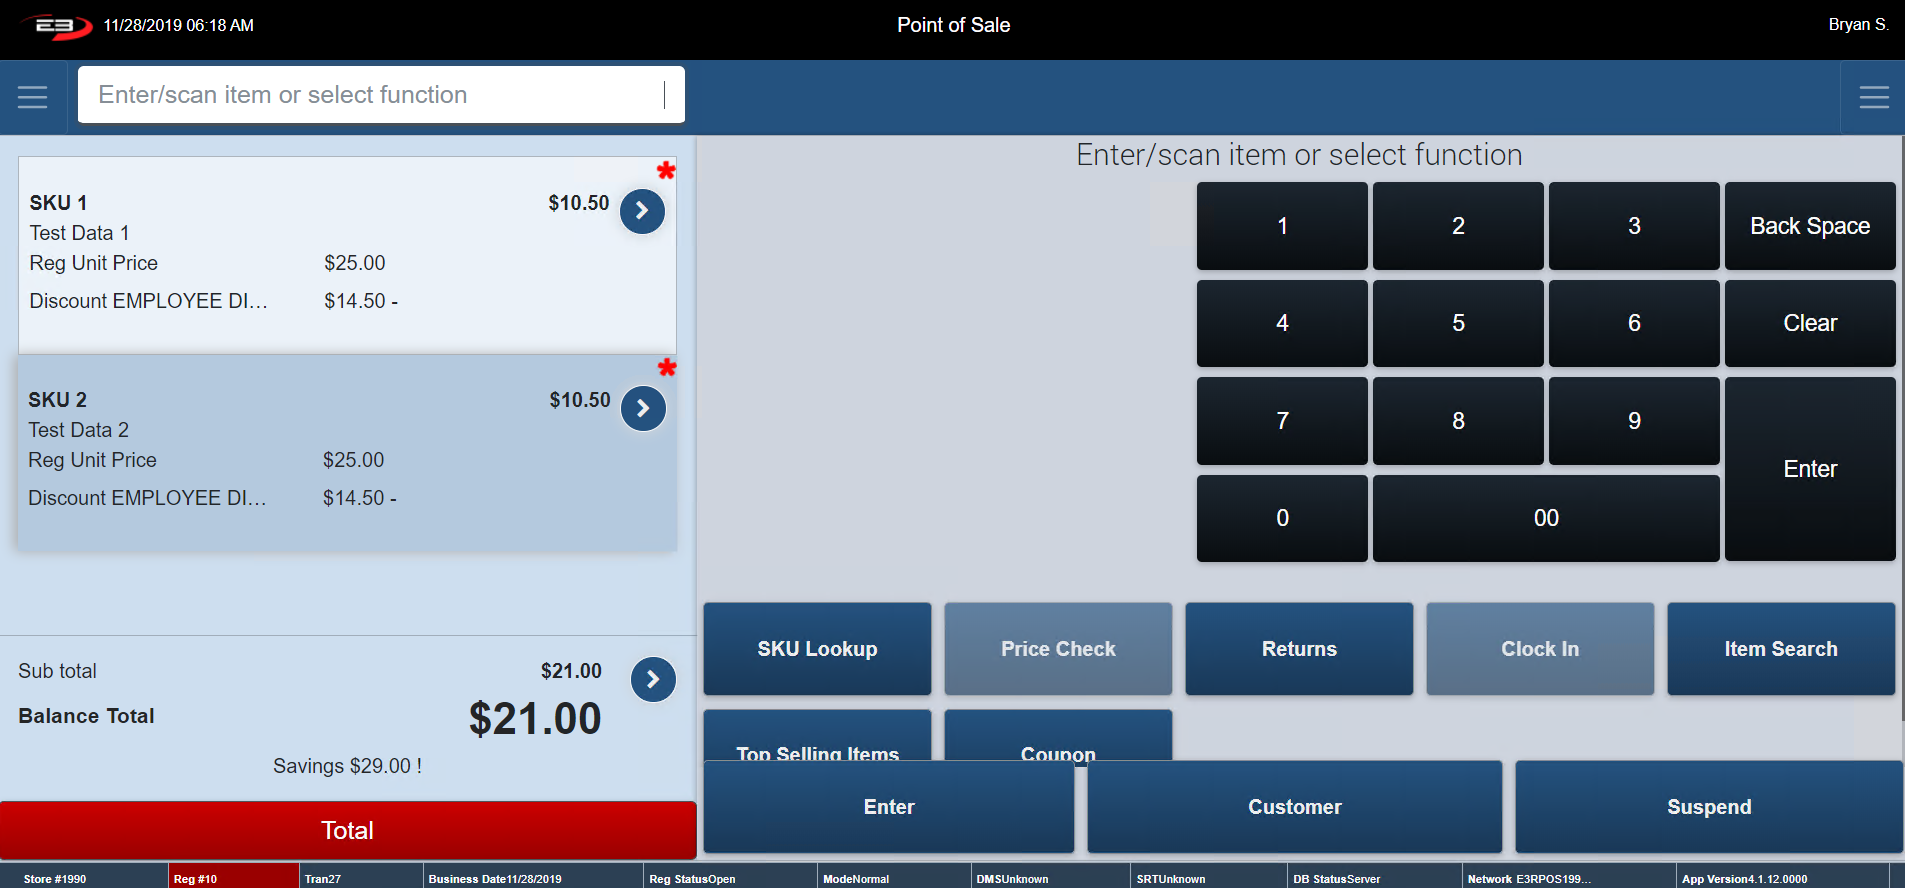
The register returns to the Item Entry Screen with the employee discount applied on each item in the transaction.
Click No if the ID does not match. The register returns to the Item Entry Screen with no discounts applied.
When a discount is applied to an item it is stated in the Transaction Tab (see below).
A red asterisk shows up beside each item that has been discounted – see below.
Screenshot of the Point of Sale application.
Stop Transaction Promotions
The Stop Transaction Promotions function stops all promotions taking place in that transaction (Does not include Instant Saving, they are not considered a promotion).
From Item Entry Screen, go to Transaction Context Menu (Explained Previous) assuming there is a transaction in the process of being completed.
The Transaction Menu appears - click Stop Transaction Promotion – any promotion that has been already applied are now discarded.
The register returns to the Item Entry Screen.
Screenshot of the Point of Sale application.
Clicking Stop Transaction Promotion on the example above adjusts the SKU back to its original price.
Gift Receipt
The Gift Receipt function in the Transaction Context Menu prints off a gift receipt for the whole transaction and not just an individual item.
From Item Entry Screen, go to Transaction Context Menu (Explained Previous) assuming there is a transaction in the process of being completed.
The Transaction Menu appears - click Gift Receipt
Enter in the number of Gift Receipts the customer requests and click Enter (Note: the customer cannot get a greater amount of gift receipts than the item count in the transaction). To return to Item Entry Screen, click Cancel.
The Gift Receipts print along with the transaction receipt.
Below is a sample Gift Receipt – Note: no prices are displayed on the receipt.
Screenshot of the Point of Sale application.
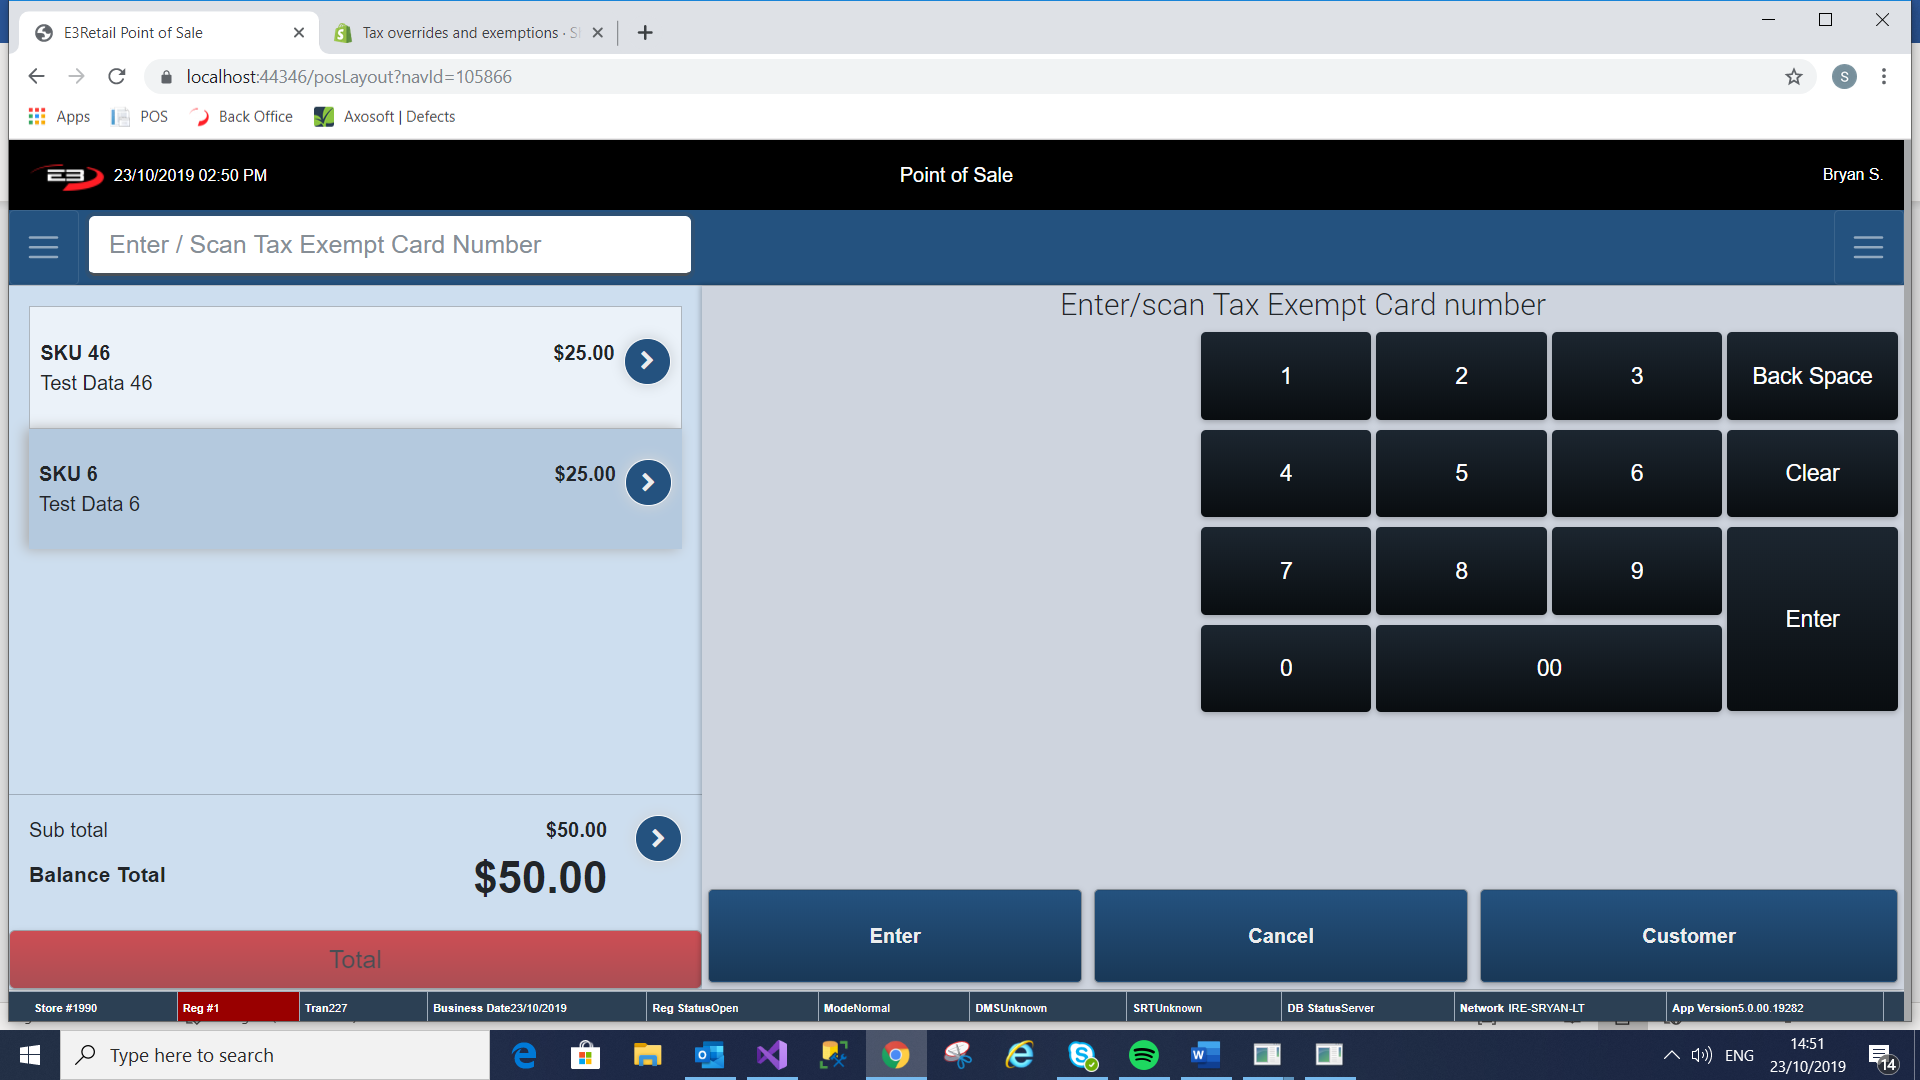
Tax Exempt
The function Tax Exempt allows an employee to cancel the tax off a transaction if the customer is exempt from paying taxes.
From Item Entry Screen, go to Transaction Context Menu (Explained Previous) assuming there is a transaction in the process of being completed.
The Transaction Menu appears - click Tax Exempt – The below screen appears.
Screenshot of the Point of Sale application.
Enter in Tax Exempt Card number (Card number must be 10 digits long) or Scan the barcode on the card.
Register prompts you to provide a reason code for the Tax-Exempt function to be used. Below are a few examples of Tax-Exempt reason codes.
Tribal Member
Federal Government
Foreign Diplomat
Out of State
Click on the relevant reason code.
The register prompts the customer to accept/decline the terms and conditions which appears on the Pin Pad.
If the customer accepts the terms and conditions the register returns to the Item Entry state, with the tax removed from the transaction.
If the customer declines the terms and conditions the register returns to the Item Entry state, but the tax will not be removed.
Salesperson Capture
This function allows an operator to add a salesperson ID to a transaction. This is normally done for reasons such as the sales associate helped the customer find what they needed/ ensured a smooth sales process.
From Item Entry Screen, go to Transaction Context Menu (Explained Previous) assuming there is a transaction in the process of being completed.
The Transaction Menu appears - click Salesperson Capture – The below screen appears.
Screenshot of the Point of Sale application.
Enter in the Salespersons ID of the employee who helped the customer with the sale into the “ID” box. Note: Multiple Salesperson IDs can be added.
If you do not have the Salespersons ID, click Search to search for the Employee. A screen like the one shown below appears.
Screenshot of the Point of Sale application.
Enter in the Employees First Name or Last Name and click Search to search for their ID number.
The store number should default to the store the register is in.
Highlight the Employee and click Select.
Click Remove to delete any ID associate with the transaction and return to the transaction.
Go to the Transaction Context Menu and select Salesperson Capture – The employee ID you previously added appears in the ID box – see below.
Screenshot of the Point of Sale application.
Change Customer
The Change Customer function is used to change the Customer attached to the transaction.
From Item Entry Screen, go to Transaction Context Menu (Explained Previous) assuming there is a transaction in the process of being completed.
The Transaction Menu appears - click Change Customer – The below screen appears.
Screenshot of the Point of Sale application.
Phone Number or First Name and Last Name are required information to search.
Enter in Customers Information and select Search.
The amount of customer information added to the search screen determines the results given.
Screenshot of the Point of Sale application.
Highlight Customer and click Select.
An Individual and/ or a Business can be added at this stage (explained previously).
The below screen appears.
Screenshot of the Point of Sale application.
The register remotes to the editing a customer screen (explained Previously)
Select Confirm Selection to proceed with choosing a customer.
Any Comments that have be attached to the customers profile appears.
Screenshot of the Point of Sale application.
Click OK. The selected customer is added to the transaction.