Store Group Maintenance
Initial (Main Search) Screen
-
SignOn to the BackOffice.
-
From the Configuration Management menu, select Store Group Maintenance.
-
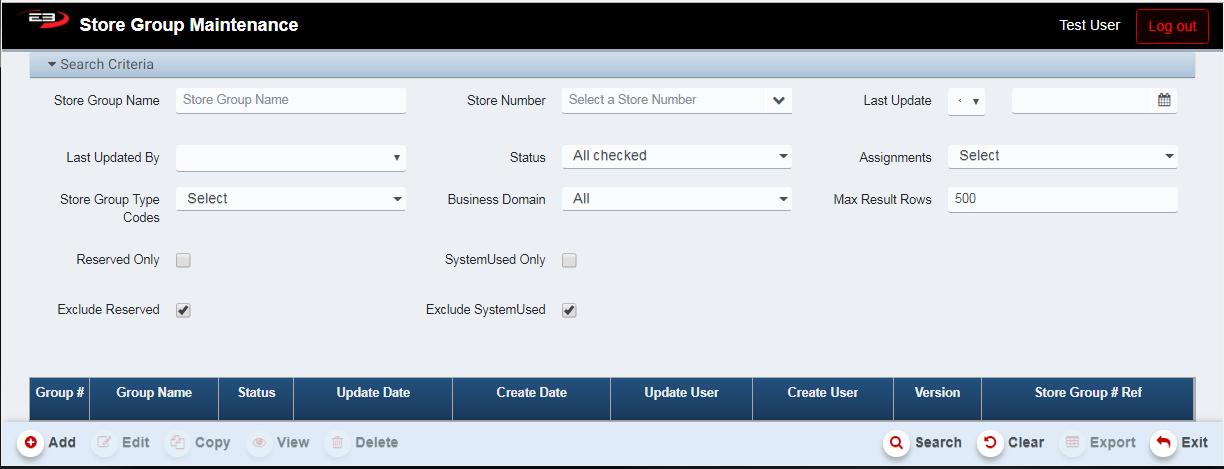
An initial search screen (like the one shown below) should appear.
-
Note the Edit, Copy, View, and Delete buttons are disabled, select a group in the search results to enable.
Screenshot of the Store Group Maintenance application.
Search Criteria
-
Store Group Name returns any group whose name matches the criteria.
-
Store Number returns any group that contains the specified store.
-
Last Update returns any group whose last updated date matches the criteria.
-
Last Updated By returns any group that was last modified by the specified user.
-
Status returns any group whose status matches the selected value(s).
-
Assignments returns any group whose assignment status matches the selected value(s).
-
Store Group Type Codes returns any group that matches the selected code(s), static or dynamic.
-
Business Domain returns any group that matches the selected domain(s), note that “All” does not mean “include all business domains”, rather it is the name of a domain.
-
Max Result Rows limits the size of the result set, 500 rows is the default.
-
Reserved Only returns only Reserved groups when checked.
-
SystemUsed Only returns only SystemUsed groups when checked.
-
Exclude Reserved returns groups that are NOT reserved when checked (default).
-
Exclude SystemUsed returns groups that are NOT system used when checked (default).
Searching And Selecting
-
Set the search criteria described in the previous section to locate particular groups.
-
Click Search.
-
The search results will look something like this:

Screenshot of the Store Group Maintenance application.
-
If you don’t see the desired group in the search results, adjust the search criteria and search again.
-
Highlight a group in the results to enable the Edit, Copy, View, and Delete functions.
Static Store Groups
A static store group is a group whose member stores are added when the group is created or modified by manually selecting the store(s) to add or remove. This list of stores does not change unless a user edits the group and changes the store list.
Add
-
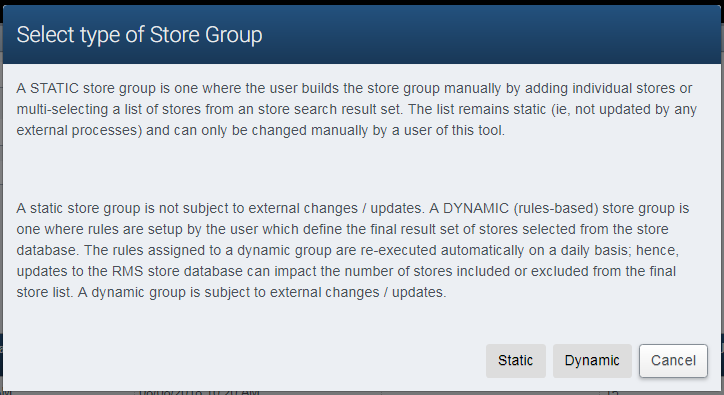
From the search screen, click Add.
-
The group type selection dialog appears as seen here:
Screenshot of the Store Group Maintenance application.
-
Select Static by clicking the button.
-
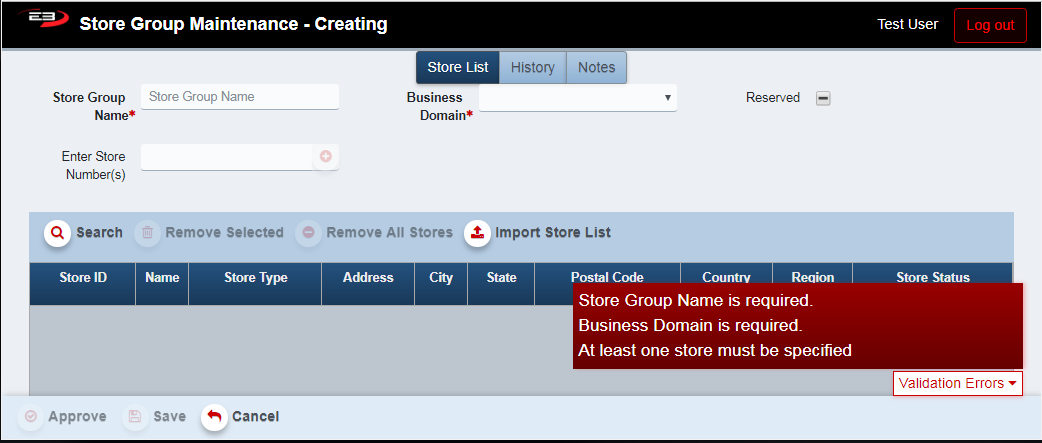
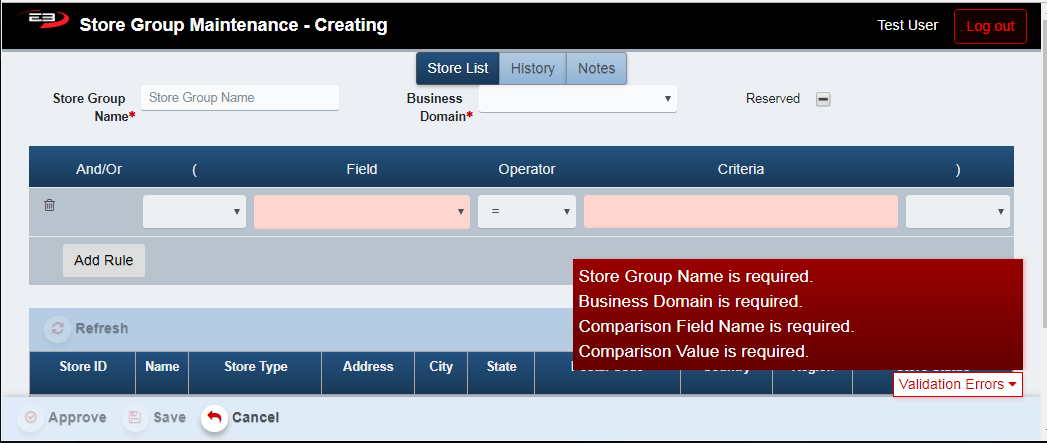
The static group creation screen appears as seen here:
Screenshot of the Store Group Maintenance application.
-
Note the validation errors. The Store Group Name and Business Domain are required fields.
-
At least one store is also required.
-
Enter the group name in the Store Group Name field.
-
If you plan to use the store group for promotions, start the name with “Promo:”
-
Select the Business Domain. As mentioned above, “All” is not an all-inclusive domain.
Adding Stores
-
To select stores by searching:
-
Click Search.
-
The search results from Retail Store Locations Maintenance are displayed within the user’s visibility.
-
Check the box next to each store you want to add to the group.
-
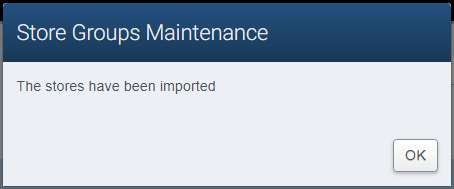
Click Submit Selection to accept the selected stores.
-
A dialog appears indicating that the selected stores have been imported to the group.
-
Screenshot of the Store Group Maintenance application.
-
Click OK to close the dialog.
-
To select stores by importing a store list:
-
Create a text file containing a comma-separated list of stores to be added to the group.
-
Click Import Store List.
-
Select the text file containing the list of store numbers and click Open.
-
There is no confirmation dialog, but the stores appear in the list.
-
-
To select stores by manually entering the store numbers:
- Enter a comma-separated list of store numbers in the Enter Store Number(s) field.

Screenshot of the Store Group Maintenance application.
- Click the plus sign to the right of the field to add the store numbers.
Removing Stores
-
To remove a selected store from the list:
-
Click on the store in the list you want to remove, you can only remove one at a time.
-
Click Remove Selected, the store is removed from the list.
-
-
To remove all stores from the list:
- Click Remove All Stores, the store list becomes empty.
Saving and Approving
-
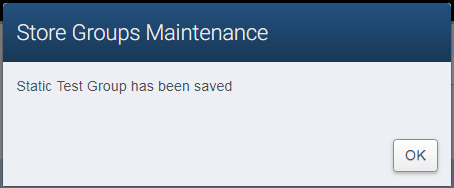
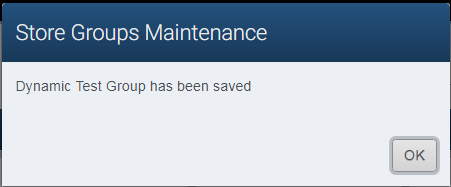
Click Save to save the group as work in progress for later updating and approval.
- A dialog appears confirming that the group has been saved.
Screenshot of the Store Group Maintenance application.
-
Click OK to dismiss the dialog.
-
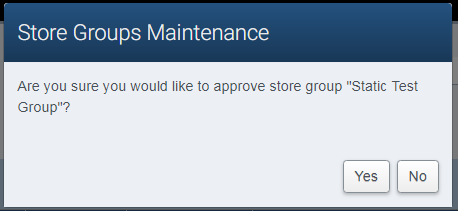
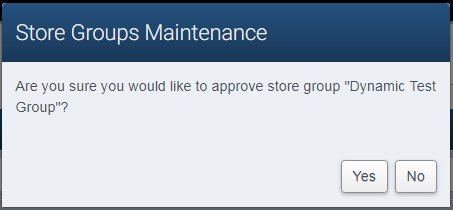
Click Approve to save and approve the group in one operation.
- A dialog appears requesting confirmation for the approval.
Screenshot of the Store Group Maintenance application.
-
Click No to cancel the approval and return to the add/edit screen.
-
Click Yes to approve the group.
-
Refer to section 4 if you see a dialog referring to store group overlap.
-
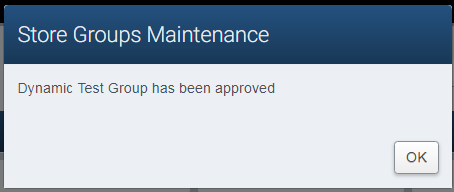
A dialog appears confirming the approval.

Screenshot of the Store Group Maintenance application.
- Click OK to dismiss the dialog.
Edit
-
Using the search criteria, locate the group you wish to modify.
-
Highlight the group in the search results, the Edit button should now be enabled.
-
Click Edit.
-
The edit screen appears, showing the name of the group in the title bar:
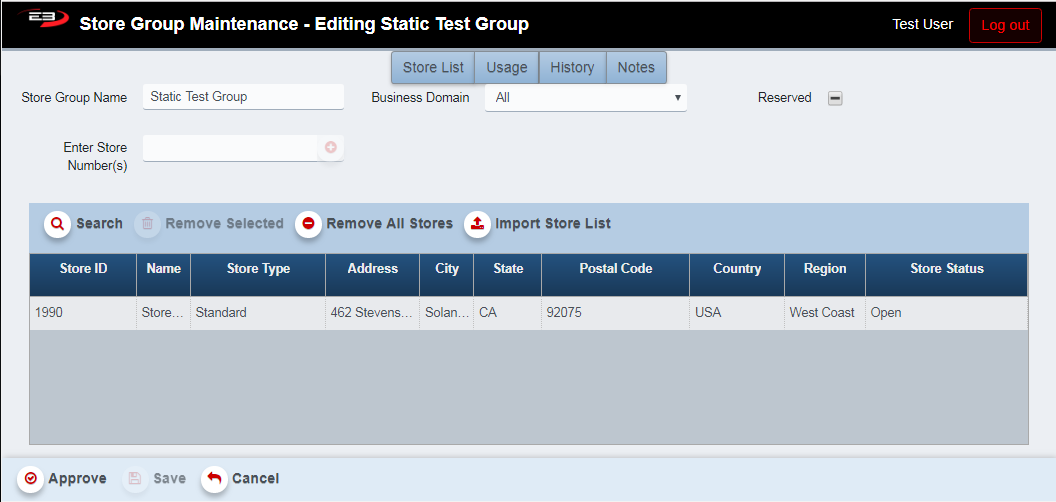
Screenshot of the Store Group Maintenance application.
-
The user can change any of the fields as described in section 2.1.
-
When modifications are complete, use the steps previously described for saving and approving the group.
Dynamic Store Groups
A dynamic store group is a group whose member stores are added when the group is created or modified by refreshing the result of the selection rule(s). This list of stores changes when the group is refreshed as the result of running the rule(s) again.
Add
-
From the search screen, click Add.
-
The group type selection dialog appears as seen here:
Screenshot of the Store Group Maintenance application.
-
Select Dynamic by clicking the button.
-
The dynamic group creation screen appears as seen here:
Screenshot of the Store Group Maintenance application.
-
Note the validation errors. The Store Group Name and Business Domain are required fields, and at least one rule is also required.
-
Enter the group name in the Store Group Name field.
-
If you plan to use the store group for promotions, start the name with “Promo:” and
-
Select the Business Domain from the drop-list. As mentioned previously, “All” is not an all-inclusive domain.
Adding Dynamic Rules
The rules for dynamic store groups allow stores to be selected by rules rather than by manually entering each individual store (whether typed in or by importing a list of stores from a text file). Each rule contains a Field, an Operator for comparison, and a Criteria (value) for the Field to match. Multiple rules are allowed, joined by and/or logical operators. Parentheses can be used to logically group rules.
| Field | Operator | Criteria examples |
|---|---|---|
| Store # | = or <> | 1990 |
| Store Name | Contains, starts with, ends with | Default Auto Parts |
| Store Type | = or <> | Standard, Express (drop-list) |
| City | = or <> | Solana Beach |
| State/Province | = or <> | California (drop-list) |
| Postal Code | = or <> | 92075 |
| Country | = or <> | United States of America (drop-list) |
| Region | = or <> | East Coast, Mid-West, South, West Coast (drop-list) |
| Store Status | = or <> | Open in progress, Open, Close in progress, Closed (drop-list) |
Use the following steps to add rules to a dynamic store group. Rule entry is done with the following form. The first rule is already present, additional rules are added by clicking the Add Rule button.

Screenshot of the Store Group Maintenance application.
-
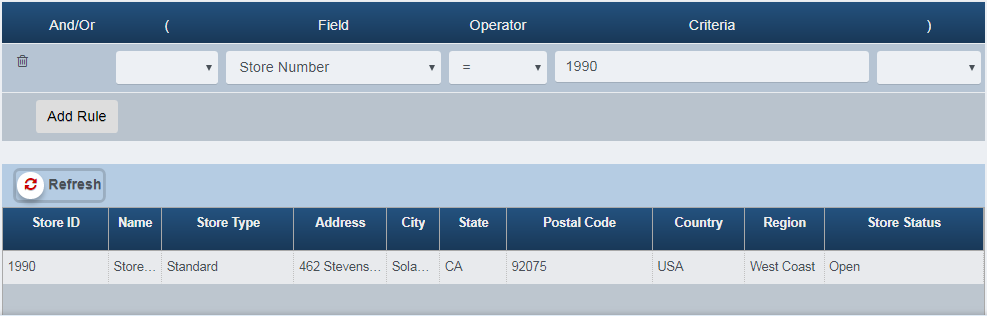
This example creates a rule that matches a single store number.
-
Select Store Number for the Field to match stores.
-
Select the appropriate Operator, in this case we want to match the store number so set the Operator to =.
-
Enter 1990 in the Criteria field.
-
Click the Refresh button, the result can be seen in the store list below the Refresh button.
Screenshot of the Store Group Maintenance application.
-
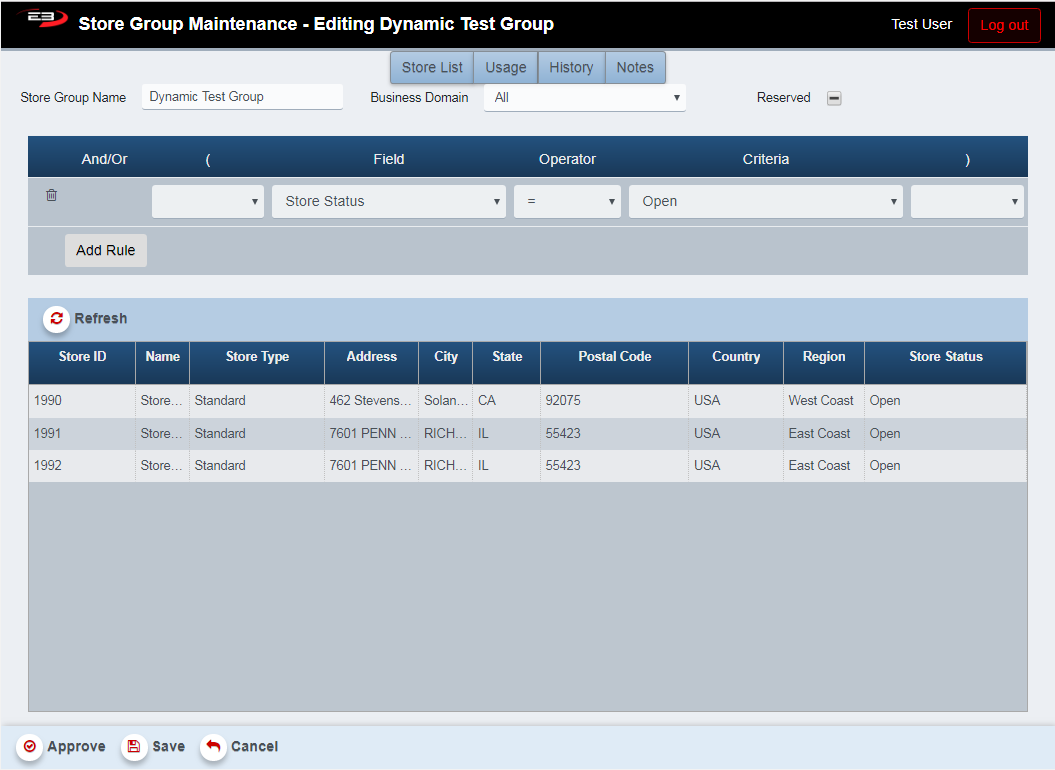
This example creates rules to return all stores on the West Coast except those in postal code 92075.
-
Select Region for the field.
-
Select the appropriate Operator, in this case we want to match the store number so set the Operator to =.
-
Select West Coast for the Criteria to match all stores whose Region is West Coast.
-
Click Refresh to see all stores whose region is West Coast.

Screenshot of the Store Group Maintenance application.
-
Click Add Rule to add the rule that will exclude all stores whose Postal Code is 92075, a new rule appears.
-
Select AND for the And/Or logical operator.
-
Select Postal Code for the Field.
-
Select the appropriate Operator, in this case we want to not match the postal code so set the Operator to <>.
-
Enter 92075 in the Criteria field for the postal code we wish to exclude.
-
Click Refresh, any stores whose postal code is 92075 will no longer appear in the results.

Screenshot of the Store Group Maintenance application.
Removing Dynamic Rules
- To remove a rule from a dynamic store group, click the Trash Can icon on the left-hand side of the rule.

Screenshot of the Store Group Maintenance application.
-
If this was the only rule, the blank rule with validation errors will reappear.
-
Deleting a rule may require restructuring grouping by parentheses to return the desired results.
Saving and Approving
-
Click Save to save the group as work in progress for later updating and approval.
- A dialog appears confirming that the group has been saved.
Screenshot of the Store Group Maintenance application.
-
Click OK to dismiss the dialog.
-
Click Approve to save and approve the group in one operation.
- A dialog appears requesting confirmation for the approval.
Screenshot of the Store Group Maintenance application.
-
Click No to cancel the approval and return to the add/edit screen.
-
Click Yes to approve the group.
-
Refer to section 4 if you see a dialog referring to store group overlap.
-
A dialog appears confirming the approval.
Screenshot of the Store Group Maintenance application.
- Click OK to dismiss the dialog.
Edit
-
Using the search criteria, locate the group you wish to modify.
-
Highlight the group in the search results, the Edit button should now be enabled.
-
Click Edit.
-
The edit screen appears, showing the name of the group in the title bar:
Screenshot of the Store Group Maintenance application.
-
The user can change any of the fields as described in section 3.1.
-
When modifications are complete, use the steps previously described for saving and approving the group.
Store Group Overlap
When creating store groups, it’s possible to have two groups which share stores in common. This is referred to as Overlap, and can cause problems with Item Relationships, Promotions, and other areas. When approving a group, if the application detects store group overlap, it will notify the user with the pop-up shown below which details which group(s) conflict with the group the user is trying to approve. Click Accept to accept the overlap(s) and continue the approval, otherwise click Cancel to cancel the approval.
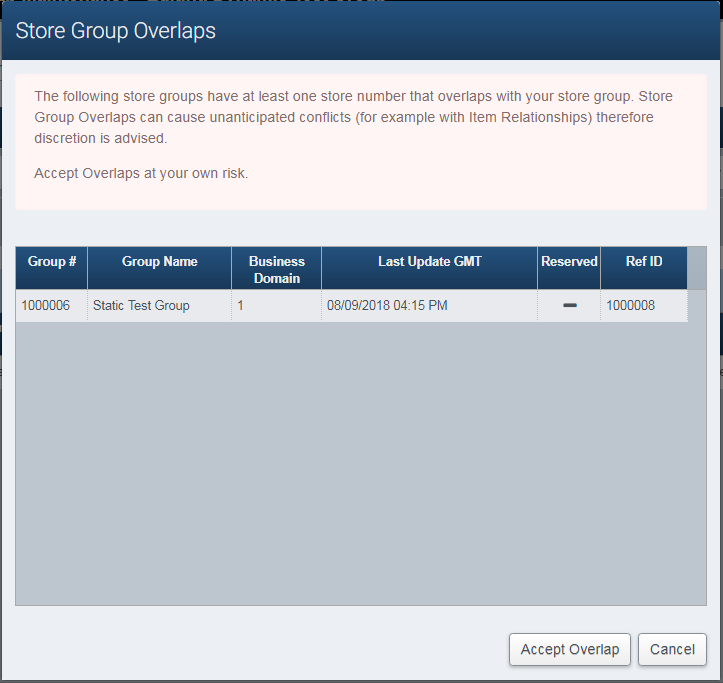
Screenshot of the Store Group Maintenance application.
Common Commands
This section contains commands that work with both static and dynamic store groups.
Copy
-
The Copy function allow the user to make a copy of an existing group.
-
Set the search criteria to locate the group(s) you wish to copy and click Search.
-
Highlight the group to be copied in the search results and click Copy.
-
A dialog appears to request the new group name for the result of the copy and click OK.

Screenshot of the Store Group Maintenance application.
-
At this point the group can be modified (other than the new group name) if desired.
-
After any changes have been made, the new group can saved and approved.
-
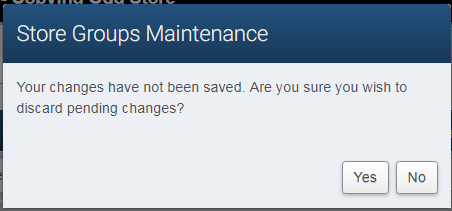
Click Cancel to discard the copied group, answer Yes to discard pending changes.
Screenshot of the Store Group Maintenance application.
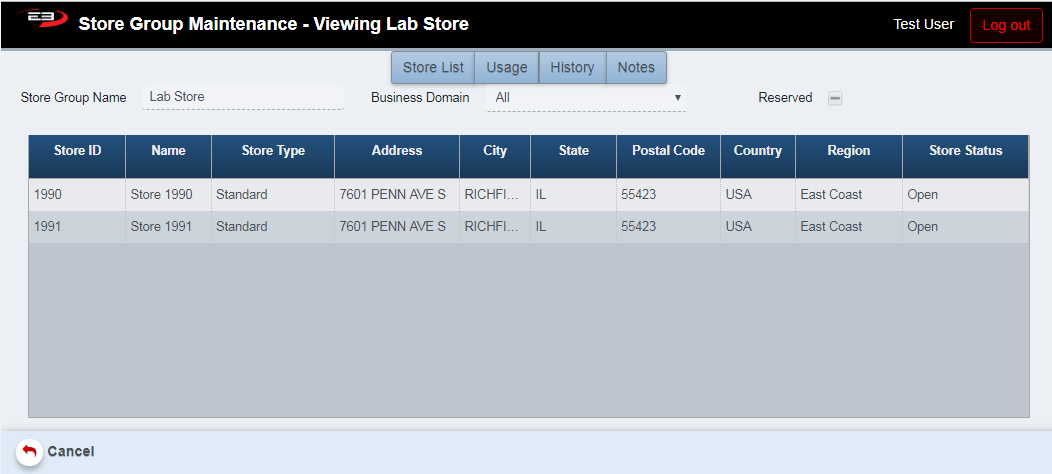
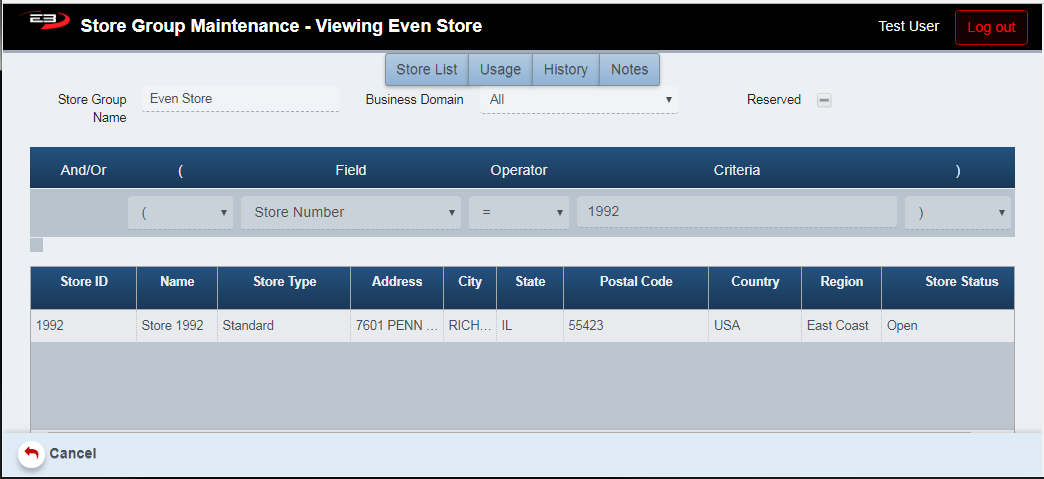
View
-
The View function allows the user to view either type of store group in read-only mode (can’t be edited).
-
Set the search criteria to locate the group(s) you wish to view and click Search.
-
Highlight the group to be viewed in the search results and click View.
-
A static store group will look something like this:
Screenshot of the Store Group Maintenance application.
- A dynamic store group will look something like this (notice the formula):
Screenshot of the Store Group Maintenance application.
- Click Cancel to leave View mode and return to the search screen.
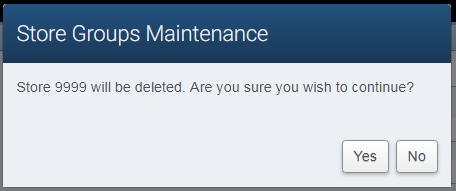
Delete
-
The Delete function allows the user to delete a store group.
-
Set the search criteria to locate the group you wish to delete and click Search.
-
Highlight the group to be deleted in the search results and click Delete.
-
A confirmation dialog appears, click Yes to perform the deletion, click No to cancel the deletion.
Screenshot of the Store Group Maintenance application.
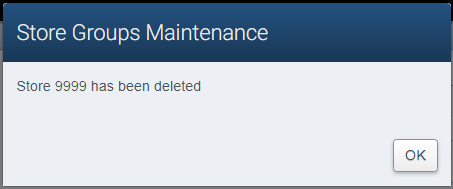
- When the deletion is complete, a notification appears. Click OK to dismiss the dialog.
Screenshot of the Store Group Maintenance application.
Export
The Export function allows the user to save a list of all store groups in the search results as a comma-separated values (CSV) file for use in Excel. Click the Export button, the file is saved as StoreGroups_yyyy-m-d.csv in the default location, typically the Downloads folder for the user. If there are no search results, the button is disabled.
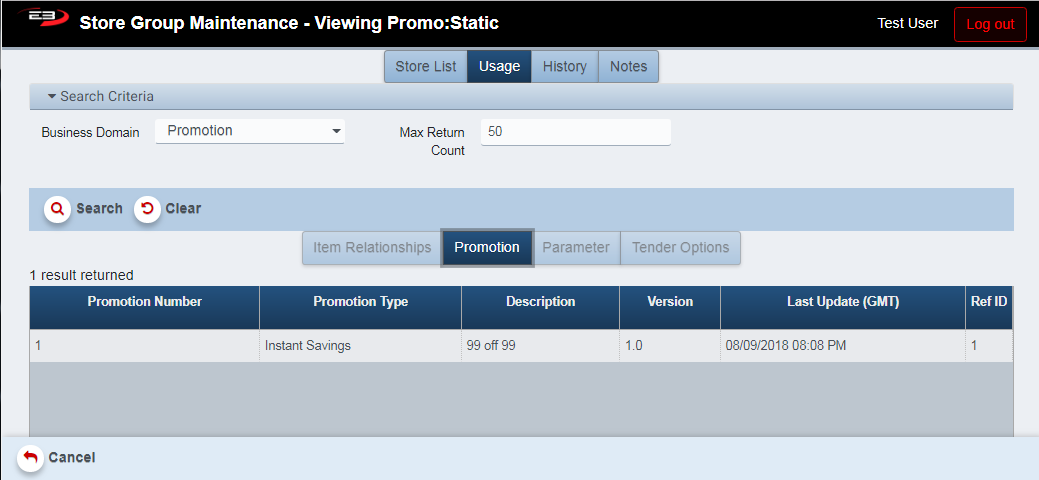
Usage Tab
The Usage tab shows any associations between the store group and other entities; these include items, promotions, parameters, and tender options.
In this example, the group Promo:Static was used for the 99 off 99 promotion (the group contains two stores) and as can be seen, with the Business Domain set to Promotion the associated promotion appears in the result set.
Screenshot of the Store Group Maintenance application.
-
Set the Business Domain for which the promotion was created (see the Store List tab).
-
Click Search to locate store groups in the selected business domain.
-
Depending on the Business Domain selected, the results will show objects associated with the store group. If you select Promotions, the results will show any promotions associated with that store group. If you select Item Relationships, the results will show any items associated with that store group.
History Tab
The History tab shows actions taken with the store group, including creating a new group, modifying the store list (or rules, in the case of dynamic groups), and approving a group.
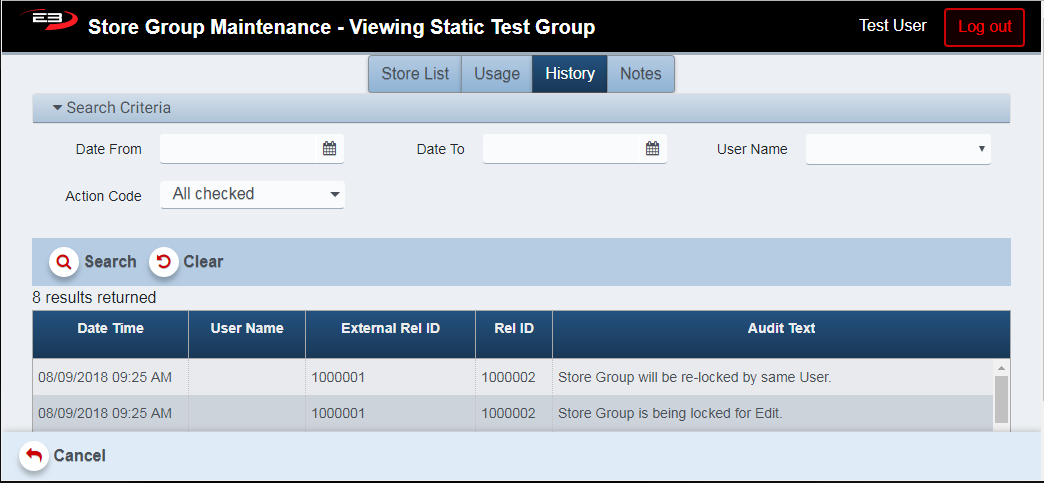
Screenshot of the Store Group Maintenance application.
-
Use the Date From and Date To criteria to narrow the search window.
-
Use the User Name criterion to limit results to a particular user.
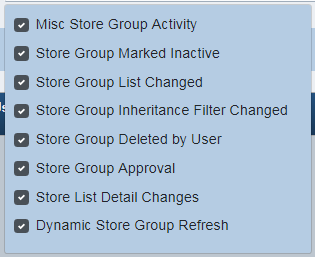
-
Use the Action Code criterion to filter on one or more codes from the following list (all selected by default):
Screenshot of the Store Group Maintenance application.
Notes Tab
The Notes tab allows a user to enter plain-text notes related to this particular store group. Notes can be added to a group without having to change the status of the group (i.e. you don’t have to re-approve the group to add a note.)

Screenshot of the Store Group Maintenance application.
-
Notes can’t be updated when in View mode for the selected store group.
-
There are no search criteria, clicking Search returns all notes for this store group.
-
Type a note in the Add Note field then click the upper Save button to save the note.
-
The lower Approve and Save buttons pertain to the store group itself, not the note(s).