Till Balancing
Initial (Main Search) Screen
-
SignOn to the BackOffice.
-
From the Cash Management / Reports menu, select Till Balancing.
-
An initial search screen (like the one shown below) should appear.
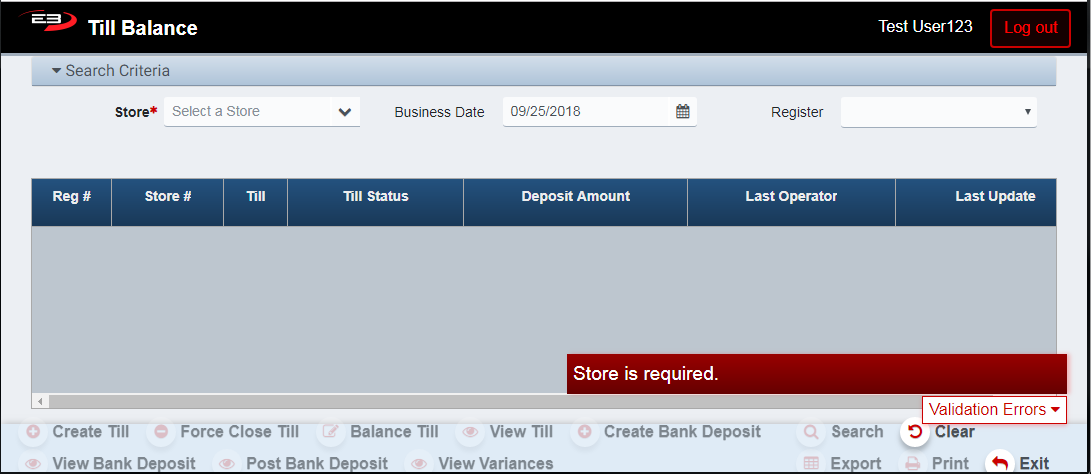
Screenshot of the TillBalancing application.
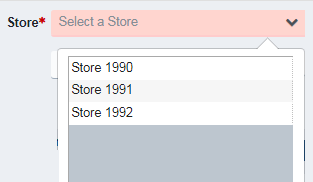
- Select the Store from the list of stores visible to you, if only one store is visible it is selected by default:
Screenshot of the TillBalancing application.
-
Set the Business Date to the business date of the till(s) you wish to balance, default is today’s date.
-
Select a register from the Register drop-list, or select All to find all tills (optional)
-
Click Search to search for tills at the selected Store on the Business Date for the Register(s).
Screenshot of the TillBalancing application.
- Click Exit to leave the Till Balancing application.
Create Till
To create a till from scratch, click the Create Till button.
- The Create Register Till dialog appears:

Screenshot of the TillBalancing application.
-
Enter the Register ID, the Till ID, and the Starting Bank Amount as indicated.
-
As each value is entered, the validation warnings for that field are removed.
-
Click Cancel to cancel the till creation process and return to the search results.
-
Click OK to save the newly created till and return to the search results.

Screenshot of the TillBalancing application.
Force Close Till
To force close a till, perform the following steps:
-
Set the Store and Business Date values to find the till to be closed.
-
Click Search.
-
Locate the till in the results with the Till Status of Open, click on that row to select the till.
-
A till with a Till Status of any value other than Open can’t be forced close.
Screenshot of the TillBalancing application.
-
You should see the Force Close Till button become enabled.
-
Click the Force Close Till button, a dialog requesting confirmation of the force close appears.
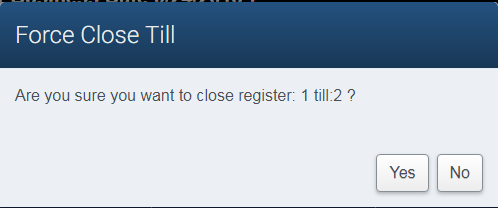
Screenshot of the TillBalancing application.
-
Click No to cancel the force close and return to the search results.
-
Click Yes to proceed with force closing the till.
-
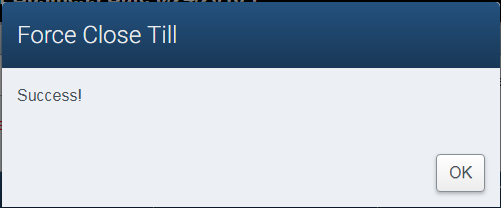
If the force close is successful, the following dialog appears; click OK to close the dialog.
Screenshot of the TillBalancing application.
- The application returns to the search results and you can see that the till has been closed.

Screenshot of the TillBalancing application.
Balance Till
To balance a till, perform the following steps:
-
Set the Store and Business Date values to find the till to be balanced.
-
Click Search.
-
Locate the till in the results with the Till Status of Closed, click on that row to select the till.
-
A till with a Till Status of any value other than Closed can’t be balanced.
-
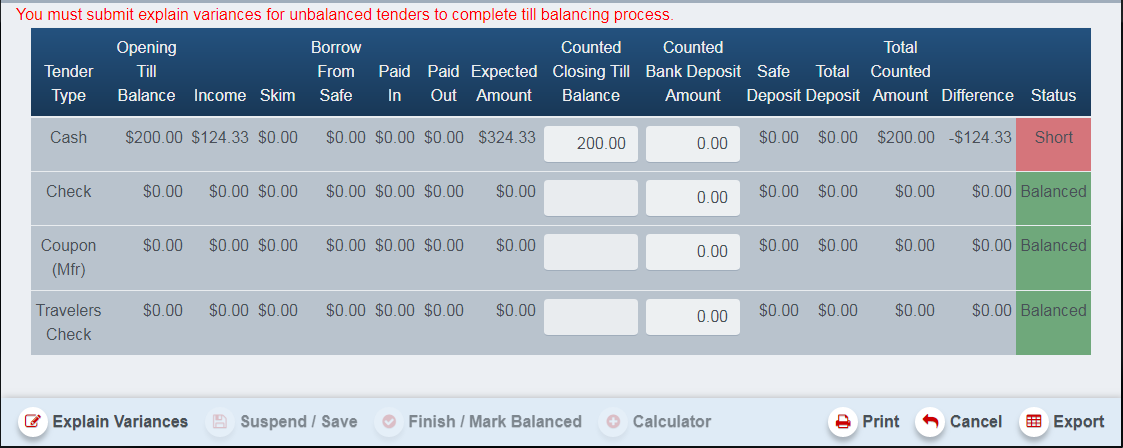
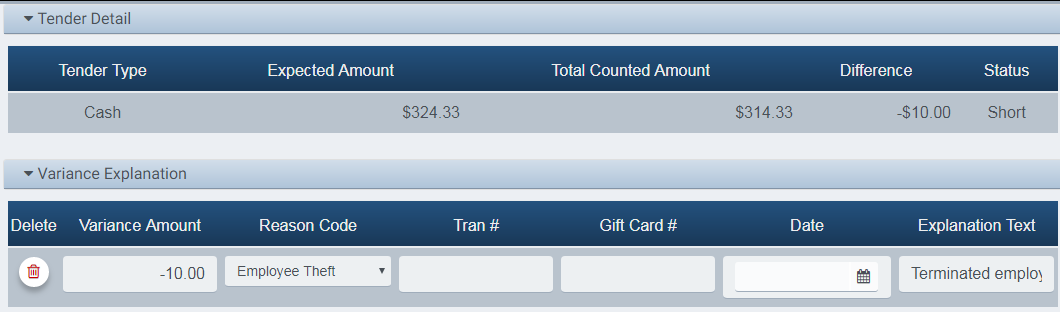
Click Balance Till to begin the balancing process, the Tender Detail Balancing screen appears.
Screenshot of the TillBalancing application.
-
For each Tender Type, count the amount in the drawer and enter it into the Counted Bank Deposit Amount.
-
If, at the end of the counting, the amount is short or over the expected amount, you must create a variance.
-
Payments made to a House Account will be part of the Paid In values for Cash, Check, and Travelers Check.
-
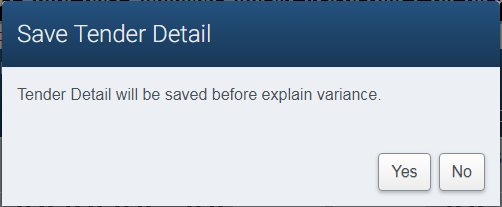
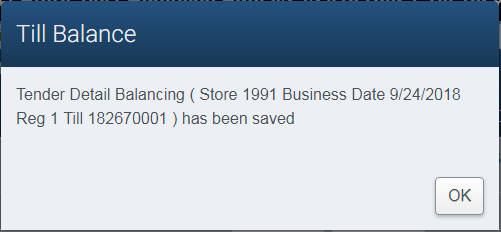
Before creating a variance, the Tender Detail will be saved. Click Yes to save, No to return to balancing.
Screenshot of the TillBalancing application.
- A dialog indicates the Save was successful, click OK to dismiss.
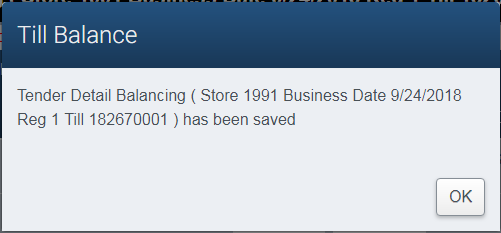
Screenshot of the TillBalancing application.
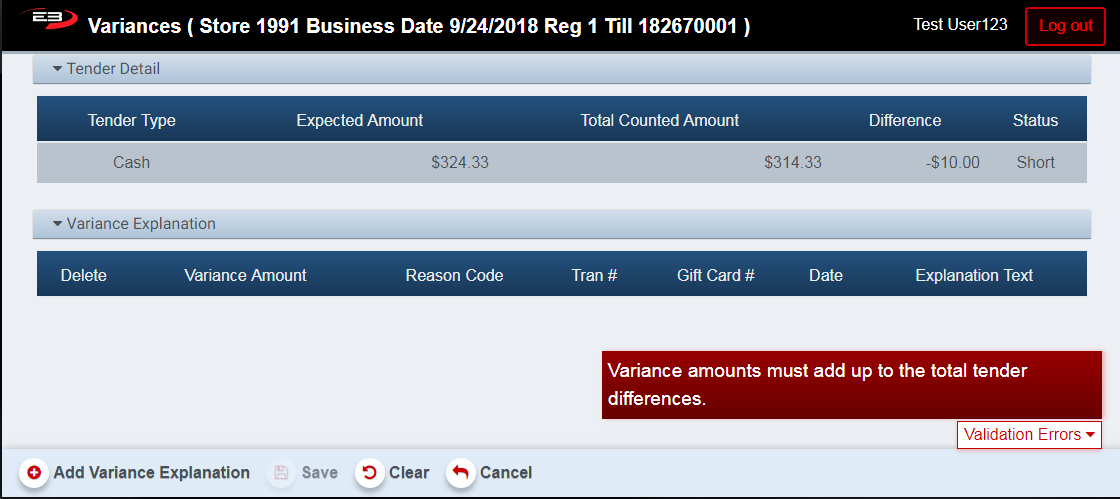
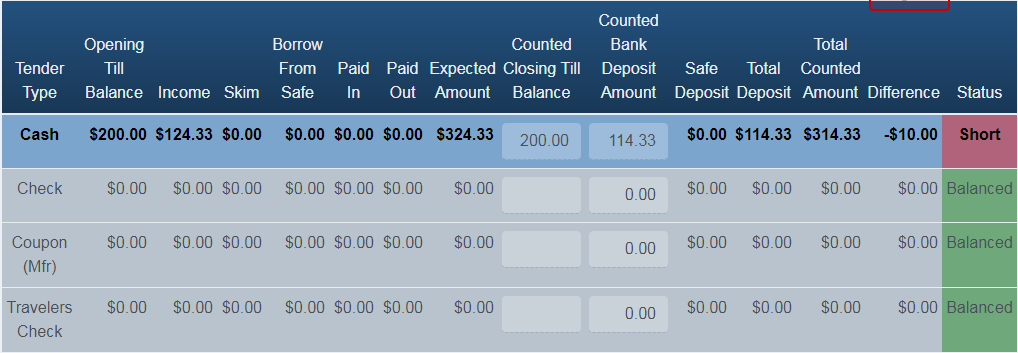
- Once the tender detail has been saved, the application goes to the Variances screen.
Screenshot of the TillBalancing application.
-
The individual variances will be visible in the Tender Detail section.
-
Each variance requires an explanation, these will be visible in the Variance Explanation section.
-
Click Add Variance Explanation to create an explanation, the Variance Explanation dialog appears.
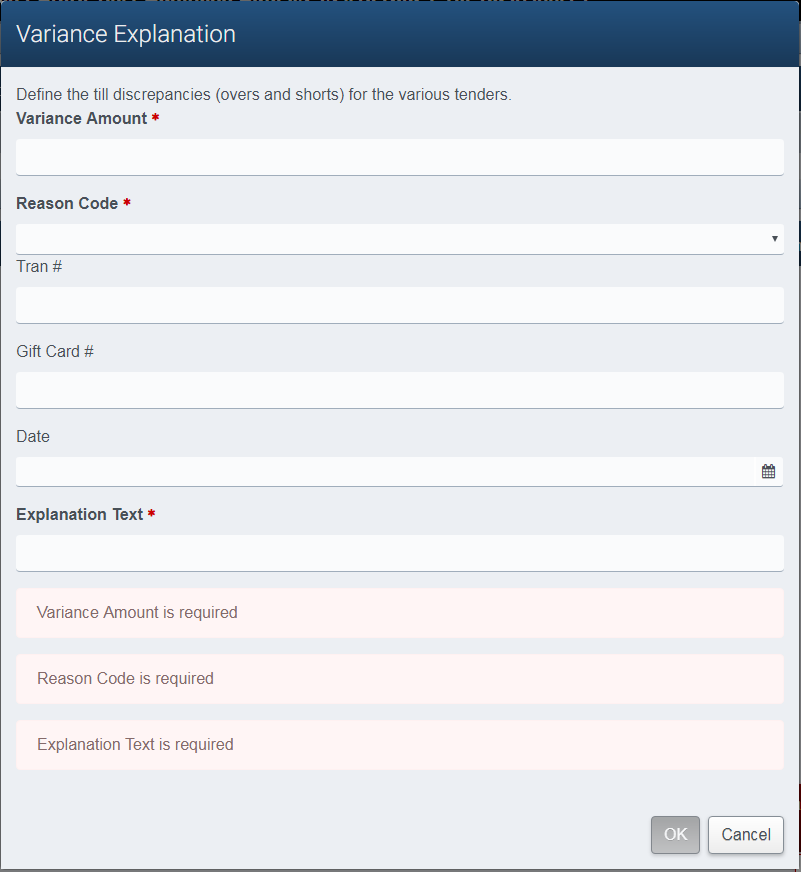
Screenshot of the TillBalancing application.
-
The Variance Amount, Reason Code, and Explanation Text are all required fields.
-
The Transaction #, Gift Card #, and Date are optional if they apply.
-
If the Variance Amount is short, enter that as a negative amount; if over, enter as a positive amount.
-
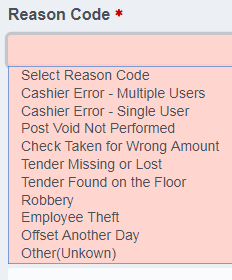
Select a Reason Code from the drop-list.
Screenshot of the TillBalancing application.
-
Enter the Explanation Text, this is free-form text.
-
Click Cancel to discard the changes and return to the Variances screen.
-
Click OK to save the Variance Explanation and return to the Variances screen.
-
You should now see the variance and amount on the screen like this:
Screenshot of the TillBalancing application.
-
Click Clear to discard all variances and return to Tender Detail Balancing.
-
Click Save to save the variance and return to Tender Detail Balancing.
-
When the required fields are entered, click OK to dismiss the success dialog.
-
Click Cancel to return to the search results without balancing.
-
Click Finish / Mark Balanced to complete balancing the till, click OK to dismiss the success dialog.
Screenshot of the TillBalancing application.
- The search results will now show that the till has been balanced and the deposit amount is visible.

Screenshot of the TillBalancing application.
- When all tills have been closed and balanced, you can proceed to creating a bank deposit.
View Till
To view a till, click on a till in the search results to select the till and then click the View Till button.
- The view screen is the same as the balance screen with the exception that all fields are read-only.
Screenshot of the TillBalancing application.
-
You can click the Print button to save the balance information as a PDF file for use with Adobe Acrobat.
-
You can click the Export button to save the balance information as a CSV file for use with Excel.
View Variances
The View Variances feature lets you examine the variances for the balanced tills.
-
Set the Store number and the Business Date for the tills whose variances you want to view and click Search.
-
When the search results are displayed, click the View Variances button.

Screenshot of the TillBalancing application.
-
The Register #, Till ID, and Till Status fields identify the till and its current state.
-
The Till Status is one of these values:
-
1 = Open
-
2 = Closed
-
3 = Balanced
-
4 = Finalized
-
5 = Inactive
-
6 = Suspended
-
7 = Posted
-
-
The tender columns (Cash, Check, Business Check, and Travelers Check) contain variance amounts, if any.
-
The Total Variance Amount sums all of the over (positive) and short (negative) values for the till.
-
If any of the amount columns are not $0.00, then there was a variance in that tender type.
-
Click Export to export the variance data to a CSV file for use with Excel.
-
Click Exit to leave the variance report and return to the search screen.
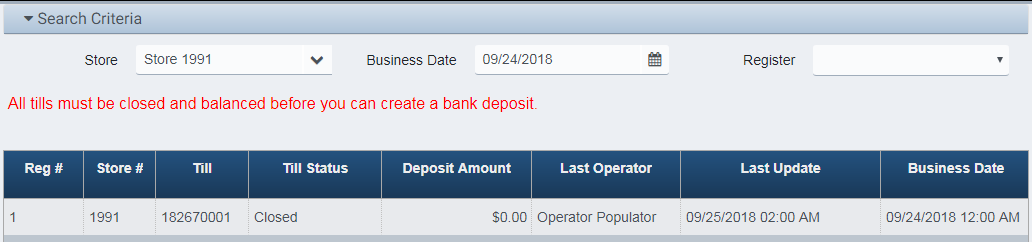
Create Bank Deposit
Once all tills for a given store and business day are closed and balanced (with the appropriate variance explanations, if any), you can create a bank deposit. A single bank deposit covers all tills for the given store and business day.
- In this example, all tills for store 1991 on business day 09/24/2018 have been closed and balanced.

Screenshot of the TillBalancing application.
-
At this point, the Create Bank Deposit button is enabled.
-
Click the Create Bank Deposit to start the bank deposit process.
-
The Bank Deposit screen looks like this:
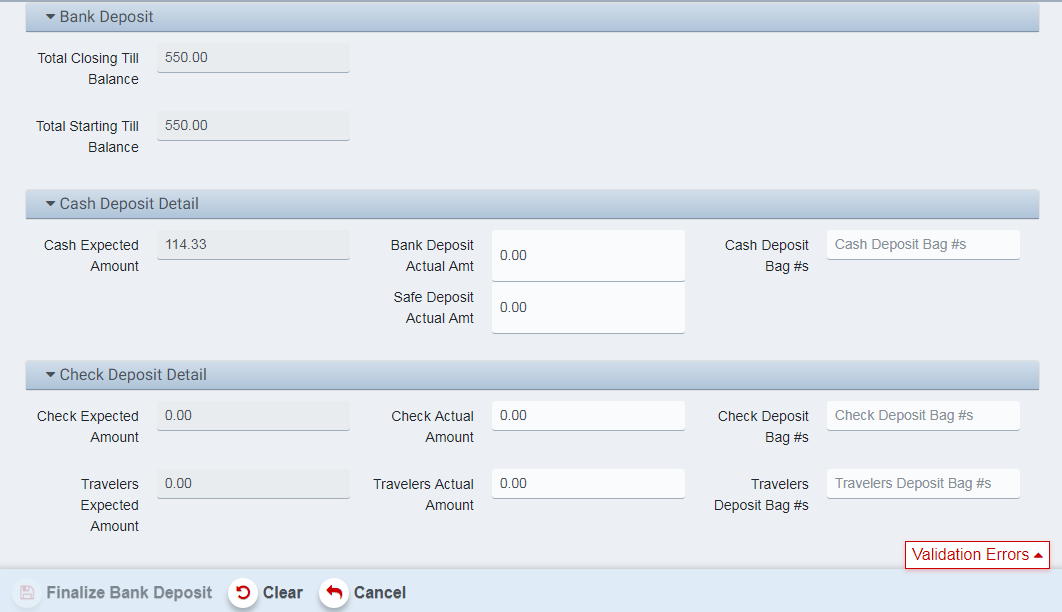
Screenshot of the TillBalancing application.
-
Click Clear to discard any changes to the bank deposit.
-
Click Cancel to return to the search results.
-
Enter actual amounts for Cash, Check, and Travelers (checks) for tenders with non-zero expeced amounts.
-
The actual amounts must match the expected amounts.
-
Enter the Deposit Bag #s for any tender that has non-zero expected amounts.
-
Click Finalize Bank Deposit to create the bank deposit, a confirmation dialog appears.
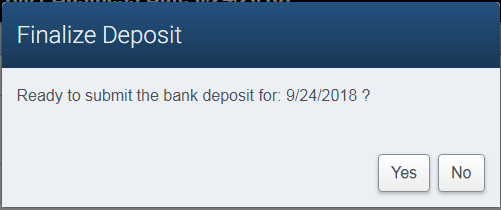
Screenshot of the TillBalancing application.
-
Click No to cancel the finalization of the bank deposit and return to the bank deposit edit screen.
-
Click Yes to confirm the bank deposit is ready to submit, a success confirmation appears.
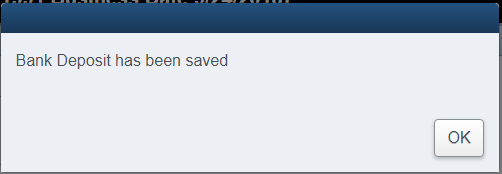
Screenshot of the TillBalancing application.
-
When the bank deposit has been finalized, the application returns to the search results.
-
You can see that the till status is Finalized for all tills, and the deposit amounts match the bank deposit.

Screenshot of the TillBalancing application.
View Bank Deposit
-
Click the View Bank Deposit button to see the settings for a given bank deposit.
-
A bank deposit of any status may be viewed.

Screenshot of the TillBalancing application.
-
In this example, the Safe Deposit Actual Amt field represents a Loan from the safe to the till.
-
As with viewing the till, viewing the bank deposit does not allow any data to be changed.
-
Click Exit to leave the View Bank Deposit screen.
Post Bank Deposit
After all tills in a store have been closed and balanced, and the bank deposit has been finalized, the bank deposit can be posted.
-
To post a bank deposit, locate the till in the search results and click on the till to select it.
-
Click the Post Bank Deposit button, a pop-up requests confirmation to post.
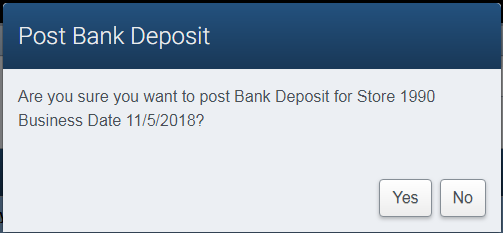
Screenshot of the TillBalancing application.
-
Click No to cancel the posting of the bank deposit.
-
Click Yes to confirm and continue with posting the bank deposit.
-
When the posting process is complete, a pop-up indicates the posting was successful.
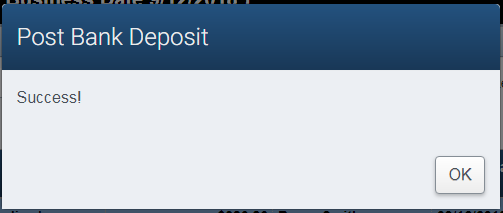
Screenshot of the TillBalancing application.
- Click OK to dismiss, the till status will now show as Posted.
Other Commands
Export
The Export function allows the user to save the report as a comma-separated values (CSV) file for use in Excel. Once you have a result set that’s filtered as desired, click the Export button. The file is saved as TillBalance_yyyy-m-d.csv in the default location, typically the Downloads folder for the user.
The Print function allows the user to save the report as an Acrobat PDF file for viewing/printing in Adobe Acrobat Reader. Once you have a result set that’s filtered as desired, click the Print button. The file is saved as TillBalance.pdf in the default location, typically the Downloads folder for the user.
Sample Till Data
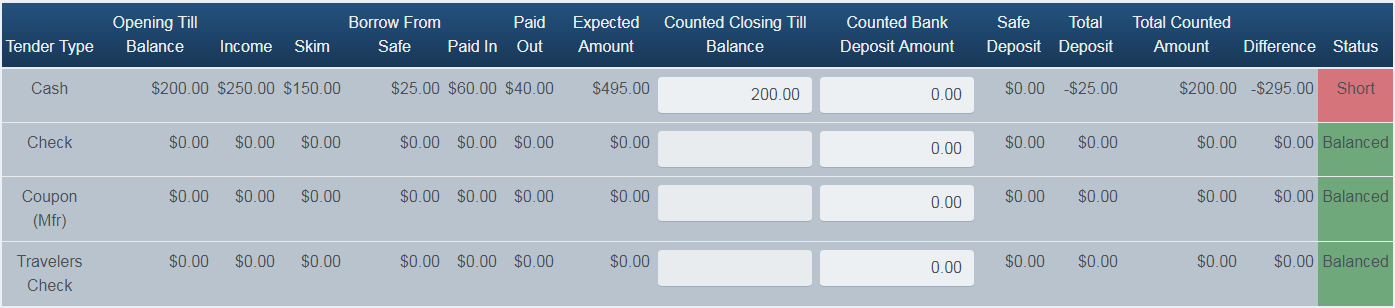
This section contains data used to populate a till and provides charts showing the various amounts and how they are reported when the till is balanced.
This chart shows the actions from opening the till through transactions that change the amount in the till.
| Action | Till | Notes |
|---|---|---|
| Open $200 (add) | $ 200.00 | Starting balance |
| Sell $250 (add) | $ 450.00 | $250 added to till from sales |
| Pickup/Skim $150 (sub) | $ 300.00 | $150 counted, moved elsewhere |
| Loan $25 (add) | $ 325.00 | $25 moved from elsewhere |
| Paid In $60 (add) | $ 385.00 | $60 cash in, added to till |
| Paid Out $40 (sub) | $ 345.00 | $40 cash out, removed from till |
When these steps have been completed, the till looks like this in the Edit Till screen:
Screenshot of the TillBalancing application.
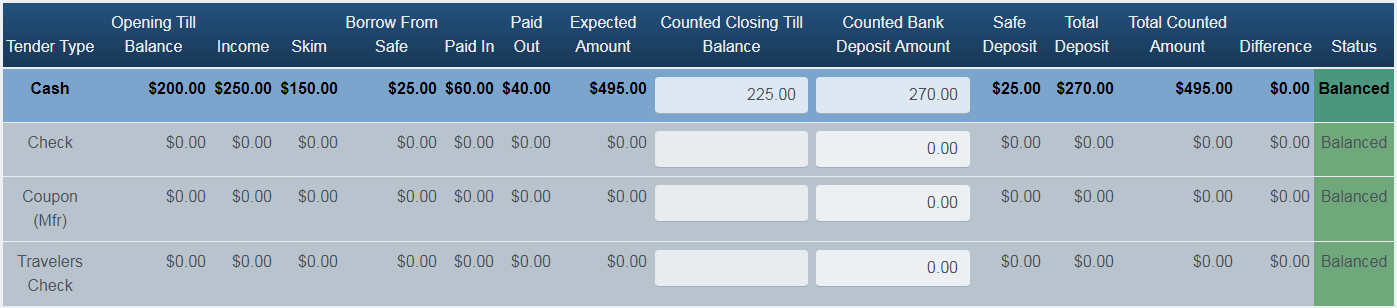
This next chart shows how the fields relate to one another and what values would be entered such that the till can be balance without variances due to over/short conditions. The fields in green are the only ones that can be changed by the operator as part of the balancing process.
| Till Balance Screen Label | Amount | Notes |
|---|---|---|
| Opening Till Balance | $ 200.00 | Opening |
| Income | $ 250.00 | Income |
| Skim | $ 150.00 | Pickup (counted portions of the till) |
| Borrow From Safe | $ 25.00 | Loan |
| Paid In | $ 60.00 | Cash In |
| Paid Out | $ 40.00 | Cash Out |
| Expected Amount | $ 495.00 | Opening + Income + Loan + PaidIn - PaidOut |
| Counted Closing Till Balance | $ 225.00 | Opening + Loan |
| Counted Bank Deposit Amount | $ 270.00 | Income + PaidIn - PaidOut |
| Safe Deposit | $ 25.00 | Loan (Return To Safe) |
| Total Deposit | $ 270.00 | Income + PaidIn - PaidOut |
| Total Counted Amount | $ 495.00 | Opening + Income + Loan + PaidIn - PaidOut |
| Difference | $ - | Expected Amount - Total Counted Amount |
When the values indicated above have been entered (Counted Closing Till Balance and Counted Bank Deposit Amount), the screen looks like the following. Note that the Borrow From Safe amount is returned to the safe from being part of the Counted Closing Till Balance, and the Total Deposit amount is the Counted Bank Deposit Amount.