Customer Sales History
Initial (Main Search) Screen
-
From the Customer Management / Reports menu, select Customer Sales History Report.
-
An initial search screen (like the one shown below) should appear.
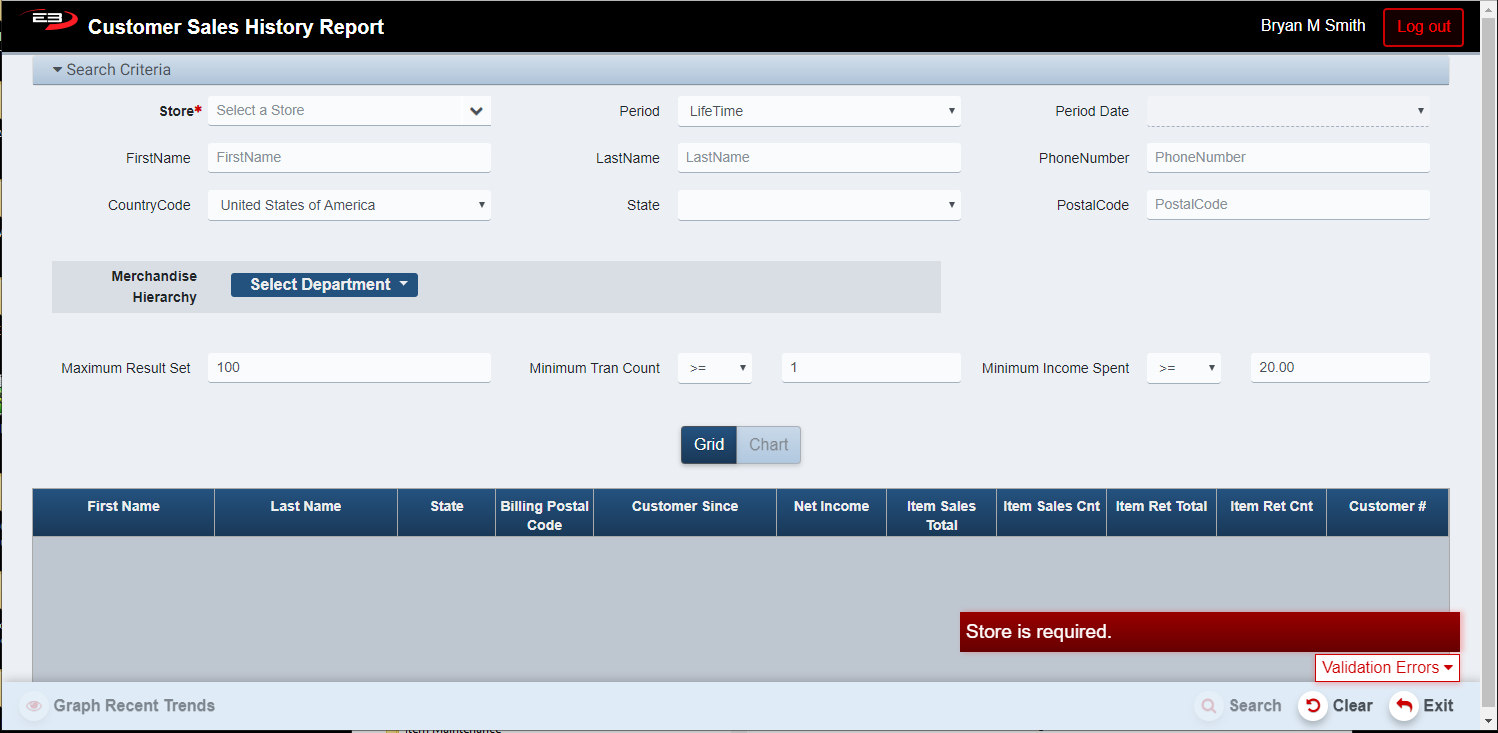
Screenshot of the Customer Sales History application.
-
Click Clear to reset the search criteria back to their default values.
-
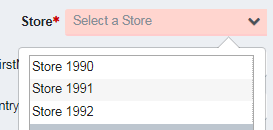
The user must select a store from their store visibility list, when a store is selected the Search button is enabled.
-
If only one store is visible, that store is selected by default.
Screenshot of the Customer Sales History application.
-
The Period value lets the user select a period of time in which to search: Monthly, Qtrly, Yearly, LifeTime.
-
The default Period value is LifeTime, there is no Period Date for LifeTime.
-
The Period Date specifies the starting point of the period (except for LifeTIme which has no starting date).
-
The default Period Date value is the start of the current period of the selected type.
-
Enter the first two characters of the customer’s First Name and/or Last Name to search by name, no defaults.
-
Enter the complete number to search by Phone Number, there is no default for this value.
-
Enter the Country Code to search by country, default is United States of America.
-
Select the State from the list, there is no default for this value.
-
Enter a Postal Code value to search by postal code, there is no default for this value.
-
Select a Merchandise Hierarchy (Dept/Class/Subclass) to limit results to sales in the specified hierarchy.
-
Use the Maximum Result Set value to limit the number of results returned.
-
Use the Minimum Tran Count value to limit results based on how many transactions were performed.
-
Use the Minimum Income Spent value to limit results based on how much money was spent in transactions.
-
NOTE: to ensure retrieval of all records, set Minimum Income Spent to 0.00
-
For business customers, the most effective search criterion will be the phone number.
-
Click Search to see the results, they will look something like this:
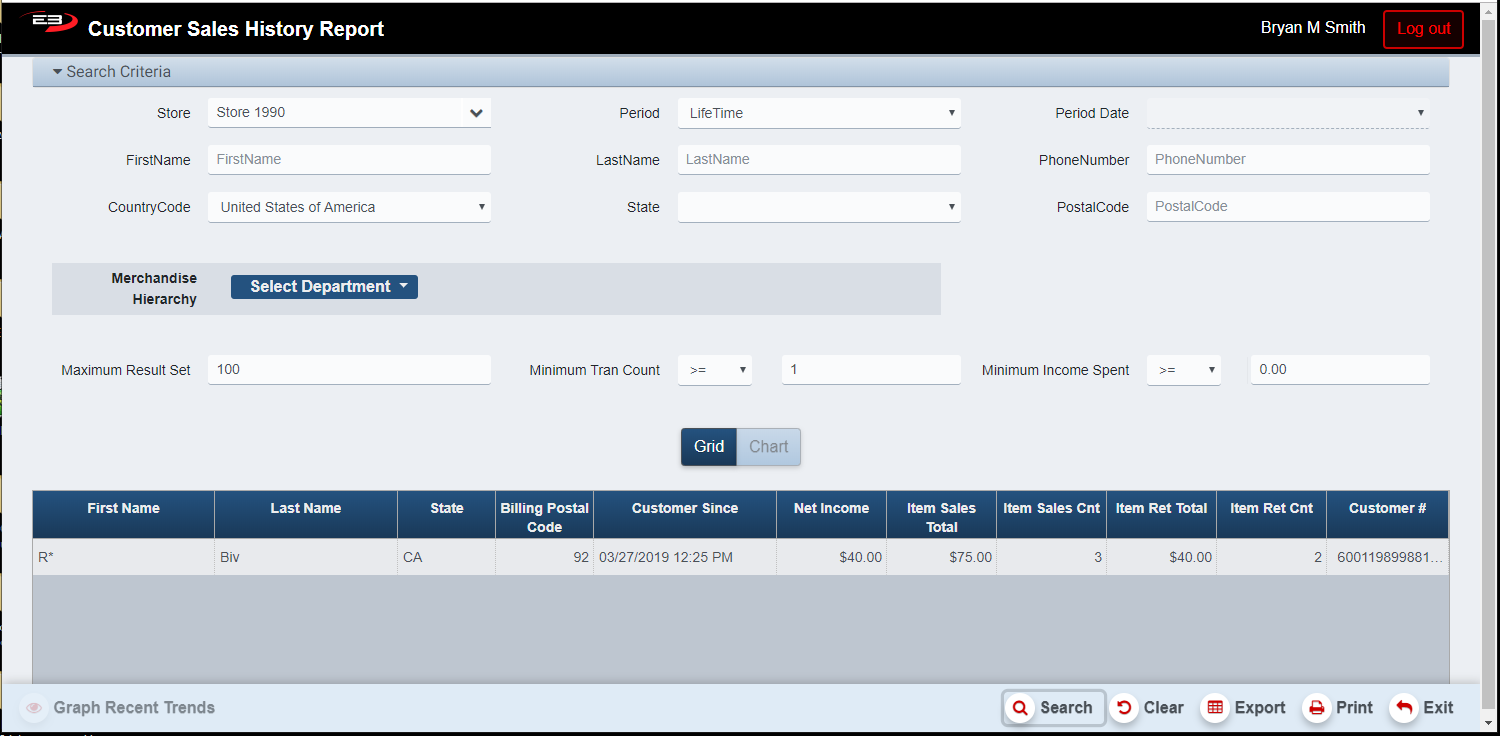
Screenshot of the Customer Sales History application.
-
Note that the Export and Print buttons become visible and enabled when there are results in the grid.
-
See the next section for details about the results.
Result Grid
The result grid shows the various customers with transactions that met the search criteria. The columns in the result grid are:
-
First Name - the customer’s first name, masked so only the first letter shows.
-
Last Name - first three characters of the customer’s last name, or the Business name for a business customer.
-
State - the customer’s state code.
-
Billing Postal Code - the customer’s billing postal code, only the first two digits are shown.
-
Customer Since - the date the customer record was created.
-
Net Income - how much income has this customer generated (totals sales minus total returns).
-
Item Sales Total - the total amount for items sold.
-
Item Sales Cnt - the total count of items sold.
-
Item Ret Total - the total amount for items returned.
-
Item Ret Cnt - the total count of items returned.
-
Customer # - the internal customer ID number.
Other Commands
Graph Recent Trends
The Graph Recent Trends function is available when there are results in the grid and one of the customers’ rows has been highlighted. This will show data for the selected customer at the selected store, graphed over time depending on the Period selected:
-
If the Period is Monthly, graph the last 24 months.
-
If the Period is Qtrly, graph the last 8 quarters.
-
If the Period is Yearly or LifeTime, graph the last 5 years.
Export
The Export function allows the user to save the report as a comma-separated values (CSV) file for use in Excel. Once you have a result set that’s filtered as desired, click the Export button. The file is saved as CustomerSalesHistory_yyyy-m-d.csv in the default location, typically the Downloads folder for the user. This function exports only the results grid.
The Print function allows the user to save the report as an Acrobat PDF file for viewing/printing in Adobe Acrobat Reader. Once you have a result set that’s filtered as desired, click the Print button. The file is saved as CustomerSalesHistoryReport.pdf in the default location, typically the Downloads folder for the user. This function prints only the results grid.